SHARE Knowledge Hub
What is construction dust and how should it be controlled?
Construction dust is a mixture, not one harmless nuisance. Identify silica, wood, cement, gypsum, asbestos or contaminated material before disturbing it; design out cutting where possible, capture or suppress dust at source, protect everyone nearby and verify that controls work.
Understanding What is construction dust and how should it be controlled?
Construction dust is a mixture, not one harmless nuisance. Identify silica, wood, cement, gypsum, asbestos or contaminated material before disturbing it; design out cutting where possible, capture or suppress dust at source, protect everyone nearby and verify that controls work.
Why this matters at work
Exposure monitoring checks what people breathe under defined conditions and helps evaluate controls; health surveillance seeks early adverse health changes where the relevant criteria are met. They answer different questions. A competent assessment should consider the substance, disease association, exposure likelihood and suitable detection methods. For example, respirable crystalline silica and sensitising wood dust require careful consideration through relevant guidance and occupational-health input. Neither a normal health result nor an isolated low air sample clears every task.
A competent review should select an effective method and verify it before restart, including suitable RPE where required. Manage slurry without creating slips, skin exposure, uncontrolled discharge or later dry dust. Brief the team on checks and stop conditions and record the defect and correction. Assess whether exposure monitoring is needed to demonstrate adequate control. This example supplies no invented flow rate, cutting duration or safe exposure allowance; those decisions require task-specific evidence.
How organisations manage this in practice
Identify the material and dust-generating task: cutting concrete, chasing mortar, sanding wood and mixing powder have different exposures and controls. Consider silica, wood dust and other dusts, plus separate asbestos or lead risks where relevant. Assess intensity, duration, enclosed conditions, nearby people and repeated exposure across the shift. Fine harmful dust may remain airborne after the visible cloud clears. Outdoor work does not automatically provide adequate breathing-zone control. Use the actual material information and task-specific HSE guidance to choose prevention and source controls. Consider prefabrication, avoiding cuts, lower-dust methods, suitable water suppression or on-tool extraction, segregation and effective cleaning. RPE supplements these measures where needed. Record the control combination, checks, responsible people and conditions requiring reassessment. GB COSHH and NI COSHH use separate instruments. A safety data sheet or a generic dust mask instruction is not a complete assessment of work-generated exposure.
Use findings to improve prevention, investigate control failures and consider individual advice or restrictions through occupational health. Keep exposure records and employer health records through the applicable legal arrangements, with clinical information confidential to the provider. Explain the programme to workers and give them routes to report symptoms promptly. Review after new materials, methods, control defects or health concerns. Avoid a universal medical test schedule: the hazard, exposure, legal conditions and competent clinical programme determine what is appropriate.
Provide training, storage, cleaning, maintenance and replacement arrangements appropriate to the equipment. Check comfort, communication, duration and correct use during real work. Keep relevant selection and fit evidence and respond to damage or symptoms. RPE is a residual protective layer alongside prevention and source control, not permission to create unnecessary dust. Do not invent a universal protection factor or filter replacement interval; the material, concentration, equipment instructions and competent assessment determine the required specification.
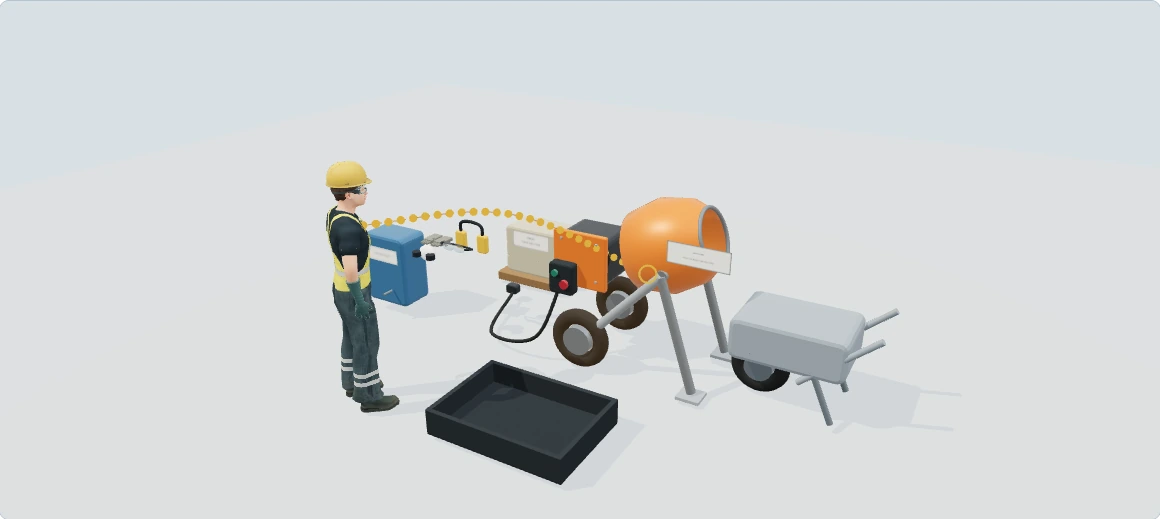

Cement mixing: rotating machinery, airborne powder and wet burns
Explore how this equipment can harm its users and other people, then follow the practical measures that interrupt each pathway. This is a hazards and good-practice lesson; the separate checklist remains the pre-use/safety-check activity.
Hazards and good practice: learn what can hurt people during use, change and maintenance. Pre-use and safety checks stay in the separate checklist.
Checksheets and risk assessments
Equipment checksheets
Risk assessment forms
Risk assessment examples
Forms and tools
Full written walkthrough — all 8 steps
1. Plan the material and mixing method
What is happening: Receiving bags, charging the mixer, placing product and cleaning are linked parts of the task.
How harm can occur: A method that controls one stage can leave others exposed to dust, strain or moving machinery.
Best practice to apply: Consider supply and ready-mixed options that remove difficult transfers and powder handling; assess the remaining task.
Why this works: Changing supply or process can remove exposure rather than simply adding PPE to each stage.
What is cement dust and why is it hazardous at work? · Choose dry powder, wet cement or hardened-material cutting2. Control dry powder at release
What is happening: Opening and emptying a bag can release fine material before mixing begins.
How harm can occur: Inhaled dust can harm airways and irritate eyes; the composition and task determine the assessment.
Best practice to apply: Identify the product and use suitable enclosed/controlled transfer and dust controls, with assessed residual protection.
Why this works: Controlling release protects the person tipping the bag and other people nearby.
What is cement dust and why is it hazardous at work? · Choose dry powder, wet cement or hardened-material cutting3. Recognise that wet cement is a different hazard
What is happening: Wet product and slurry remain hazardous even when airborne powder is reduced.
How harm can occur: Alkaline material trapped against skin can cause dermatitis or deep chemical burns without severe initial pain.
Best practice to apply: Prevent skin/eye contact through suitable work methods and protective clothing, with effective welfare and prompt response to contamination.
Why this works: Removing visible dust does not remove chemical harm from wet material held in boots, gloves or clothing.
What is cement dust and why is it hazardous at work? · Choose dry powder, wet cement or hardened-material cutting4. Keep people away from moving parts
What is happening: The drum and its drive act on material and can also act on a person's clothing or limbs.
How harm can occur: Reaching into moving equipment or exposing a transmission can entangle, draw in or crush.
Best practice to apply: Use suitable guarding and methods that keep charging and work outside dangerous movement; do not bypass protection.
Why this works: The method has to keep the person away while the machine is capable of moving.
Mechanical hazards · How can a roller nip point cause serious injury?5. Organise material movement and footing
What is happening: Bags, trolleys, the mixer and the placing route affect posture, force and access.
How harm can occur: Heavy or awkward transfers, slippery slurry and trailing equipment can cause strains, slips and secondary contact.
Best practice to apply: Redesign transfers, provide suitable handling assistance and maintain the actual work and placing routes.
Why this works: A manageable supply path reduces repeated force and prevents contamination creating a walking hazard.
What is cement dust and why is it hazardous at work? · What welfare is needed?6. Separate cleaning from operating
What is happening: Residue removal or jam clearance may require access that normal mixing does not.
How harm can occur: Unexpected start or drum movement can trap someone while they clean or reach inside.
Best practice to apply: Use the actual competent isolation, securing and cleaning procedure before intrusive access; a stop button alone is not isolation.
Why this works: Cleaning changes where people can reach, so production guarding and stop arrangements alone may not suffice.
Mechanical hazards · When should work involving mechanical hazards stop?7. Contain washout and protect helpers
What is happening: Wash water, slurry and contaminated tools can spread exposure beyond the mixer.
How harm can occur: Wet contamination can harm cleaners, waste handlers and people using the surrounding area.
Best practice to apply: Use suitable contained washout, safe waste arrangements and washing facilities; keep contaminated routes and items controlled.
Why this works: Containment prevents moving the hazard from the workpiece to the cleaner or the next user.
What is cement dust and why is it hazardous at work? · What forms can cement-related exposure take?8. Review the full task and return it safely
What is happening: Wear, damaged guarding and reported skin or breathing problems are evidence that the arrangement needs review.
How harm can occur: Repeating the same task without correcting causes can worsen health harm or lead to mechanical injury.
Best practice to apply: Stop unsafe work, report symptoms/defects and verify competent repairs and suitable task controls before return.
Why this works: A clean appearance or completed check cannot substitute for an effective work method and resolved defects.
Mechanical hazards · How should mechanical hazards be assured?
Illustrative awareness learning. Geometry, colours and movement do not establish safe distances, capacity, exposure, isolation or work permission. Use the actual assessment, equipment information and competent arrangements.
The wider workplace has its own account and subscription access. Exploring this lesson does not grant access, record course completion or authorise work.
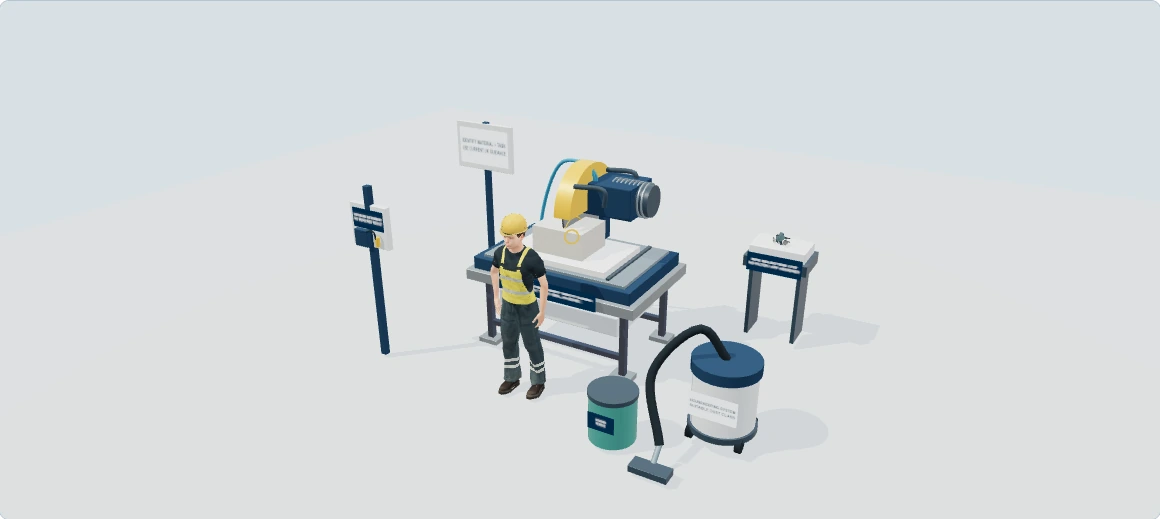
Silica: stop fine dust travelling from the task to the lungs
Explore how this equipment can harm its users and other people, then follow the practical measures that interrupt each pathway. This is a hazards and good-practice lesson; the separate checklist remains the pre-use/safety-check activity.
Checksheets and risk assessments
Equipment checksheets
- Abrasive wheel tools and cut off saws — 3D checks · Word · PDF
- Local exhaust ventilation: user and condition check — 3D checks · Word · PDF
Risk assessment forms
Risk assessment examples
Forms and tools
Full written walkthrough — all 8 steps
1. Identify the material and complete task
What is happening: The saw and drill are separate teaching examples, not a design for every stone product.
How harm can occur: Cutting, drilling or disturbing residues can release invisible respirable particles that reach the deep lung.
Best practice to apply: Identify the actual material, task and other exposed people; consider avoiding processing or using a safer product/method.
Why this works: Bulk silica percentage and visible appearance do not establish breathing-zone exposure.
Silica Dust · What is silica dust and why is it so harmful?2. Choose source control for the process
What is happening: The workpiece and tool define where dust is released and how it can be controlled.
How harm can occur: An unsuitable control can leave a fine airborne fraction even when coarse dust is reduced.
Best practice to apply: Plan suitable source controls and current task-specific guidance; engineered-stone controls need their own specific assessment.
Why this works: Control selection must follow the material and process, rather than treating all dusty tasks as identical.
Silica Dust · How can the hierarchy of controls reduce respirable crystalline silica exposure at source?3. Follow water to the cutting point
What is happening: In the wet-saw example water is directed towards the cutting interface.
How harm can occur: A lost, unsuitable or ineffective supply can allow dust to escape while cutting continues.
Best practice to apply: Use the specified functioning suppression and relevant mist/slurry controls; stop and resolve control failure.
Why this works: Water present somewhere on site does not prove that it reaches and controls the point of release.
Silica Dust · What does a controlled silica workflow look like?4. Follow dust into on-tool extraction
What is happening: The shrouded-drill example connects the tool's release point, hose and collector.
How harm can occur: A poor shroud, leak, restriction or unsuitable collection arrangement can allow dust towards people.
Best practice to apply: Match the complete on-tool system to the task and contaminant and verify its function; compare the separate example explicitly.
Why this works: A connected collector alone does not prove capture at the tool.
Silica Dust · How should a concrete cutting task be controlled?5. Keep collector and residues controlled
What is happening: The filter and collection container retain material that remains hazardous.
How harm can occur: Opening, servicing or poorly sealed equipment can release concentrated residue to workers.
Best practice to apply: Use suitable filter/collection equipment and the actual contained servicing, isolation and waste method.
Why this works: Moving dust out of the cutting area does not remove its hazard during maintenance or disposal.
Silica Dust · Where do silica dust controls commonly fail?6. Prevent a second release during clean-up
What is happening: Settled dust and slurry can become a later source when dried or disturbed.
How harm can occur: Dry sweeping, compressed-air cleaning or uncontrolled residue handling can re-expose workers and others.
Best practice to apply: Use suitable dust-controlled cleaning and contained waste/wet-residue arrangements; avoid creating another airborne release.
Why this works: Clean-up belongs in the exposure plan, not after the control system has been removed.
Silica Dust · What does a controlled silica workflow look like?7. Provide suitable residual protection for the person
What is happening: Respiratory protection must be selected and managed for the actual process and person.
How harm can occur: Incorrect type, fit or use can leave inhalation risk; a generic mask is not a universal control.
Best practice to apply: Follow the task-specific assessment and current guidance for suitable RPE and fit/use arrangements while retaining source controls.
Why this works: RPE selection cannot be inferred from the unassigned teaching facepiece shown here.
Silica Dust · How do WELs, monitoring and health surveillance fit together?8. Verify performance and respond to change
What is happening: Exposure assessment, symptoms and changes in material or work test whether the method remains suitable.
How harm can occur: A visually tidy task can still create harmful exposure and long-latency disease.
Best practice to apply: Use competent verification and required monitoring/surveillance, act on defects and symptoms and re-plan changed work.
Why this works: Absence of visible dust or illness does not demonstrate adequate control.
Silica Dust · How do WELs, monitoring and health surveillance fit together?
Illustrative awareness learning. Geometry, colours and movement do not establish safe distances, capacity, exposure, isolation or work permission. Use the actual assessment, equipment information and competent arrangements.
The wider workplace has its own account and subscription access. Exploring this lesson does not grant access, record course completion or authorise work.
UK guidance for further reading
HSE: SilicaHow can I practise this topic in 3D?
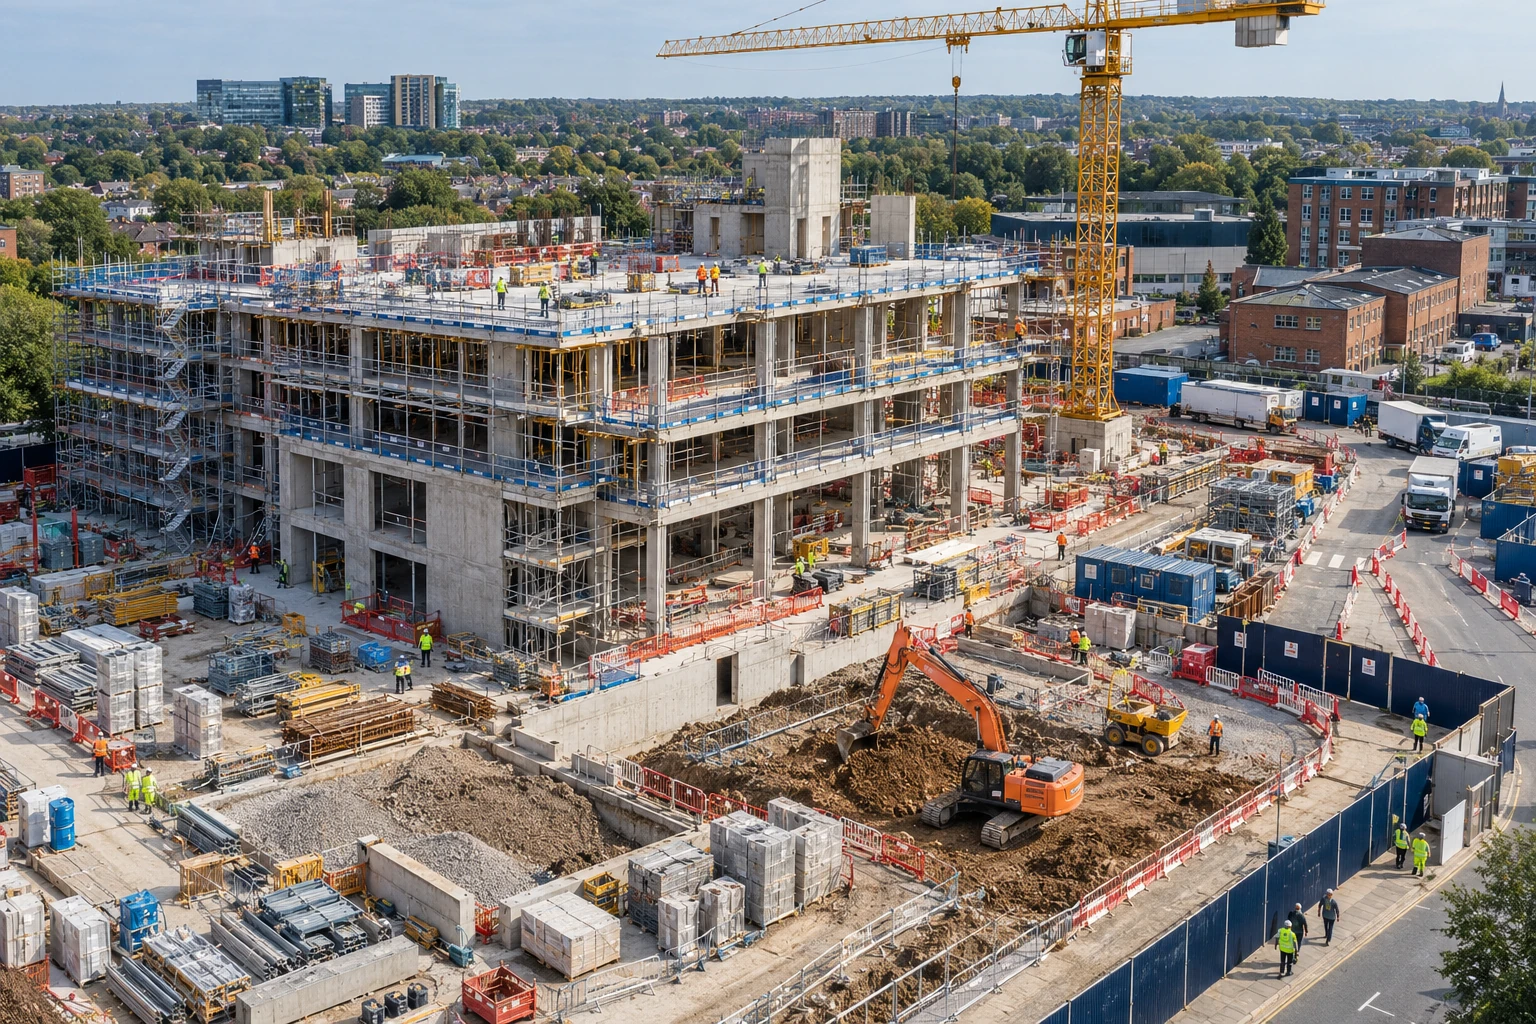
The operator proposes removing saw protection
All related inspection points 2 across 1 location
Construction site 2 inspection points
Practice in the SHAREhub environment. Browser practice is separate from workplace competence and formal learning records.
Choose the material and task before selecting dust controls
Compare cutting masonry, sanding timber and finishing plasterboard. Identify the material and task-specific contaminant, first ask whether the dusty operation can be avoided, then select suitable extraction or suppression, segregation and cleaning. Residual RPE must match the assessment and wearer; the same mask and vacuum choice cannot be assumed to cover every task.
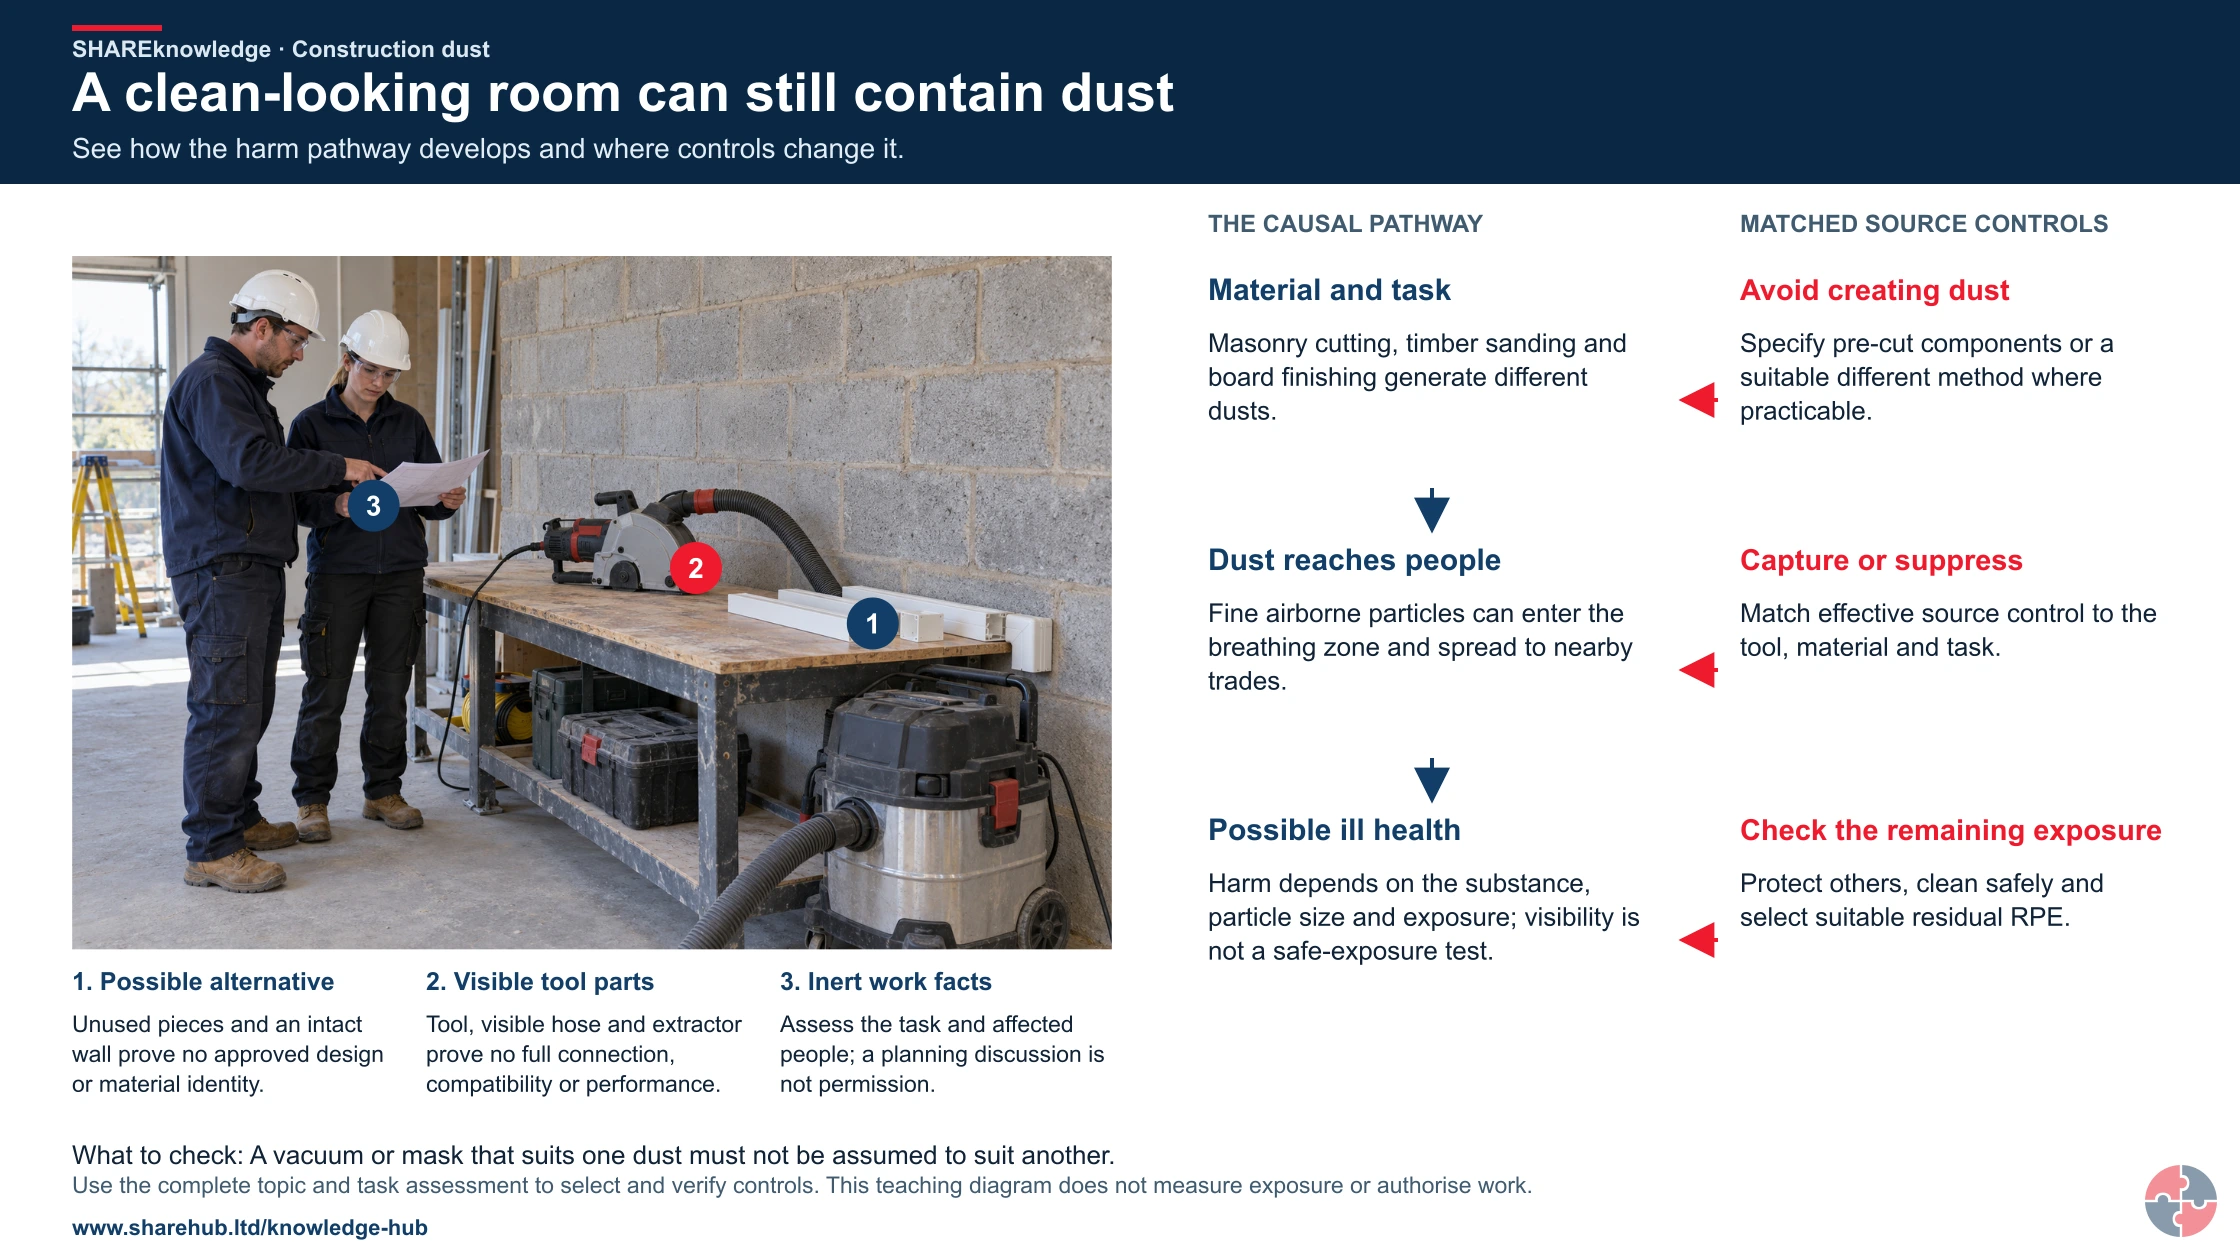
A clean-looking room can still contain dust
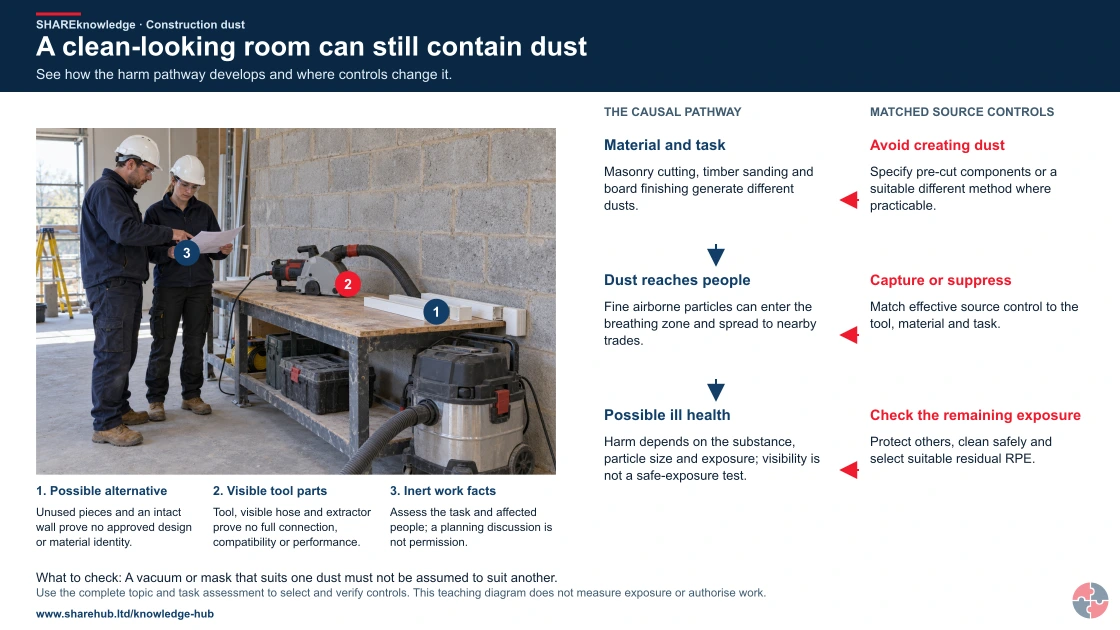
Full written explanation
An illustrative paused refurbishment workface shows an intact block wall, unused surface-route pieces, an inactive enclosed wall-chaser, visible hose sections and a closed extractor, beside normal uninjured people reviewing inert task facts. The full natural image proportions are used. Picture key: 1 identifies a possible alternative; 2 identifies visible tool parts; 3 identifies inert work facts. The unused pieces and wall establish no material identity or approved service design. Part of the hose route is hidden behind the bench: the image does not show or prove a complete continuous connection, compatibility, airflow, extraction class, filter suitability, capture, energy isolation or permission to cut. Beside this physical context, the complete causal teaching links material and task to dust reaching people and possible ill health. Three separate matching control connections enter those stages: avoid creating dust; capture or suppress; check the remaining exposure. The complete source text distinguishes masonry cutting, timber sanding and board finishing, states that fine particles can spread to nearby trades, and explains why visibility is not a safe-exposure test. Independent analytical headings are unnumbered; the physical picture key is the only numbered series. No cutting, dust cloud, particle or anatomy demonstration, injury, diagnosis, exposure result, RPE selection, numerical limit, tool setup or operating method is depicted. Existing source and clinical routes remain separate from work planning and records; use the complete topic for the actual material, method, controls, jurisdiction and qualified review.
- Material and task. Masonry cutting, timber sanding and board finishing generate different dusts.
- Dust reaches people. Fine airborne particles can enter the breathing zone and spread to nearby trades.
- Possible ill health. Harm depends on the substance, particle size and exposure; visibility is not a safe-exposure test.
Change the pathway
- Avoid creating dust. Specify pre-cut components or a suitable different method where practicable.
- Capture or suppress. Match effective source control to the tool, material and task.
- Check the remaining exposure. Protect others, clean safely and select suitable residual RPE.
Evidence check: A vacuum or mask that suits one dust must not be assumed to suit another.
Best-practice guide: Construction Dust
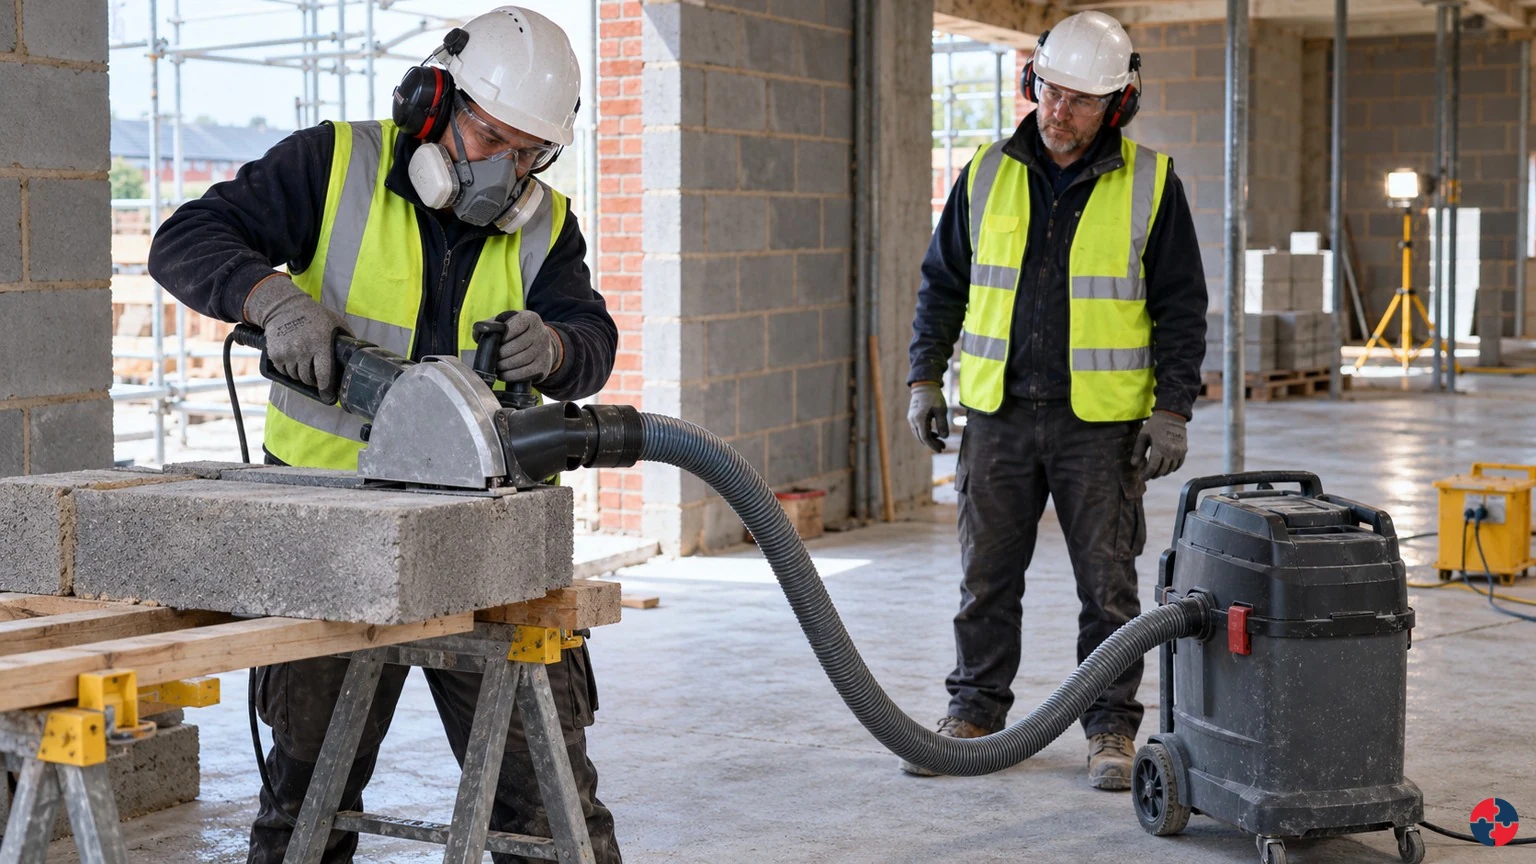
Choose the material and task before selecting dust controls
Compare cutting masonry, sanding timber and finishing plasterboard. Identify the material and task-specific contaminant, first ask whether the dusty operation can be avoided, then select suitable extraction or suppression, segregation and cleaning. Construction dust is a mixture, not one harmless nuisance.
Turn construction dust knowledge into a decision
Construction dust is a mixture, not one harmless nuisance. Identify silica, wood, cement, gypsum, asbestos or contaminated material before disturbing it; design out cutting where possible, capture or suppress dust at source, protect everyone nearby and verify that controls work. Post-job reviews capture whether the method actually controlled dust, whether extra cutting occurred and whether the RAMS needs improving.
Example business example
Planning and risk assessment: Identifies dusty tasks at tender, design, programme and RAMS review stage. The planner challenges whether cutting can be avoided, reduced, moved off site, pre-formed or completed using lower-dust methods. Evidence / response: Post-job reviews capture whether the method actually controlled dust, whether extra cutting occurred and whether the RAMS needs improving. Equipment and procurement: Specifies water suppression, on-tool extraction, M-class vacuums, suitable blades, enclosed cutting areas and compatible respiratory protective equipment before labour is sent to site. Equipment is selected for the material and duration, not simply what is available in the van. Evidence / response: Defect trends such as blocked filters, missing shrouds or poor water supply are reviewed to improve plant selection and maintenance.
Warning signs, harm pathways and workplace indicators
Exposure route 1: Visible dust clouds during cutting, drilling or sweeping Fine respirable dust may be entering workers lungs and spreading to nearby trades. No water suppression or on-tool extraction: The source of dust is uncontrolled, so RPE has to carry too much of the protection burden. RPE is issued without fit and use checks: Workers may believe they are protected while contaminated air leaks around the face seal.
Choose controls for construction dust
Eliminate: Design service route to avoid chasing or use factory-prepared element. Substitute: Use a lower-dust fixing or method after checking structural and electrical effects. Engineering: Matched shroud/extraction or water suppression plus zone separation. Administrative: Task COSHH assessment, cleaning, inspection and worker briefing. PPE: Selected, fitted RPE for residual exposure; protect others through source control. Read the full control table for qualifications, ownership and verification. Use the actual task and applicable jurisdiction; existing technical approval remains unchanged.
Use the full construction dust lesson
Use the full topic for the decision points, practical examples, detailed control tables and source scope. HSE guidance applies to Great Britain; use HSENI for the Northern Ireland route and the source’s stated jurisdiction. A simplified guide does not change the page’s technical-review or approval status.
Read all six steps as text
1. Choose the material and task before selecting dust controls
Compare cutting masonry, sanding timber and finishing plasterboard.
- Avoid / redesign: Design service route to avoid chasing or use factory-prepared element.
- Control the task: Matched shroud/extraction or water suppression plus zone separation.
- Verify before release: Designer records option; hold intrusive work on unknown material.
Compare cutting masonry, sanding timber and finishing plasterboard. Identify the material and task-specific contaminant, first ask whether the dusty operation can be avoided, then select suitable extraction or suppression, segregation and cleaning. Construction dust is a mixture, not one harmless nuisance.
Apply it: Which part of this plan would you check at the workface before authorising the task?
2. Turn construction dust knowledge into a decision
Use the evidence to improve the actual work arrangement.
- Change at source: Design service route to avoid chasing or use factory-prepared element.
- Make it observable: Designer records option; hold intrusive work on unknown material.
- Keep useful evidence: Post-job reviews capture whether the method actually controlled dust, whether extra cutting occurred and whether the RAMS needs improving.
Construction dust is a mixture, not one harmless nuisance. Identify silica, wood, cement, gypsum, asbestos or contaminated material before disturbing it; design out cutting where possible, capture or suppress dust at source, protect everyone nearby and verify that controls work. Post-job reviews capture whether the method actually controlled dust, whether extra cutting occurred and whether the RAMS needs improving.
Apply it: What evidence would show that the change improves this task, rather than only completing a record?
3. example business example
Example: a practical application of the existing topic lesson.
- Planning and risk assessment: Identifies dusty tasks at tender, design, programme and RAMS review stage.
- Equipment and procurement: Specifies water suppression, on-tool extraction, M-class vacuums, suitable blades, enclosed cutting areas and compatible respiratory protective equipment before labour is sent to site.
- Training and contractor control: Briefs operatives and subcontractors on silica risk, visible dust warning signs, wet cutting, extraction use, cleaning methods, RPE use and stop-work triggers.
Planning and risk assessment: Identifies dusty tasks at tender, design, programme and RAMS review stage. The planner challenges whether cutting can be avoided, reduced, moved off site, pre-formed or completed using lower-dust methods. Evidence / response: Post-job reviews capture whether the method actually controlled dust, whether extra cutting occurred and whether the RAMS needs improving. Equipment and procurement: Specifies water suppression, on-tool extraction, M-class vacuums, suitable blades, enclosed cutting areas and compatible respiratory protective equipment before labour is sent to site. Equipment is selected for the material and duration, not simply what is available in the van. Evidence / response: Defect trends such as blocked filters, missing shrouds or poor water supply are reviewed to improve plant selection and maintenance.
Apply it: At which point would you hold this example, and what evidence would allow it to proceed?
4. Warning signs, harm pathways and workplace indicators
Connect the task, the route to the person and the control that can fail.
- Exposure route 1: Visible dust clouds during cutting, drilling or sweeping Fine respirable dust may be entering workers lungs and spreading to nearby trades.
- No water suppression or on-tool extraction: The source of dust is uncontrolled, so RPE has to carry too much of the protection burden.
- RPE is issued without fit and use checks: Workers may believe they are protected while contaminated air leaks around the face seal.
Exposure route 1: Visible dust clouds during cutting, drilling or sweeping Fine respirable dust may be entering workers lungs and spreading to nearby trades. No water suppression or on-tool extraction: The source of dust is uncontrolled, so RPE has to carry too much of the protection burden. RPE is issued without fit and use checks: Workers may believe they are protected while contaminated air leaks around the face seal.
Apply it: Who could be exposed, including other trades, cleaners, maintainers and people nearby?
5. Choose controls for construction dust
Start with the stronger practicable options and verify their effect.
- Eliminate: Design service route to avoid chasing or use factory-prepared element.
- Substitute: Use a lower-dust fixing or method after checking structural and electrical effects.
- Engineering: Matched shroud/extraction or water suppression plus zone separation.
- Administrative: Task COSHH assessment, cleaning, inspection and worker briefing.
- PPE: Selected, fitted RPE for residual exposure; protect others through source control.
Eliminate: Design service route to avoid chasing or use factory-prepared element. Substitute: Use a lower-dust fixing or method after checking structural and electrical effects. Engineering: Matched shroud/extraction or water suppression plus zone separation. Administrative: Task COSHH assessment, cleaning, inspection and worker briefing. PPE: Selected, fitted RPE for residual exposure; protect others through source control. Read the full control table for qualifications, ownership and verification. Use the actual task and applicable jurisdiction; existing technical approval remains unchanged.
Apply it: Which stronger option can be used here, and who will verify it before accepting the remaining risk?
6. Use the full construction dust lesson
Follow the official sources below and retain the task-specific evidence.
- Official guidance: HSE construction silica task sheets
- Official guidance: HSENI construction silica dust
- Task decision: Post-job reviews capture whether the method actually controlled dust, whether extra cutting occurred and whether the RAMS needs improving.
Use the full topic for the decision points, practical examples, detailed control tables and source scope. HSE guidance applies to Great Britain; use HSENI for the Northern Ireland route and the source’s stated jurisdiction. A simplified guide does not change the page’s technical-review or approval status.
Apply it: Which official source and full-topic section will you use to resolve the next decision?
Check the control at the workface before release and as conditions change. A short indoor task can still create significant exposure, and a clear-looking room does not demonstrate control of fine dust. If required extraction or water suppression is unavailable, stop the affected method and restore or redesign it rather than simply telling workers to wear masks more carefully.
BuildOut: the water supply fails during masonry cutting
Illustrative example. A crew loses its planned suppression supply and proposes finishing the remaining cuts dry.
Decision. The supervisor holds cutting and arranges restoration or a competently assessed alternative method with effective source control.
Evidence to check. Material and task assessment, source-control function, segregation, suitable cleaning and residual protection checks.
Hold or escalation point. No continuation merely because only a few cuts remain or masks are available.
Follow-up. Verify the restored control in use and change the pre-start arrangements to avoid repeat failure.
Choose controls for the material and the release
Masonry cutting, timber sanding and plasterboard finishing are different tasks. Match the source control to the actual material and people affected.
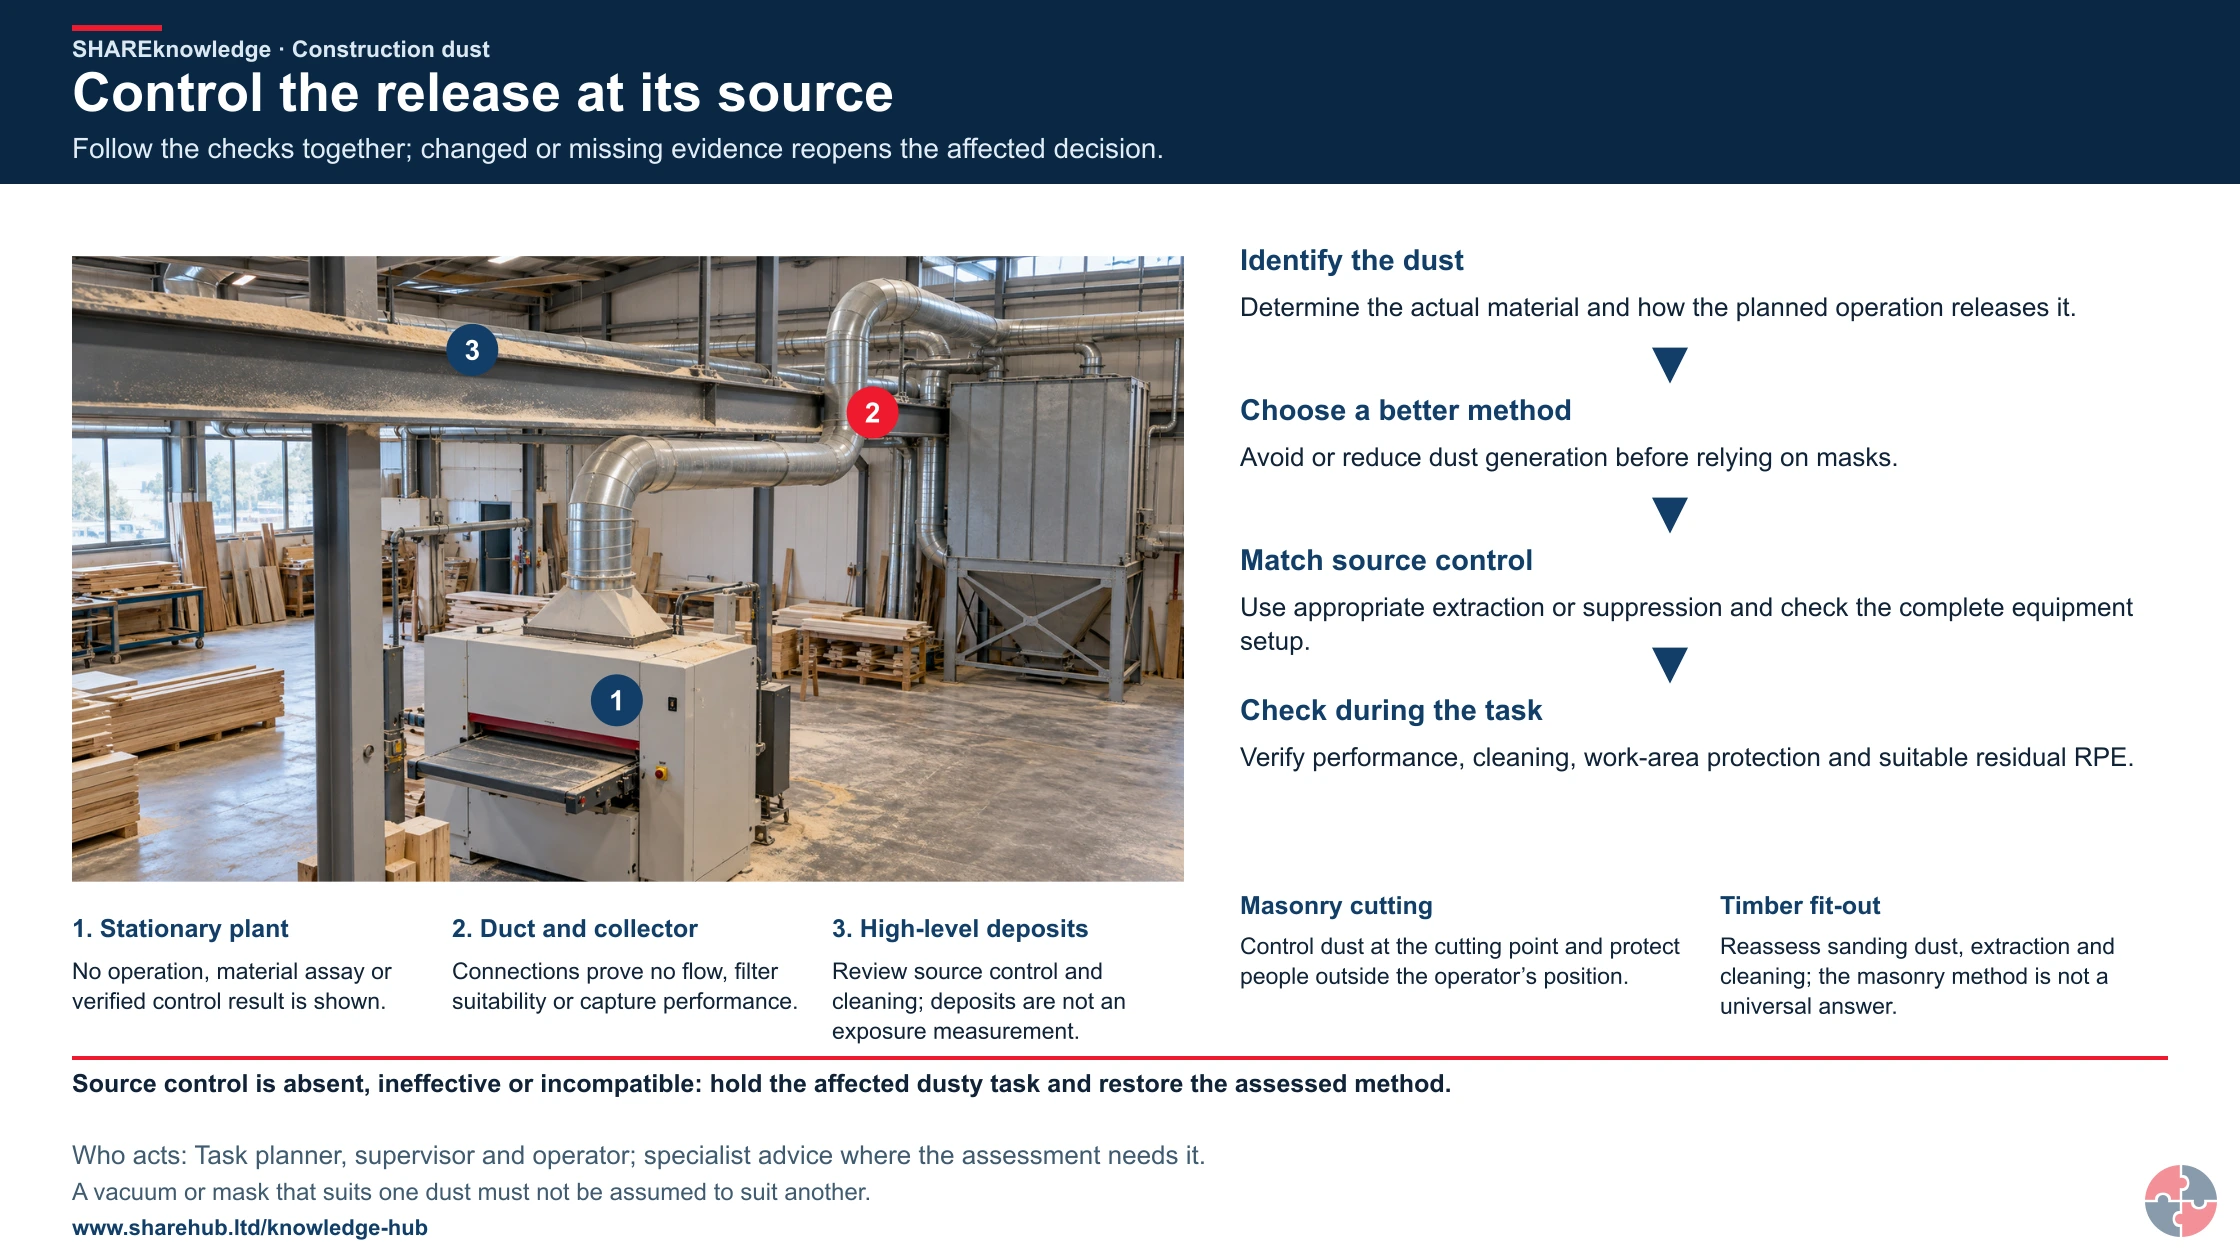
Control the release at its source
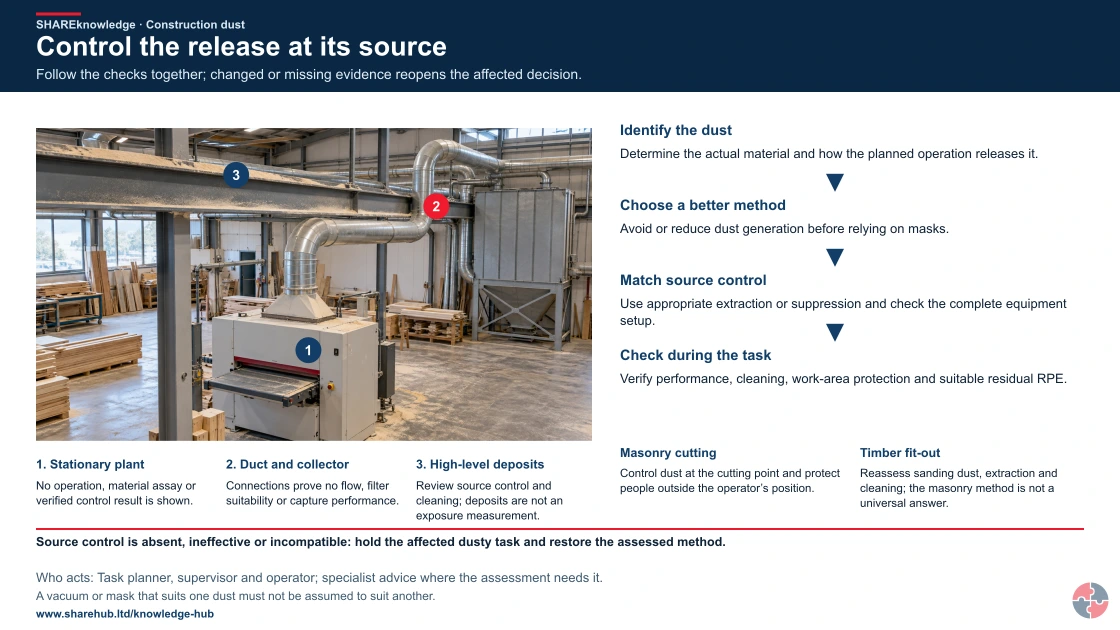
Full written explanation
An illustrative inactive timber-workshop setting shows stationary plant, connected overhead ductwork and a closed collector, with visible high-level and equipment deposits. Picture key: 1 identifies stationary plant; 2 identifies duct and collector; 3 identifies high-level deposits. The picture demonstrates no operation, material assay, actual airborne concentration, filter suitability, airflow, capture, explosion protection, energy isolation, approved cleaning method or permission. Deposits prompt review of source control and cleaning; their appearance is not an exposure measurement or identification of a dust disease. The complete ordered checks remain: identify the actual material and release; choose a better method before relying on masks; match extraction or suppression to the complete equipment setup; check performance, cleaning, protection of the work area and suitable residual RPE during the task. These independent headings are unnumbered, with genuine order arrows. The full failed-source-control hold, responsible task roles, evidence limit and both masonry-cutting and timber-fit-out cases accompany the checks. The masonry method is not a universal answer for timber, and a vacuum or mask suitable for one dust cannot be assumed suitable for another. No sanding, cloud, cleaning, dust handling, new lung or particle image, symptom, diagnosis, RPE prescription, numerical threshold or operating recipe is shown. Existing urgent clinical help is independent of assessment records, investigation or work-control decisions. Use the complete topic for material-specific controls, asbestos and lead boundaries, source qualifications and GB or NI requirements.
- Identify the dust. Determine the actual material and how the planned operation releases it.
- Choose a better method. Avoid or reduce dust generation before relying on masks.
- Match source control. Use appropriate extraction or suppression and check the complete equipment setup.
- Check during the task. Verify performance, cleaning, work-area protection and suitable residual RPE.
When the evidence does not fit: Source control is absent, ineffective or incompatible: hold the affected dusty task and restore the assessed method.
Who acts: Task planner, supervisor and operator; specialist advice where the assessment needs it.
Changed workplace
Masonry cutting: Control dust at the cutting point and protect people outside the operator’s position.
Timber fit-out: Reassess sanding dust, extraction and cleaning; the masonry method is not a universal answer.
Evidence check: A vacuum or mask that suits one dust must not be assumed to suit another.

Material and task
Check composition and the dust-generating process; stop for unknown material rather than assume a generic dust.
Control at source
Assess suitable capture, suppression or an alternative method. Consider nearby trades, cleaning and waste handling.
Verify performance and separation
Check the assessed indicators, maintenance and relevant exposure evidence. Suitable residual RPE does not excuse a failed source control. The observer in this illustration is too close to the cutting activity. Keep observers and nearby trades outside the assessed exclusion area and away from the dust-release zone and cutting line; a respirator worn by the operator does not protect other people.
An apparently clear work area does not establish low exposure. This diagram gives no material identification or equipment approval.
Why is construction dust a health risk?
Fine dust can reach deep into the lungs even when the air does not look dusty; composition, particle size, task and duration determine harm.
The HSE dust guide describes lung cancer, silicosis, COPD and asthma from repeated exposures. Cutting concrete or stone can release respirable crystalline silica (RCS); machining hardwood and softwood releases wood dust; cement and gypsum create different irritant and respiratory risks. An older refurbishment may involve asbestos or contaminated coatings and needs a separate specialist assessment before disturbance. Check the HSE asbestos survey guidance or HSENI survey guidance for the work location; lead coatings require the HSE lead or HSENI lead route. Do not use a generic “dust mask” or visible haze as the risk test; identify material and method first.
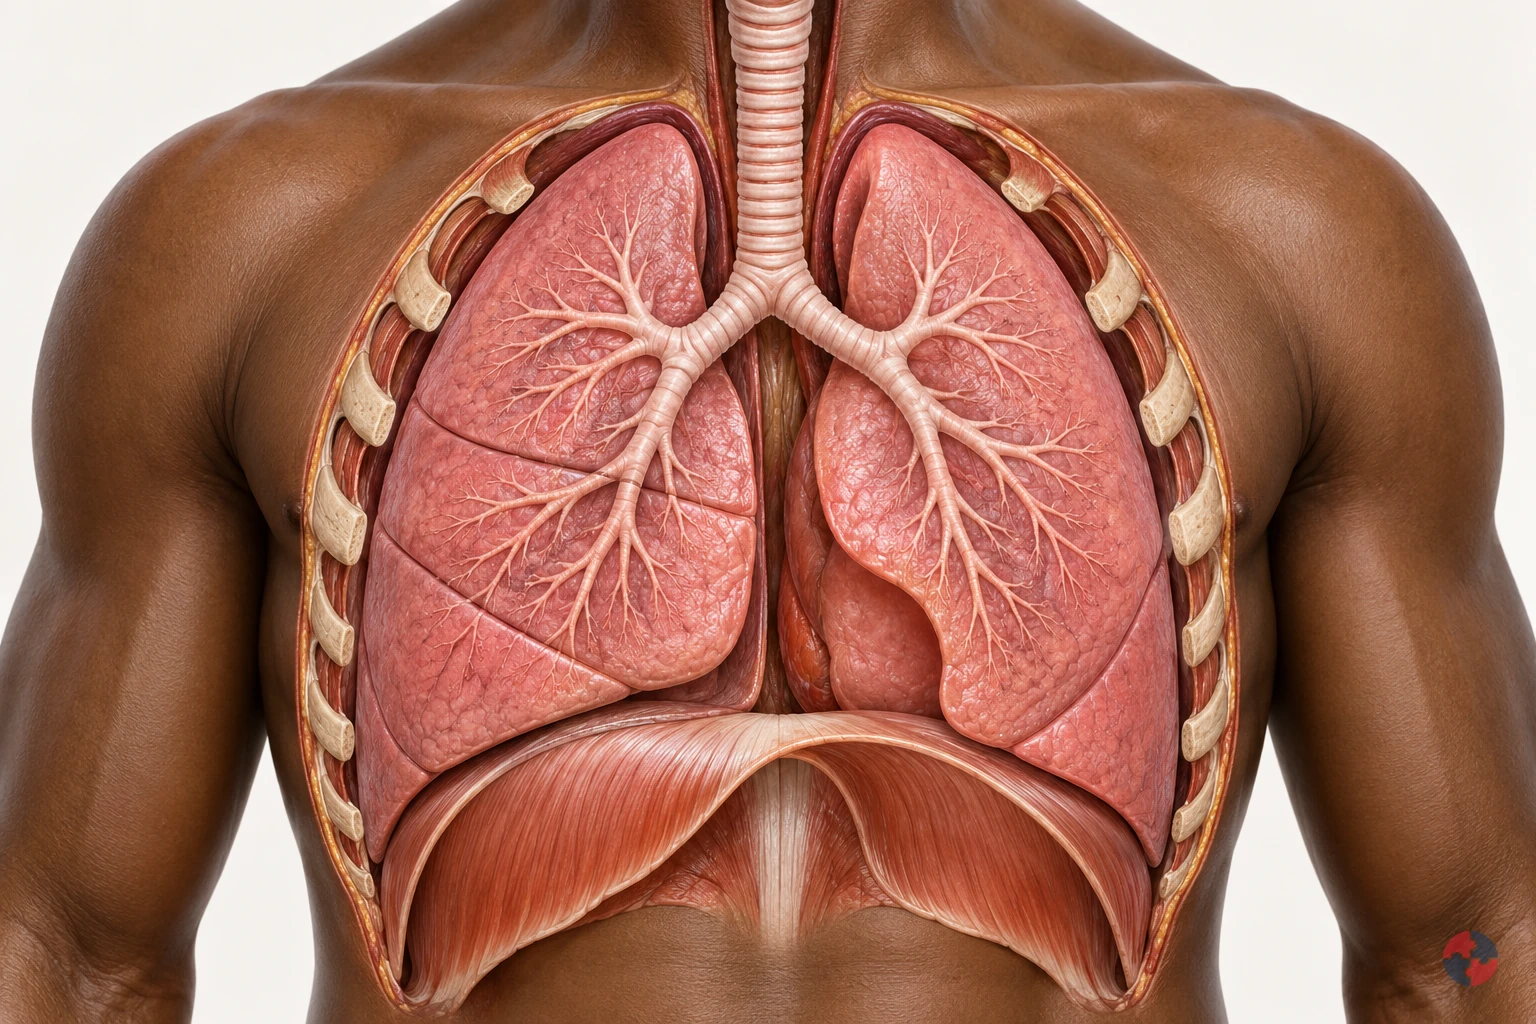
How do the lungs work, and how can workplace exposures affect breathing?
Interactive anatomy · Respiratory tract and lungs · Updated 2026-10-23
Read all anatomy and process explanations without the viewer
Simplified education, not diagnosis, a lung-function or oxygen-saturation test, an exposure calculator or a fitness-to-work assessment. No breath-holding challenge, breathing-rate score or personal health-data collection. Ordinary particle filters do not protect against every gas or oxygen deficiency. COPD and coal-dust topics may reuse normal anatomy only until separate mechanisms are reviewed.
Nose and mouth
Air enters and leaves here. The nose and mouth connect the outside air with the respiratory passages. Air moves through these openings on both the inward and outward breath. Follow the route towards the windpipe before looking at the smaller branches. The illustrated flow is air, a mixture of gases, rather than pure oxygen passing directly into blood. Frimley Health NHS Foundation Trust: How your lungs work · Central and North West London NHS Foundation Trust: How do we breathe?
Trachea
The windpipe carries air into the chest. The trachea, commonly called the windpipe, carries air down towards the chest. It divides into the two main bronchi that supply the lungs. Locate this shared passage before following either branch. Its role is to conduct air towards the gas-exchange regions and provide an outward route for the next exhalation. Frimley Health NHS Foundation Trust: How your lungs work
Bronchi
A main branch carries air into each lung. The two main bronchi take air from the windpipe into the right and left lungs. They divide into progressively smaller branches, distributing the breath through the lungs. Use the split as a landmark before following one highlighted route. These are air passages, distinct from the blood vessels that run through the same organs. Frimley Health NHS Foundation Trust: How your lungs work · University Hospitals of North Midlands NHS Trust: My lung surgery: about your lungs
Bronchioles
Smaller branches distribute air. Bronchioles are smaller branches of the airway system inside the lungs. Their branching routes lead towards clusters of alveoli, where the breath reaches the gas-exchange surface. Follow one branch to its end, using the others as context. This simplified route represents part of a much larger network supplying the lungs together. Frimley Health NHS Foundation Trust: How your lungs work
Alveoli
Tiny air sacs provide a gas-exchange surface. Alveoli are tiny air sacs at the ends of the small airway routes. Their close relationship with surrounding capillaries allows oxygen to pass towards blood and carbon dioxide towards alveolar air. Connect the highlighted cluster with the enlarged gas-exchange view. The enlargement changes the scale so the air space and neighbouring blood vessel can be distinguished. Frimley Health NHS Foundation Trust: How your lungs work · Central and North West London NHS Foundation Trust: How do we breathe?
Air–blood barrier
A thin boundary separates air from blood. The thin alveolar and capillary walls separate air in the sac from blood in its neighbouring vessel. Oxygen and carbon dioxide cross this boundary in opposite directions. Locate the tissue between the two spaces in the enlarged view. Blood cells remain in the vessel; the model does not represent an open connection through which air and blood mix. Central and North West London NHS Foundation Trust: How do we breathe?
Pulmonary capillaries
Small blood vessels pass beside the air sacs. Pulmonary capillaries are small blood vessels beside the alveoli. Blood moving through them receives oxygen and releases carbon dioxide across the thin exchange boundary, then continues through the circulation. Follow the labelled gas routes separately from the blood cells. These cells stay inside the capillary rather than moving into the air sac. Central and North West London NHS Foundation Trust: How do we breathe?
Diaphragm
This muscle helps make room for a breath. The diaphragm is a broad, dome-shaped breathing muscle beneath the lungs. It contracts and flattens downwards during inhalation, helping increase the space in the chest. During a quiet exhalation it relaxes towards its dome shape. Compare it with the rib cage: their changing positions help move air without the lung tissue acting as a contracting muscle. Cambridge University Hospitals NHS Foundation Trust: Breathing techniques to ease breathlessness: muscles involved
Rib cage and breathing muscles
Chest movement changes the space around the lungs. The rib cage protects the chest organs and moves with the breathing muscles. Expansion upwards and outwards helps increase chest space during inhalation; relaxation reduces that space during a quiet exhalation. Compare this movement with the diaphragm below the lungs. Together these structures provide the mechanics that allow air to move through the airways. Central and North West London NHS Foundation Trust: How do we breathe? · Cambridge University Hospitals NHS Foundation Trust: Breathing techniques to ease breathlessness: muscles involved
Pleura
Two thin layers surround the lungs and line the chest. The pleura has two thin layers around the lungs and inside the chest wall. A small amount of fluid between them allows the surfaces to slide with less friction as breathing changes the chest space. Locate this outer covering separately from the internal air sacs; it is not the thin air–blood exchange boundary. Blackpool Teaching Hospitals NHS Foundation Trust: Pleural clinic
Open the complete process transcript
The process, step by step
1 · Make space
Breathing in begins with a change in the space inside the chest. The diaphragm, a dome-shaped muscle beneath the lungs, contracts and moves downwards. Muscles around the ribs help lift the chest upwards and outwards. As the lungs expand with this changing space, air can enter through the airways. Locate the diaphragm and rib cage together rather than treating the lungs as muscles that pull themselves open. The model separates the movement into a teaching step so you can follow its purpose. In the body, chest movement, airflow and blood circulation are connected parts of a continuing process. Central and North West London NHS Foundation Trust: How do we breathe? · Cambridge University Hospitals NHS Foundation Trust: Breathing techniques to ease breathlessness: muscles involved
What to watch: Locate the diaphragm beneath the lungs and the rib cage around them; compare their positions with the space occupied by the lungs.
Why it matters: Changing the chest space draws air into the lung passages. The breathing muscles supply the movement, while the lungs expand with the chest to receive the next breath.
Explore this step: Select the diaphragm and rib cage in turn, then explain how their movement helps air enter without the lungs contracting like muscles.
2 · Move air
Air entering through the nose or mouth travels down the trachea, or windpipe, towards the chest. The trachea divides into the two main bronchi, with one route supplying each lung. Follow this continuous passage in the whole-chest view before moving into the smaller branches. The moving air is a mixture of gases, including oxygen; it is not a stream of pure oxygen travelling straight into the blood. These larger airways carry the breath towards the places where gas exchange happens. The same connected passages also provide the outward route when air is breathed out. Frimley Health NHS Foundation Trust: How your lungs work
What to watch: Start at the nose and mouth, follow the trachea downwards and find the split into the right and left main bronchi.
Why it matters: The larger passages distribute air to both lungs and connect the outside air with the smaller branches inside. Gas exchange takes place further along the route, rather than within the windpipe.
Explore this step: Trace the route to each lung and distinguish the tubes carrying air from the separate vessels carrying blood.
3 · Reach the air sacs
Inside each lung, the bronchi divide into smaller branches called bronchioles. These passages distribute air towards clusters of tiny air sacs, the alveoli. Follow one branch in the close-up and connect its end with an air-sac cluster, using the other branches as surrounding context. These routes distribute the breath throughout the lungs rather than supplying only one working air sac. A real lung contains many branching routes and air sacs operating together. This distribution brings air close to a large network of small blood vessels, preparing for the exchange shown in the next view. Frimley Health NHS Foundation Trust: How your lungs work
What to watch: Follow one smaller airway to the cluster of air sacs at its end, keeping the other branches as surrounding context.
Why it matters: Branching delivers air throughout the lungs instead of to one large chamber. The many air sacs bring the inhaled gases close to blood vessels where oxygen and carbon dioxide can cross.
Explore this step: Trace one complete branch to its air sacs, then explain how the many branches distribute air throughout the lungs.
4 · Change scale
The lesson now changes from a branching airway to an enlarged air–blood interface. An alveolus contains air; beside it runs a capillary containing blood. Their very thin walls form the boundary across which gases can move. Locate the air space, the separating tissue and the inside of the vessel before following any gas symbols. The magnified view represents a tiny part of the same lung, not a separate organ or a hole that joins air and blood into one space. The enlargement helps explain how the two systems can exchange gases while keeping their contents separate. Central and North West London NHS Foundation Trust: How do we breathe?
What to watch: Find the air inside the enlarged alveolus, the thin separating boundary and the neighbouring capillary with blood cells inside it.
Why it matters: A close boundary allows gases to cross between alveolar air and capillary blood. Keeping the two spaces separate lets ventilation and circulation cooperate without blood cells entering the air sac.
Explore this step: Identify the air space and blood-vessel space, then point to the boundary each gas must cross between them.
5 · Exchange gases
At the air–blood boundary, oxygen moves from the alveolar air into the capillary blood. At the same time, carbon dioxide carried back from the body moves from the blood into the air sac. The two gases cross in opposite directions; blood cells stay within the vessel. Follow each labelled symbol separately so that exchanging gases is not confused with mixing the air and blood together. Blood then carries oxygen onwards towards the heart and the body’s tissues. The teaching symbols simplify continuous gas movement, and their size, colour and speed do not represent a measurement. Central and North West London NHS Foundation Trust: How do we breathe?
What to watch: Follow the O₂ symbol towards the capillary and the CO₂ symbol towards the air sac, while locating the blood cells within the vessel.
Why it matters: Oxygen can be carried onwards for use by the body, while carbon dioxide returns to the airways for removal. Both transfers connect the breath with the continuing circulation of blood.
Explore this step: Trace the two gas routes in opposite directions and explain why a blood cell should remain inside the capillary.
6 · Breathe out
During a quiet breath out, the diaphragm and other breathing muscles relax. The diaphragm returns towards its dome shape, chest space decreases and air moves back along the airways to the nose or mouth. This outgoing air carries carbon dioxide that crossed from the blood into the alveoli. Trace the route in reverse without reversing the direction of blood circulation: oxygen-carrying blood continues towards the heart while another breath prepares to enter. The model presents a single cycle to explain the relationship. It does not show breathing as a series of separate events in which circulation stops between steps. Central and North West London NHS Foundation Trust: How do we breathe? · Cambridge University Hospitals NHS Foundation Trust: Breathing techniques to ease breathlessness: muscles involved
What to watch: Compare the diaphragm and chest with the inhalation step, then follow the outward airway route from the lungs to the nose or mouth.
Why it matters: Exhalation removes air containing carbon dioxide from gas exchange. Meanwhile, blood circulation continues carrying oxygen onwards, linking this breathing cycle with the needs of the rest of the body.
Explore this step: Trace the outward air route and the onward blood route separately, then describe why they are connected processes with different pathways.
Mechanisms and their limits
Sensitiser-related asthma Some people become sensitised to workplace substances such as flour or wood dust. Later exposure may trigger inflamed, narrowed airways, sometimes at low levels. Compare the airway opening, not the size of the whole lung. Sensitisation and later triggering are different phases, shown without a fixed clock. Work can also worsen existing asthma. Not all work-related asthma is an allergic reaction. A symptom pattern can prompt investigation but cannot establish a diagnosis from this model. HSE: Asthma: an overview · NHS: Asthma · HSE: Flour dust and risks to bakers
Assess sensitisers and maintain exposure controls
Get clinical advice about asthma symptoms
Dust-related fibrosis · silica Fine respirable crystalline silica can reach deep into the lungs, causing inflammation and areas of scarring. Scarred tissue does not work normally. Established silicosis damage cannot be reversed and may progress after exposure ends. Disease often develops over years, but very heavy exposure can cause much faster disease. No animation time represents a number of shifts or a safe dose. Show selected scarred regions, not every air sac filling with sand. This example does not diagnose the cause of breathlessness or show every effect of silica. NHS: Silicosis
Plan and control silica-generating cutting
Understand silicosis and seek assessment
Dust-related fibrosis · asbestos Inhaled asbestos fibres can cause asbestosis: scarring of lung tissue, usually after heavy exposure over many years. Mesothelioma is a separate cancer involving linings such as the pleura; it is not another name or a later stage of asbestosis. Lung scarring and the separate pleural annotation show different disease concepts. Other asbestos diseases also exist. Do not show one exposure causing immediate fibrosis or cancer. The sequence is illustrative and timing varies. The illustration cannot establish whether material contains asbestos or whether a person has an asbestos-related disease. HSE: Why is asbestos dangerous?
Understand the separate asbestos diseases
Sensitiser-related asthma — follow the anatomy
Look at: The airway opening, its muscle and swollen lining.
What changes: In asthma, narrowing, swelling and mucus can restrict the route for air.
Why it matters: Breathing may become difficult, with wheeze, cough or chest tightness.
What to do: Prevent exposure to the cause and report breathing symptoms for medical assessment.
Flour handling and later occupational asthma
Bakery: flour is tipped and benches are dusted repeatedly during production. Time jump: sensitisation may develop over a variable period; a later exposure may trigger symptoms. This is not asthma developing in 32 seconds. Not every exposed or sensitised person develops asthma. Wheeze or timing alone does not establish the cause or diagnosis.
A dusty bakery task Flour is tipped into a mixer and used to dust the bench. Review low-dust ingredients and careful handling before relying on the worker to avoid a visible cloud. HSE: Flour dust and risks to bakers
Repeated exposure, then a time jump Breathing flour dust can lead to sensitisation in some people over time. The timeline now jumps to a later contact after a hypersensitive state has developed in this chosen example. HSE: Asthma: an overview · HSE: Flour dust and risks to bakers
A later contact can narrow airways The airway wall becomes inflamed and the breathing passage narrows in the illustrative asthma episode. Symptoms may occur during the task or later; this is not the same as identifying asthma by a short animation. HSE: Asthma: an overview · NHS: Asthma
Report patterns and reduce exposure Report work-related breathing problems promptly and obtain clinical advice. Review low-dust flour, transfer/handling and the full control assessment; use the emergency panel immediately for severe breathing difficulty. HSE: Advice for employers: occupational asthma · HSE: Flour dust and risks to bakers · NHS: Shortness of breath
Dust-related fibrosis · silica — follow the anatomy
Look at: The thin walls of the air sacs and their nearby blood vessels.
What changes: Respirable silica can reach deep into the lung and cause scarring over time.
Why it matters: Scarred tissue makes gas exchange harder; established silicosis cannot be reversed by simply stopping exposure.
What to do: Prevent dust at source using suitable wet methods or extraction and correctly selected respiratory protection.
Repeated uncontrolled cutting of paving materials
A paving crew uses a cut-off saw on kerbs without effective dust suppression. Explicit time jump: silicosis usually develops after prolonged exposure, sometimes faster after very heavy exposure. Scarring does not appear during the 32-second clip. The dust route and later fibrosis are explanatory stages. No single cut, visible cloud or symptom predicts an individual’s disease.
A silica-generating activity Cutting paving blocks or kerbs can create very fine silica-containing dust near the operator and nearby workers. Plan cuts and material choices before work starts. HSE: Construction dust: cutting paving blocks, kerbs and flags · NHS: Silicosis
Fine dust reaches deeper lung regions Some inhaled fine particles reach the alveolar region. Repeated uncontrolled exposure across separate tasks and days is represented by a clearly labelled time jump. NHS: Silicosis
Later inflammation and fibrosis The chosen long-term example marks inflammation and scarred lung tissue that cannot function normally. This is not a real-time scan, exposure calculator or inevitable outcome after one task. NHS: Silicosis
Control dust at the task Reduce cutting where possible, use suitable water suppression or on-tool extraction with the required RPE, and check controls. Report symptoms and exposure history to a healthcare professional; controls do not erase existing scarring. HSE: Construction dust: cutting paving blocks, kerbs and flags · NHS: Silicosis
Dust-related fibrosis · asbestos — follow the anatomy
Look at: The deep lung tissue around the air sacs.
What changes: Inhaled asbestos fibres can cause scarring after a long delay.
Why it matters: Asbestosis reduces lung function; this fibrosis example is separate from mesothelioma and other asbestos diseases.
What to do: Identify asbestos before work and prevent disturbance through competent controls.
Disturbing asbestos-containing material during maintenance
A worker pulls down an older ceiling or roof-lining panel and dust falls beside their face. This shows an uncontrolled disturbance to avoid, not a safe removal method. Explicit time jump: asbestos-related disease can emerge many years after exposure. Asbestosis is a later scarring example, not a seconds-long transformation. Asbestosis, pleural disease and mesothelioma are different conditions. The visible dust is an illustrative cue, not a way to identify asbestos or judge whether air is safe. This example does not predict illness after one disturbance.
Pulling down a ceiling panel The worker pulls an overhead panel away from its frame and dust falls into the work area. This is a hazardous example, not a removal method. Check the asbestos information before disturbance; stop if the material or work arrangements are unclear. Health and Safety Executive: Asbestos essentials
What a failed control could allow In the counterfactual exposure example, disturbing asbestos-containing material releases fibres that may be inhaled. The timeline then jumps forward; no new disturbance is instructed. HSE: Why is asbestos dangerous? · Health and Safety Executive: Asbestos essentials
One possible later asbestos effect A separate asbestosis view illustrates scarring within lung tissue after substantial exposure over time. The outside pleural layer remains distinct; it is not a cancer or a generic asbestos-disease patch. HSE: Why is asbestos dangerous?
Prevent further disturbance Stop and follow competent asbestos-management arrangements, with suitable classification, planning and specialist work where needed. Seek appropriate advice about exposure concerns; neither a clear-looking room nor a normal diagram gives clearance. Health and Safety Executive: Asbestos essentials · HSE: Why is asbestos dangerous?
Read the practice situations and all answer explanations
LU-Q1: Which plan best addresses the hazard?
A team plans repeated concrete cuts with a handheld cut-off saw. Dust can enter the operator’s and nearby workers’ breathing zones.
Open a window and use the same dry-cutting method. — A window alone does not control dust generated beside the face. Choose task controls that prevent or capture it at source.
First reduce the need to cut, then assess source suppression or extraction and any required suitable RPE. — This addresses the task before exposure occurs. Check that suppression or extraction works and that required RPE is suitable, fitted and used.
Continue while nobody is coughing. — Symptoms are not an exposure monitor. Harmful respirable dust may be invisible, and a worker can feel well during exposure.
HSE: Construction dust: cutting paving blocks, kerbs and flagsLU-Q2: What is the most useful next action?
A bakery worker notices repeated wheeze after dusty flour tasks, including some symptoms later in the evening.
Report the pattern and seek medical and workplace assessment. — Reporting the pattern allows exposure controls and clinical assessment to be reviewed. Symptoms can be delayed; a clinician may need further investigation.
Use this model to diagnose occupational asthma. — The model explains a mechanism. It cannot diagnose asthma or establish that work caused it.
Assume the task is safe if breathing improves away from work. — Improvement away from work may be useful information for investigation, but it does not show that returning to the same exposure is safe.
HSE: Asthma: an overview · HSE: Advice for employers: occupational asthma · NHS: Asthma · HSE: Flour dust and risks to bakersLU-Q3: What is the important distinction?
One diagram shows a narrowed airway at LUN03–04. A second shows scarred gas-exchange tissue around LUN05–07.
They show the same disease at successive stages. — Narrowed airways and scarred lung tissue are different changes. One is not automatically the next stage of the other.
Both effects disappear when airborne dust settles. — Removing airborne dust does not reverse established fibrosis. Controlling further exposure remains important.
Airway narrowing and tissue fibrosis are different mechanisms. — Correct. Airway narrowing affects the passage for air; fibrosis affects lung tissue and its function. Neither picture supplies an individual diagnosis.
NHS: Silicosis · NHS: AsthmaSources and how the model is made
The opening images are AI-generated anatomical illustrations. The interactive 3D models and labelled SVG diagrams use original procedural artwork. These teaching images are not medical scans or diagnostic tools. Source references support the learner explanations and do not grant artwork rights.
- Frimley Health NHS Foundation Trust: How your lungs work — Normal airway branching, air sacs and capillary gas exchange; factual text only.
- Central and North West London NHS Foundation Trust: How do we breathe? — Thin alveolar/capillary walls, opposing gas transfer, circulation and chest mechanics. No illustrations or exercises copied.
- Cambridge University Hospitals NHS Foundation Trust: Breathing techniques to ease breathlessness: muscles involved — Diaphragm movement and breathing-muscle context only; this module does not prescribe breathing exercises.
- HSE: Health risks from welding — Welding-related airway irritation, possible deeper injury and irritant asthma; not a universal pattern for every gas.
- HSE: Asthma: an overview — Sensitisation, later triggering and work aggravation. Legacy labelling language and statistics are not reused.
- HSE: Advice for employers: occupational asthma — Exposure prevention, controls and health surveillance only; legacy legislation wording is not reused.
- NHS: Silicosis — Silica-associated inflammation/fibrosis, varying latency, irreversible damage and possible progression after exposure stops.
- HSE: Why is asbestos dangerous? — Asbestosis, mesothelioma and pleural disease are distinct; long disease latency.
- HSE: Construction dust: cutting paving blocks, kerbs and flags — Task design, source suppression/extraction, suitable RPE and checking controls; not a generic dust safe-dose rule.
- NHS: Shortness of breath — Emergency recognition of severe breathing difficulty and 999; emergency advice is outside the activity.
- NHS: Asthma — Narrowed/swollen airways, symptoms and clinical diagnosis; no medication doses or treatment plan reproduced.
- University Hospitals of North Midlands NHS Trust: My lung surgery: about your lungs — Right/left lung lobe counts and airway anatomy; no source image copied.
- Blackpool Teaching Hospitals NHS Foundation Trust: Pleural clinic — Pleural layers and the small lubricating fluid layer outside lung tissue; no procedural teaching included.
- HSE: Asphyxiation hazards in welding and allied processes — Oxygen-deficient spaces and need for independent air supply; no unprotected entry or rescue.
- HSE: Respiratory protective equipment at work — RPE selection must match the contaminant and conditions; filtering protection is not a supply of oxygen.
- HSE: Flour dust and risks to bakers — Flour sensitisation and practical reduction of dusty handling; exposure-limit numbers are not reused.
- Health and Safety Executive: Asbestos essentials — Task planning, training and competent asbestos work arrangements for the maintenance exposure example; not permission to disturb unknown material or a licence/classification decision.
- Health and Safety Executive: Welding fume: protect your workers — Alternative joining, fume reduction, LEV, suitable RPE and maintained controls for the welding-fume example. No unprotected exposure or rescue procedure.
What types of construction dust should be considered?
Construction dust should be broken down by material because silica, asbestos, lead, cement, plasterboard and wood dust can cause different health effects and require different controls.
A useful assessment does not simply write “dust” as the hazard. It identifies the material being disturbed, the likely dust type, the physical form of the dust, how fine the particles may be, who can inhale or ingest it and whether the work could disturb legacy hazards such as asbestos or lead paint. The table below links to the more specific topic pages where those dusts need their own deeper assessment.
| Dust type | What it usually contains | Where it is commonly generated | Why it matters for health | Main control focus |
|---|---|---|---|---|
| Silica dust | Respirable crystalline silica from concrete, brick, mortar, stone, tiles and engineered stone. | Cutting, grinding, drilling, chasing, scabbling, demolition and dry sweeping of silica-containing materials. | Fine respirable particles can reach deep into the lungs and are linked with silicosis, chronic obstructive pulmonary disease and lung cancer. | Avoid cutting where possible, use wet methods or on-tool extraction, segregate the area, use M-class vacuums and provide suitable face-fit-tested RPE for residual exposure. |
| Asbestos dust | Airborne asbestos fibres released when asbestos-containing materials are disturbed. | Refurbishment, demolition, drilling, removal, damaged insulation, old boards, coatings, lagging or unknown legacy materials. | Fibres can cause fatal diseases including mesothelioma, asbestos-related lung cancer and asbestosis, often decades after exposure. | Identify asbestos before work, stop if suspect material is found, use competent asbestos procedures and follow licensed or non-licensed work controls as applicable. |
| Lead dust | Dust or fume from lead-containing paints, coatings, pipes, solders, flashings or contaminated old materials. | Sanding, burning off paint, abrasive blasting, hot cutting, demolition, heritage refurbishment and poor hygiene after dusty work. | Lead can be absorbed by inhalation or ingestion and may harm the nervous system, blood, kidneys and reproductive health. | Identify lead-containing materials, avoid dry abrasive methods, control dust and fume, use hygiene controls, prevent ingestion and consider biological monitoring where required. |
| Cement dust | Alkaline dust from cement powder, dry mortar, concrete products and mixing activities. | Opening bags, dry mixing, chasing concrete, cutting cement-based boards, sweeping and cleaning dried residues. | Can irritate the eyes and respiratory tract and can contribute to dermatitis or burns when mixed with sweat or water. | Reduce dust release, use local extraction or wet methods where suitable, provide eye and skin protection, maintain washing facilities and control contaminated clothing. |
| Plasterboard and drywall dust | Fine gypsum and additive dust generated when plasterboard, jointing compound or drywall systems are cut, sanded or broken. | Board cutting, sanding joints, refurbishment, demolition, ceiling work and dry sweeping after finishing tasks. | Usually lower toxicity than silica, but heavy exposure can irritate the airways and eyes and can add to total respirable dust burden. | Use score-and-snap methods where possible, use extraction sanding tools, avoid dry sweeping, ventilate enclosed areas and protect nearby workers. |
| Wood dust | Dust from hardwood, softwood, MDF, plywood and other wood-based materials. | Sawing, sanding, routing, planing, machining, sweeping and emptying extraction bags or bins. | Can cause occupational asthma and dermatitis; some hardwood dust exposure is associated with nasal cancer. | Use properly designed extraction, low-dust tools, good housekeeping, health surveillance where needed and suitable RPE for residual exposure. |
| Mixed construction dust | A changing mixture of dusts from refurbishment, demolition, waste handling and general construction activity. | Breaking out, sweeping, stripping out, moving rubble, cleaning voids and working in old or poorly characterised areas. | The health risk depends on what is in the dust; unknown dust may include silica, wood, cement, lead, asbestos or biological contamination. | Do not assume mixed dust is harmless. Identify likely materials, plan controls for the worst credible exposure and stop work if suspect hazardous material is discovered. |
How should construction dust be assessed?
A construction dust assessment should identify the material, dust type, task, tool, duration, work area, exposed people and controls before the work starts.
The assessor should start with the material. Concrete, brick, mortar, sandstone and engineered stone should raise concern about respirable crystalline silica. Timber and board products should raise concern about wood dust. Refurbishment work should also consider whether asbestos, lead paint, biological contamination or unknown residues could be present.
The task and tool then determine how much dust is likely to be generated. Drilling a few holes with extraction is very different from chasing walls, dry cutting slabs, grinding concrete, sanding timber for hours or sweeping dry debris at the end of a shift. Duration, frequency and enclosure can turn an apparently small task into a significant exposure.
The assessment should describe routes of exposure and spread. Inhalation is the main route, but dust can also contaminate eyes, skin, clothing, welfare facilities and vehicles. Eating, drinking or smoking with contaminated hands can introduce dust by ingestion.
Planning should include who is exposed, how dust will be prevented or captured, how the area will be cleaned, what respiratory protective equipment is required, whether face-fit testing is current and how supervisors will check the controls during the task.
| Assessment question | What to look for | Evidence to keep |
|---|---|---|
| What material is being disturbed? | Concrete, brick, mortar, stone, engineered stone, wood, MDF, plasterboard, cement or contaminated material. | Material information, survey, task assessment and contractor method statement. |
| What task creates dust? | Cutting, grinding, drilling, chasing, sanding, demolition, sweeping or waste handling. | Task plan and equipment selection record. |
| Who is exposed? | Tool user, nearby trades, cleaners, visitors and people in occupied premises. | Work area segregation and briefing records. |
| How will dust be controlled? | Avoid cutting, use pre-cut materials, water suppression, on-tool extraction, M-class vacuum and RPE for residual exposure. | Inspection records, RPE face-fit and supervisor checks. |
How can the hierarchy of controls reduce construction-dust exposure at source?
Design out unnecessary cuts, use a lower-dust method where feasible, then capture or suppress at source and check residual exposure.
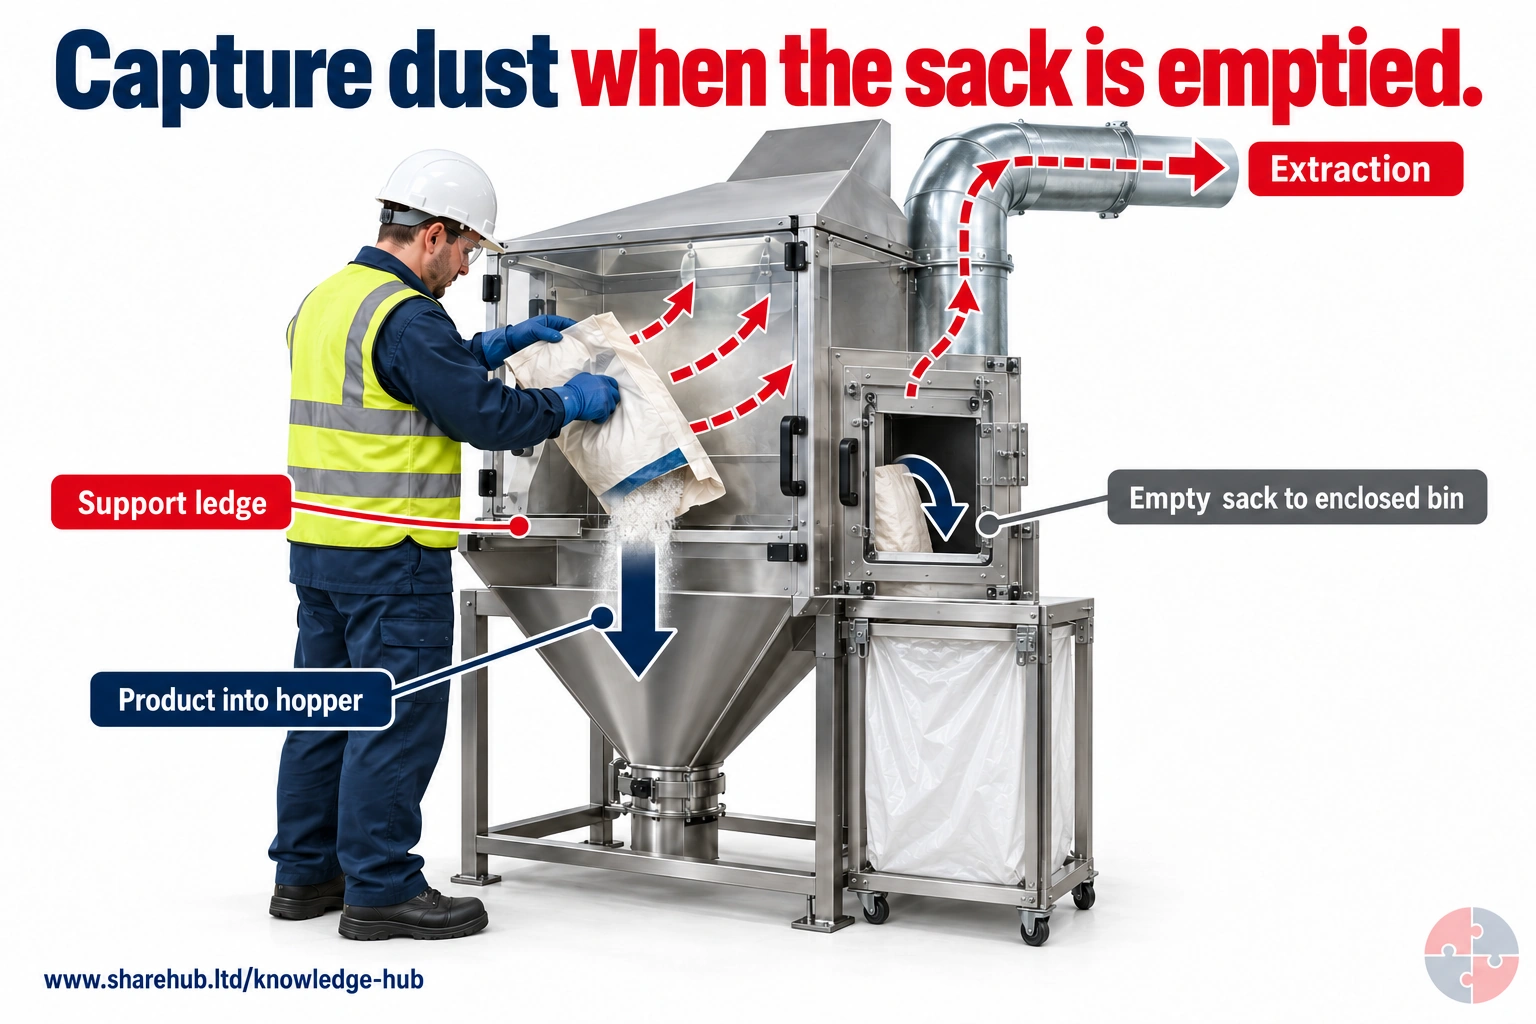
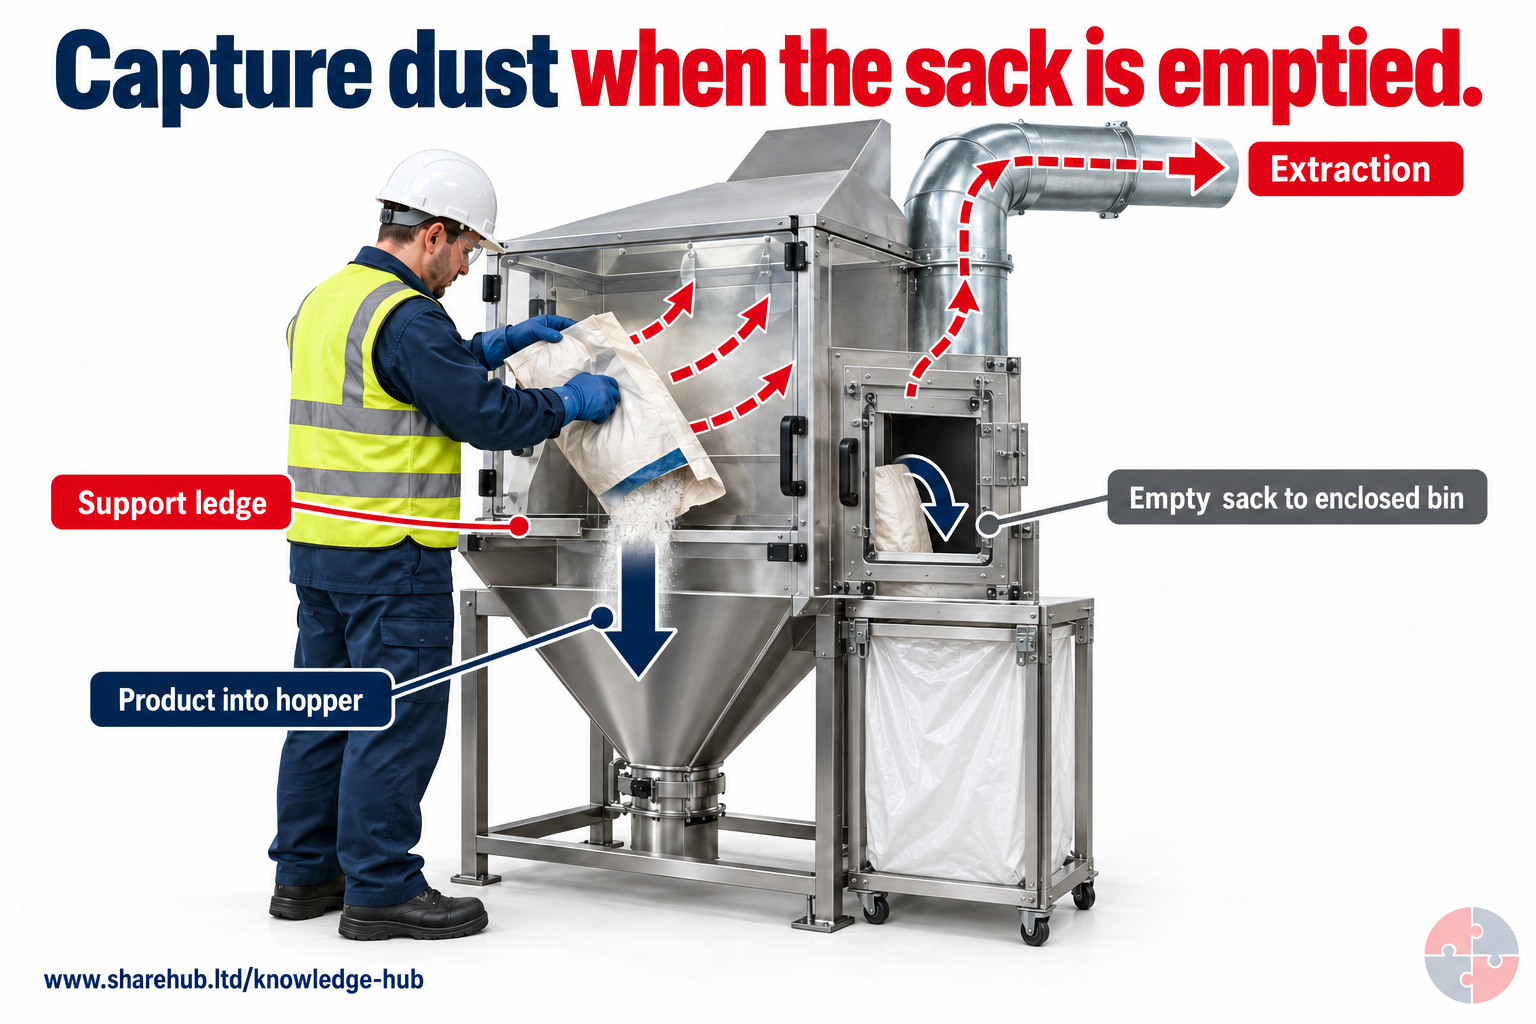
The station separates product flow, extraction airflow and empty-sack handling. Dust released during bag disposal remains part of the control problem.
Where can exposure occur after the hopper is filled?
Residual powder can escape from the empty sack during handling or disposal, so that stage also needs control.
Conceptual enclosure; hood opening, airflow, materials, housekeeping and commissioning require task-specific design.
Source guidance: HSE HSG258
For chasing a concrete wall, first route services through a planned void or use preformed components. If cutting remains, choose a compatible lower-energy method; fit a suitable shroud and extraction or water suppression matched to the tool and material. Segregate others, control slurry and clean with a suitable vacuum or wet method rather than dry sweeping. Select task-specific RPE where residual exposure remains; fit testing and clean-shaven seal matter for tight-fitting equipment. The HSE task sheets and HSENI silica guidance support these controls. Stop when capture fails, water is absent, dust escapes the zone or unknown material appears.
On a small screen, scroll this table sideways to read all columns.
How can the ERICPD hierarchy of controls reduce construction-dust exposure at source?

| Five-level / ERICPD | Control and feasibility | Owner, evidence, failure and stop |
|---|---|---|
| Eliminate / eliminate | Design service route to avoid chasing or use factory-prepared element. | Designer records option; hold intrusive work on unknown material. |
| Substitute / reduce | Use a lower-dust fixing or method after checking structural and electrical effects. | Site engineer approves trial; stop if dust or other risks exceed assessed controls. |
| Engineering / isolate and control | Matched shroud/extraction or water suppression plus zone separation. | Supervisor tests airflow/water at tool; stop on plume or failed capture. |
| Administrative / discipline | Task COSHH assessment, cleaning, inspection and worker briefing. | Site lead observes and records defects; hold work until control defects are corrected. |
| PPE / PPE | Selected, fitted RPE for residual exposure; protect others through source control. | RPE lead verifies fit and condition; no work if required protection fails. |
How can the ISO 45001 hierarchy of controls reduce construction-dust exposure at source?

| Five-level / ERICPD | Control and feasibility | Owner, evidence, failure and stop |
|---|---|---|
| Eliminate / eliminate | Design service route to avoid chasing or use factory-prepared element. | Designer records option; hold intrusive work on unknown material. |
| Substitute / reduce | Use a lower-dust fixing or method after checking structural and electrical effects. | Site engineer approves trial; stop if dust or other risks exceed assessed controls. |
| Engineering / isolate and control | Matched shroud/extraction or water suppression plus zone separation. | Supervisor tests airflow/water at tool; stop on plume or failed capture. |
| Administrative / discipline | Task COSHH assessment, cleaning, inspection and worker briefing. | Site lead observes and records defects; hold work until control defects are corrected. |
| PPE / PPE | Selected, fitted RPE for residual exposure; protect others through source control. | RPE lead verifies fit and condition; no work if required protection fails. |
HSE’s five-level hierarchy sets out elimination, substitution, engineering, administrative controls and PPE for GB. ERICPD is complementary. Choose measures for the actual task and location, and verify physical control performance separately from briefing or permit completion.
For concrete chasing, CIS69 supports selecting compatible tool, hood, hose and extractor for the material and task. The equipment owner records acceptance of capture and airflow, then maintains filters, connections and indicators; the supervisor checks these before use and during work. Keep servicing and competent examination records, including hired equipment. Loss of flow, damaged capture or ineffective suppression holds cutting until repaired and performance verified. The supervisor records restart authority. No visible plume does not prove adequate exposure control; use the task assessment and suitable exposure evaluation.
What should each role learn and demonstrate?
Learning must match the decisions people make, from recognising danger to checking that controls work.
Briefings should tell people how to act, but attendance alone does not show competence. Assess the real decision or task, record who assessed it and revisit after a material change, failed control or incident. A local authorisation is task-specific; no universal external certificate is implied.
On a small screen, scroll this table sideways to read all columns.
| Role and learning | Demonstration and assessor | Record and reassessment trigger |
|---|---|---|
| Concrete cutter | Demonstrate shroud/water, zone and stop response; supervisor assesses. | Observed task; repeat after tool change. |
| Supervisor | Inspect capture, housekeeping and other-trade exposure; hygienist reviews complex task. | Inspection and corrective action; reassess after escape. |
| RPE user | Demonstrate fit, seal check and limitations; competent trainer assesses. | Fit test and observation; retest after facepiece/fit change. |
Which dust duties apply by location?
GB COSHH 2002 and NI COSHH (NI) 2003 require task-specific exposure assessment and control; asbestos needs its separate regime.
The HSE COSHH assessment guide applies to GB hazardous dust work. HSENI COSHH is the NI route. A workplace exposure limit is not a target or a guarantee of safety; source controls and review still matter. Health surveillance depends on actual exposure and risk, especially for wood dust or silica, and an occupational-health professional should set the method. Identify potential asbestos before intrusive work and follow the separate legal process; do not assume a general dust plan covers it.
On a small screen, scroll this table sideways to read all columns.
| Location | Official route | Practical check |
|---|---|---|
| Great Britain | COSHH 2002 and HSE construction dust guidance. | Task assessment, source control, maintenance and review. |
| Northern Ireland | COSHH (NI) 2003 and HSENI silica guidance. | NI task assessment, control, fit and review. |
HSE exposure-limit guidance explains that GB limits are concentrations averaged over specified periods. Assess exposure by an appropriate sampling strategy where needed; a momentary observation cannot establish compliance. For carcinogens, mutagens and asthmagens, exposure must also be reduced as low as reasonably practicable. Apply the NI legal route to NI work.
What do HSE enforcement and campaigns show about construction dust?
HSE enforcement activity shows that dry cutting, weak dust suppression and poor respiratory control remain serious issues in construction.
Construction dust is often underestimated because the harm is delayed. HSE has highlighted engineered stone and silica exposure because serious disease can follow repeated uncontrolled dust exposure.
| Public case source | What happened | Learning point |
|---|---|---|
| HSE Media Centre: no dry cutting of engineered stone | HSE made clear that dry cutting of engineered stone is unacceptable and water suppression is expected. | High-silica tasks must be designed around dust prevention, not controlled by masks alone. |
| HSE construction dust guidance | HSE states construction dust is a real risk to lungs and identifies silica, wood and general dust. | Dust controls should be planned using assess, control and review. |
What should the risk or assurance register include for construction dust?
A useful register links the hazard to exposed people, controls, evidence, owners and review triggers.
| Register field | What to record | Why it matters |
|---|---|---|
| Dust-generating tasks | Tasks, materials, tools and locations that create dust. | Helps prioritise high-risk work. |
| Critical controls | Water, extraction, vacuums, segregation and RPE. | Shows what must be checked before work. |
| Health risk group | Workers regularly cutting, grinding, sanding or sweeping. | Supports training and health surveillance decisions. |
| Review triggers | New material, dust complaint, RPE failure, inspection finding or method change. | Keeps the dust plan live. |
How could BuildOut Ltd manage construction dust?

BuildOut Ltd would reduce the dusty work where possible, control remaining emissions at source and check that the full method protects the operator and others.
BuildOut Ltd · practical example
Plan a sanding task around dust control and nearby people
The key lesson Dust control includes the task, neighbouring exposure, cleaning and maintenance; respiratory protection is one layer of the method.
The situation: A finishing crew is due to sand walls beside an occupied office. Opening windows and issuing masks would leave the release, migration and cleaning arrangements unresolved. BuildOut would plan those parts together.
Why this matters: Repeated construction-dust exposure can cause lasting disease even when an individual shift causes no obvious immediate illness.
How BuildOut Ltd would manage it
- Reduce the dust-producing task — Project Manager. Discuss finishing quality, materials and preparation with the designer and trade. Consider methods that avoid or reduce sanding before selecting controls for the work that remains.
- Choose a complete control method — Health and Safety Manager. Use task-specific guidance and competent advice to match tools, extraction, segregation and any necessary respiratory protection. Identify how the occupied area and other trades will be protected.
- Check the equipment combination — Plant and Procurement Coordinator. Provide compatible tools, extraction and consumables with the required maintenance arrangements. A vacuum cleaner available on site is not automatically suitable for the dust and application.
- Observe the work — Trade Supervisor. Check that extraction and other precautions are used as intended. Respond to leaks, damaged equipment, spreading dust or unavailable protection by stopping the affected task and resolving the cause.
- Control the whole shift — Site Manager. Include assessed cleaning, waste handling and handover in the method. Check that adjacent users are protected and use recurring defects to improve purchasing, training or maintenance.
When the conditions change
- Recognise the trigger
- The intended source control or separation is absent or ineffective.
- Make the immediate decision
- Pause sanding if extraction, separation or required respiratory protection cannot be used effectively.
- Verify the next step
- The Trade Supervisor observes the specified tool and extraction functioning at the sanding task, confirms occupied-area separation and required RPE arrangements, and checks that cleaning controls are available.
What good looks like
Dust is controlled where it is generated and does not simply move into someone else's breathing zone. The crew can explain equipment checks, protection limits and the cleaning method.
Evidence to look for: Task assessment, source-control selection, equipment and maintenance records, required RPE arrangements, observations and cleaning checks.
Common mistake to avoid: Equating a tidy-looking room or open window with adequate dust control.
Apply this to your work: Where will the dust go during the task and its clean-up?
Guidance behind the management approach: HSE: construction dust. Use the topic's legal and technical guidance for the applicable work and location.
BuildOut Ltd is a construction contractor carrying out refurbishment, fit-out, drilling, chasing, cutting, demolition and finishing work. Its dust risks include respirable crystalline silica from concrete and masonry, wood dust, plasterboard dust and mixed refurbishment dust.
The company would treat dust as a planned health risk rather than an unavoidable by-product of construction. The strongest controls would be decided before work starts, then verified during the task.
| Management area | How the business manages it | Documented system or evidence | How it learns and improves |
|---|---|---|---|
| Planning and risk assessment | Identifies dusty tasks at tender, design, programme and RAMS review stage. The planner challenges whether cutting can be avoided, reduced, moved off site, pre-formed or completed using lower-dust methods. | Dust risk register, design risk review, COSHH assessments, RAMS, pre-construction information and task-specific permits where needed. | Post-job reviews capture whether the method actually controlled dust, whether extra cutting occurred and whether the RAMS needs improving. |
| Equipment and procurement | Specifies water suppression, on-tool extraction, M-class vacuums, suitable blades, enclosed cutting areas and compatible respiratory protective equipment before labour is sent to site. Equipment is selected for the material and duration, not simply what is available in the van. | Procurement standard, plant issue records, inspection checklist, maintenance records, face-fit records and supplier information. | Defect trends such as blocked filters, missing shrouds or poor water supply are reviewed to improve plant selection and maintenance. |
| Training and contractor control | Briefs operatives and subcontractors on silica risk, visible dust warning signs, wet cutting, extraction use, cleaning methods, RPE use and stop-work triggers. Supervisors are trained to challenge dry cutting and sweeping. | Induction, toolbox talks, subcontractor pre-start checks, competence records, RAMS briefings and daily supervisor observations. | Dust observations, worker feedback and health surveillance themes feed into refresher training and contractor performance reviews. |
| Checking, health surveillance and improvement | Supervisors inspect dusty tasks while they happen, not just after the area has been cleaned. Higher-risk groups are considered for health surveillance and exposure monitoring where needed. | Site inspection records, occupational health referrals where applicable, exposure monitoring, close-out logs and management review minutes. | Repeated non-compliance triggers review of supervision, procurement, disciplinary standards, method design and whether work should pause until controls are reliable. |
What does construction dust require for NEBOSH Construction Certificate study?
For construction safety study, construction dust is a useful example because it is a chemical and biological agent exposure topic with serious long-term health outcomes.
Good study answers should show that construction dust is not simply a housekeeping issue. It is a foreseeable occupational health exposure that must be planned out before cutting, grinding, chasing, drilling, demolition, sweeping or material handling begins.
| Qualification criteria | Context of the topic | What learners should know | How to apply it in practice | Scenario-based understanding |
|---|---|---|---|---|
| construction safety study: chemical and biological agents | Construction dust is a practical example of exposure to hazardous substances, particularly respirable crystalline silica, wood dust and mixed nuisance dusts. | Know the health effects, dust types, exposure routes, high-risk tasks, control hierarchy, health surveillance and respiratory protective equipment requirements. | Plan work using safer methods, water suppression, on-tool extraction, local exhaust ventilation, segregation, cleaning standards, suitable respiratory protective equipment and supervision. | A worker dry-cutting concrete kerbs with a disc cutter should trigger questions about pre-planning, wet cutting, extraction, exclusion zones, face-fit-tested respiratory protective equipment and supervisor checks. |
| Assessment focus | Construction dust risk changes with material, tool, duration, location and the effectiveness of controls. | Know why visible dust is a warning sign but not the only indicator of harmful exposure. | Use method statements and permits where needed to specify tool choice, water supply, extraction class, housekeeping and waste disposal. | A refurbishment job chasing walls indoors needs controls for silica dust, occupied areas, ventilation, cleaning, vulnerable occupants and contractor coordination. |
| Exam application | Scenario questions often test whether learners can identify practical controls and weaknesses in site arrangements. | Recognise poor answers that rely only on masks or generic training. | Prioritise elimination, reduced cutting, off-site fabrication, wet methods, extraction, enclosure and then suitable personal protective equipment. | If a site has dust clouds, dry sweeping and no face-fit records, the answer should connect health risk, COSHH duties, supervision failure and corrective action. |
How can a management system sustain effective decisions?
Give each hazard or support route an owner, a control, a check and a response to failure.
Track design choices, task-specific COSHH controls, equipment defects, exposure evidence and worker health signals. Review after method, material or control change. An owner should sample actual work and corrective actions, not accept a policy or certificate as evidence that the controls work.
The free GB regulator guide HSE Managing for health and safety (HSG65) explains a plan–do–check–act approach: assign controls and owners, involve workers, check work as done, and correct failures. For Northern Ireland, use HSENI risk assessment guidance for the local duty. A certificate alone does not demonstrate that a control works.
What are the warning signs that construction dust is not being managed well?
Poor dust control is visible when dusty work is treated as normal, extraction is unreliable and respiratory protection is used as the main control instead of the last line of defence.
Construction dust harms by repeated inhalation of fine particles, often before anyone feels unwell. Warning signs should be treated as exposure events, because diseases such as silicosis, occupational asthma and chronic obstructive pulmonary disease can develop after repeated poorly controlled work.
| Warning sign | How it can cause harm | How it may show up at work |
|---|---|---|
| Visible dust clouds during cutting, drilling or sweeping | Fine respirable dust may be entering workers lungs and spreading to nearby trades. | Dry cutting, dust hanging in indoor air, dusty clothes, dust settling on ledges, or other trades working nearby. |
| No water suppression or on-tool extraction | The source of dust is uncontrolled, so RPE has to carry too much of the protection burden. | Cut-off saws used dry, missing shrouds, poor water supply, blocked vacuum filters or damaged hoses. |
| RPE is issued without fit and use checks | Workers may believe they are protected while contaminated air leaks around the face seal. | No face-fit records, stubble, shared masks, dirty masks in toolboxes, missing filters or poor compatibility with eye protection. |
| Cleaning creates more airborne dust | Dust that settled after the task is re-suspended and inhaled by workers and cleaners. | Dry sweeping, compressed air, dusty waste bags, no M-class vacuum, contaminated welfare routes. |
| RAMS do not match site reality | Planning controls fail because the task changes, equipment is missing or supervision is weak. | Generic method statements, dusty work added at short notice, no supervisor challenge or repeated subcontractor non-compliance. |
Chemical hazard symbols: what do they mean?
Exploding bomb
Explosive, self-reactive or organic peroxide hazards.
Flame
Flammable, self-heating or pyrophoric substances.
Flame over circle
Oxidising substances that can intensify fire.

Gas cylinder
Gas under pressure.
Corrosion
Skin burns, eye damage or corrosive to metals.
Skull and crossbones
Acute toxicity.

Exclamation mark
Irritation, harmful effects or skin sensitisation; some classifications cover drowsiness, dizziness or ozone-layer hazard. Read the actual hazard statements. Skin sensitisation differs from respiratory sensitisation.
Health hazard
Serious health hazards, including organ damage, aspiration hazard, respiratory sensitisation, cancer and reproductive effects; some can follow a single exposure.
Environment
Hazardous to the aquatic environment.
What acronyms and terms should readers understand for construction dust?
The main acronyms should be defined before they are used in controls, records or training.
| Acronym or term | What it means | Why it matters |
|---|---|---|
| RCS | Respirable crystalline silica. | Fine silica dust that can reach deep into the lungs and cause silicosis and cancer. |
| RPE | Respiratory protective equipment. | Masks or respirators used where dust remains after stronger controls. |
| LEV | Local exhaust ventilation. | Extraction used to capture dust near the source. |
| WEL | Workplace exposure limit. | Legal exposure limit for airborne substances such as silica and wood dust. |
| FFP3 | Filtering facepiece class 3. | A common disposable mask protection level used for high dust tasks when suitable. |
| M-class vacuum | Medium hazard class vacuum. | Common vacuum class used for construction dust control and cleaning. |
Which BuildOut documents support this topic?
Download individual editable BuildOut documents for this topic. Procedures and plans contain completed arrangements; forms, checklists, assessments, RAMS and permits are blank masters. Registers include separate worked examples.
| Document | Purpose and content | Editable download |
|---|---|---|
| Substance assessment, exposure control and monitoring procedure BOUK-PRO-COSHH · Completed worked example · v1.0 | Use task-specific COSHH assessments, competent RPE selection/fit testing and effective control verification. | Download DOCX Read preview |
| Task-specific COSHH assessment BOUK-RA-COSHH-01 · Blank editable master · v1.0 | Assess actual exposure routes and select effective controls beyond the safety data sheet. | Download DOCX Read preview |
| Silica and construction-dust control RAMS BOUK-RAMS-COSHH-01 · Blank editable master · v1.0 | Specify cutting method, water/extraction, RPE, cleaning and exclusion controls. | Download DOCX Read preview |
| RPE selection and face-fit record BOUK-FRM-COSHH-01 · Blank editable master · v1.0 | Record compatible RPE, face-fit result, training and limitations. | Download DOCX Read preview |
| LEV and exposure-monitoring evidence register BOUK-REG-COSHH-01 · Blank register with separate worked entries · v1.0 | Track control checks, thorough examinations/tests, monitoring and remedial actions. | Download XLSX Read preview |
| Biological agents, water hygiene and contaminated-ground assessment BOUK-RA-COSHH-02 · Blank editable master · v1.0 | Assess sewage, animal contamination, standing water and welfare water-system risks. | Download DOCX Read preview |
| Hazardous-substance storage, spill and waste check BOUK-CHK-COSHH-01 · Blank editable master · v1.0 | Verify labelling, segregation, containers, spill response and controlled disposal. | Download DOCX Read preview |
| Screeding, flooring and tiling RAMS BOUK-RAMS-COSHH-02 · Blank editable master · v1.0 | Wet materials, adhesives, dust, cutting, kneeling and occupied-area segregation. | Download DOCX Read preview |
| Painting, coating and spray application RAMS BOUK-RAMS-COSHH-03 · Blank editable master · v1.0 | Product substitution, ventilation, skin/respiratory exposure, fire and access. | Download DOCX Read preview |
| Drilling, chasing, core cutting and grinding RAMS BOUK-RAMS-COSHH-04 · Blank editable master · v1.0 | Hidden services, silica, noise, vibration, rotating equipment and slurry/waste control. | Download DOCX Read preview |
| Insulation and fire-stopping installation RAMS BOUK-RAMS-COSHH-05 · Blank editable master · v1.0 | Product exposure, access, confined areas and quality/safety-critical interfaces. | Download DOCX Read preview |
Review and adapt the documents for your organisation, activities and jurisdiction before approval and issue. Open the SHAREms management-system hierarchy to find each document under its parent policy.