SHARE Knowledge Hub
What is cement dust and why is it hazardous at work?
Dry cement powder irritates airways and skin; wet cement can cause serious alkaline burns and dermatitis. Cutting hardened concrete or mortar can also release respirable crystalline silica, a separate long-term lung hazard. Plan low-dust methods, capture dust at source, prevent wet skin contact and provide prompt washing and medical escalation.
Understanding What is cement dust and why is it hazardous at work?
Cement work is not one exposure. Dry cement powder can irritate the airways, eyes and skin; wet cement, mortar, concrete and slurry are strongly alkaline and can cause serious burns and dermatitis; and cutting, drilling, grinding or scabbling cured concrete and mortar can generate respirable crystalline silica (RCS), which can cause silicosis, chronic obstructive pulmonary disease and lung cancer. The material state and task must therefore be identified before advice is given.
Why this matters at work
Silicosis is irreversible scarring of the lungs caused by inhaling RCS. It can progress after exposure ends and may cause increasing breathlessness, cough, fatigue and reduced exercise tolerance. High exposure can produce accelerated or acute disease; cumulative lower exposure can cause chronic disease after a long latency. Prevention is the primary protection because established fibrosis cannot be reversed by workplace controls.
Large particles may be trapped in the upper airway and cause irritation, while smaller particles can reach bronchioles and alveoli. Lung clearance can be overwhelmed or impaired by repeated exposure. RCS particles can provoke persistent inflammation and fibrosis. Smoking, pre-existing respiratory disease and combined workplace exposures can worsen functional consequences, but do not transfer responsibility away from exposure control.
How organisations manage this in practice
Apply the COSHH principles of good control practice: design and operate processes to minimise emission and spread, consider all routes, control by measures proportionate to risk, choose reliable options, review effectiveness, provide suitable PPE where needed, inform and train, and ensure the controls do not create new risks. For RCS generated by a work process, HSE and HSENI guidance requires exposure reduced as low as is reasonably practicable as well as below the relevant WEL; apply the separate GB or NI COSHH regime.
Document the elimination decision at design, procurement and method-review stages. If elimination is rejected, record the technical and operational reason and move to the next hierarchy level. 'We have always done it this way' and availability of masks are not reasonable evidence that source elimination was considered.
Client, principal designer and principal contractor duties under CDM should remove or control dust and contact through design, pre-construction information, construction-phase planning, cooperation and coordination. Contractor assessment should test equipment, health surveillance, fit testing, exposure data, maintenance and incident history, not accept a generic policy alone.
If wet cement gets into boots, gloves, sleeves, clothing or eyes, treat it as a serious exposure risk: stop the task, remove contamination where safe, use the site washing or eyewash arrangements and follow the first-aid procedure. Wet cement can keep burning while trapped against skin, and cutting or breaking dried concrete or mortar can also release harmful dust. Skin burns, eye exposure, breathing difficulty, persistent cough, wheeze, chest tightness or repeated skin symptoms should be escalated through site first-aid, NHS, GP or occupational health routes as appropriate.
Who needs to understand cement dust?
Cement dust should be understood by workers, supervisors, contractors, designers, site managers, H&S advisers and occupational health teams.
Construction workers
Need to recognise inhalation, skin, eye and wet cement hazards.
Supervisors
Need to plan controls, check RPE/PPE and stop dry uncontrolled work.
Site managers
Need to coordinate welfare, dust control, subcontractors and inspections.
Designers and planners
Need to reduce dusty methods through design, specification and sequencing.
H&S advisers
Need to assess COSHH, RCS, RPE, LEV and health surveillance.
Occupational health
Need to support skin checks, respiratory concerns and exposure-related referrals.
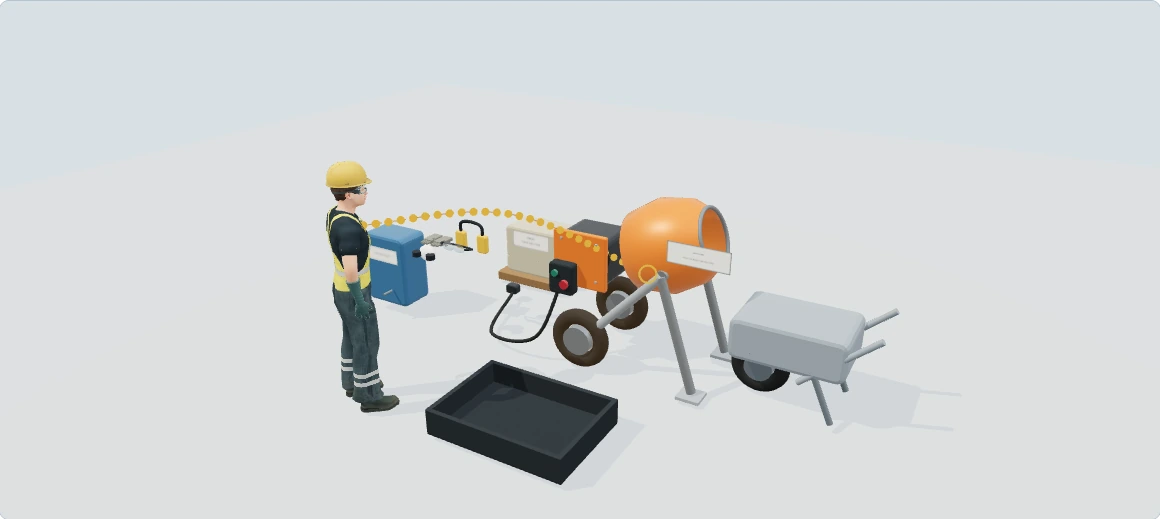

Cement mixing: rotating machinery, airborne powder and wet burns
Explore how this equipment can harm its users and other people, then follow the practical measures that interrupt each pathway. This is a hazards and good-practice lesson; the separate checklist remains the pre-use/safety-check activity.
Hazards and good practice: learn what can hurt people during use, change and maintenance. Pre-use and safety checks stay in the separate checklist.
Checksheets and risk assessments
Equipment checksheets
Risk assessment forms
Risk assessment examples
Forms and tools
Full written walkthrough — all 8 steps
1. Plan the material and mixing method
What is happening: Receiving bags, charging the mixer, placing product and cleaning are linked parts of the task.
How harm can occur: A method that controls one stage can leave others exposed to dust, strain or moving machinery.
Best practice to apply: Consider supply and ready-mixed options that remove difficult transfers and powder handling; assess the remaining task.
Why this works: Changing supply or process can remove exposure rather than simply adding PPE to each stage.
What is cement dust and why is it hazardous at work? · Choose dry powder, wet cement or hardened-material cutting2. Control dry powder at release
What is happening: Opening and emptying a bag can release fine material before mixing begins.
How harm can occur: Inhaled dust can harm airways and irritate eyes; the composition and task determine the assessment.
Best practice to apply: Identify the product and use suitable enclosed/controlled transfer and dust controls, with assessed residual protection.
Why this works: Controlling release protects the person tipping the bag and other people nearby.
What is cement dust and why is it hazardous at work? · Choose dry powder, wet cement or hardened-material cutting3. Recognise that wet cement is a different hazard
What is happening: Wet product and slurry remain hazardous even when airborne powder is reduced.
How harm can occur: Alkaline material trapped against skin can cause dermatitis or deep chemical burns without severe initial pain.
Best practice to apply: Prevent skin/eye contact through suitable work methods and protective clothing, with effective welfare and prompt response to contamination.
Why this works: Removing visible dust does not remove chemical harm from wet material held in boots, gloves or clothing.
What is cement dust and why is it hazardous at work? · Choose dry powder, wet cement or hardened-material cutting4. Keep people away from moving parts
What is happening: The drum and its drive act on material and can also act on a person's clothing or limbs.
How harm can occur: Reaching into moving equipment or exposing a transmission can entangle, draw in or crush.
Best practice to apply: Use suitable guarding and methods that keep charging and work outside dangerous movement; do not bypass protection.
Why this works: The method has to keep the person away while the machine is capable of moving.
Mechanical hazards · How can a roller nip point cause serious injury?5. Organise material movement and footing
What is happening: Bags, trolleys, the mixer and the placing route affect posture, force and access.
How harm can occur: Heavy or awkward transfers, slippery slurry and trailing equipment can cause strains, slips and secondary contact.
Best practice to apply: Redesign transfers, provide suitable handling assistance and maintain the actual work and placing routes.
Why this works: A manageable supply path reduces repeated force and prevents contamination creating a walking hazard.
What is cement dust and why is it hazardous at work? · What welfare is needed?6. Separate cleaning from operating
What is happening: Residue removal or jam clearance may require access that normal mixing does not.
How harm can occur: Unexpected start or drum movement can trap someone while they clean or reach inside.
Best practice to apply: Use the actual competent isolation, securing and cleaning procedure before intrusive access; a stop button alone is not isolation.
Why this works: Cleaning changes where people can reach, so production guarding and stop arrangements alone may not suffice.
Mechanical hazards · When should work involving mechanical hazards stop?7. Contain washout and protect helpers
What is happening: Wash water, slurry and contaminated tools can spread exposure beyond the mixer.
How harm can occur: Wet contamination can harm cleaners, waste handlers and people using the surrounding area.
Best practice to apply: Use suitable contained washout, safe waste arrangements and washing facilities; keep contaminated routes and items controlled.
Why this works: Containment prevents moving the hazard from the workpiece to the cleaner or the next user.
What is cement dust and why is it hazardous at work? · What forms can cement-related exposure take?8. Review the full task and return it safely
What is happening: Wear, damaged guarding and reported skin or breathing problems are evidence that the arrangement needs review.
How harm can occur: Repeating the same task without correcting causes can worsen health harm or lead to mechanical injury.
Best practice to apply: Stop unsafe work, report symptoms/defects and verify competent repairs and suitable task controls before return.
Why this works: A clean appearance or completed check cannot substitute for an effective work method and resolved defects.
Mechanical hazards · How should mechanical hazards be assured?
Illustrative awareness learning. Geometry, colours and movement do not establish safe distances, capacity, exposure, isolation or work permission. Use the actual assessment, equipment information and competent arrangements.
The wider workplace has its own account and subscription access. Exploring this lesson does not grant access, record course completion or authorise work.
How can I practise this topic in 3D?

A concrete hose is cleared without controlling pressure
All related inspection points 2 across 1 location
Construction site 2 inspection points
Practice in the SHAREhub environment. Browser practice is separate from workplace competence and formal learning records.
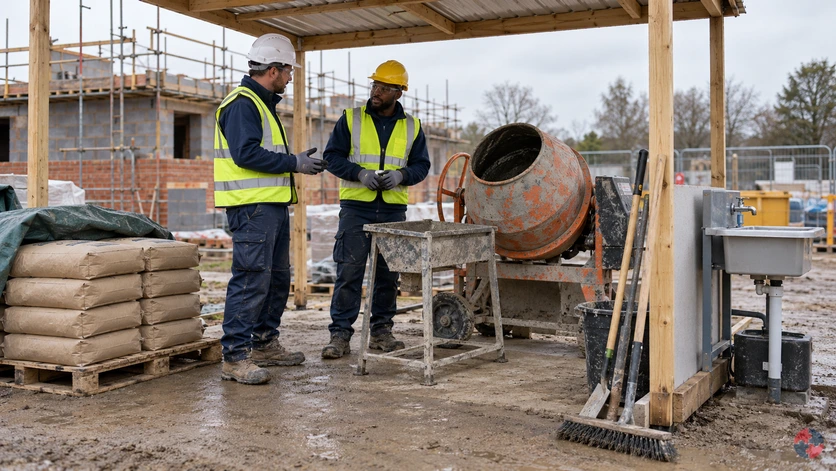
Choose dry powder, wet cement or hardened-material cutting
Compare three tasks. Emptying a cement bag calls for controlled handling of dry powder and its airborne and skin-contact routes. Screeding brings prolonged wet alkaline contact, contaminated clothing and welfare into the decision. Cutting hardened concrete or mortar needs a separate assessment of dust, including silica-bearing material; it is not answered by the cement-bag assessment.
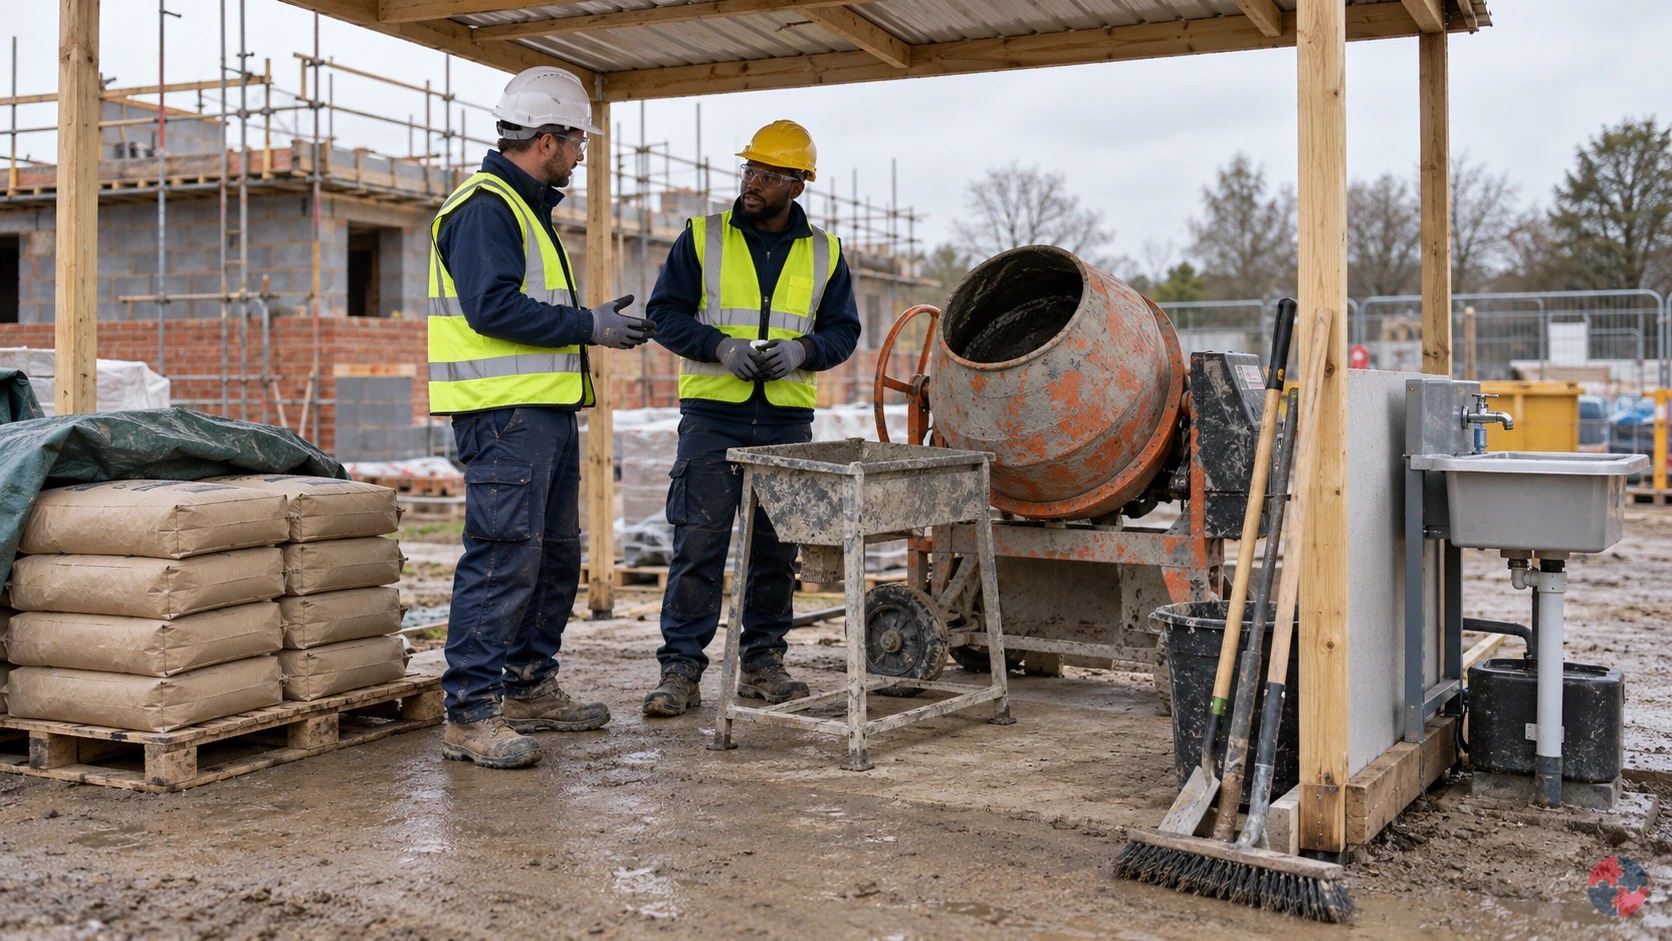
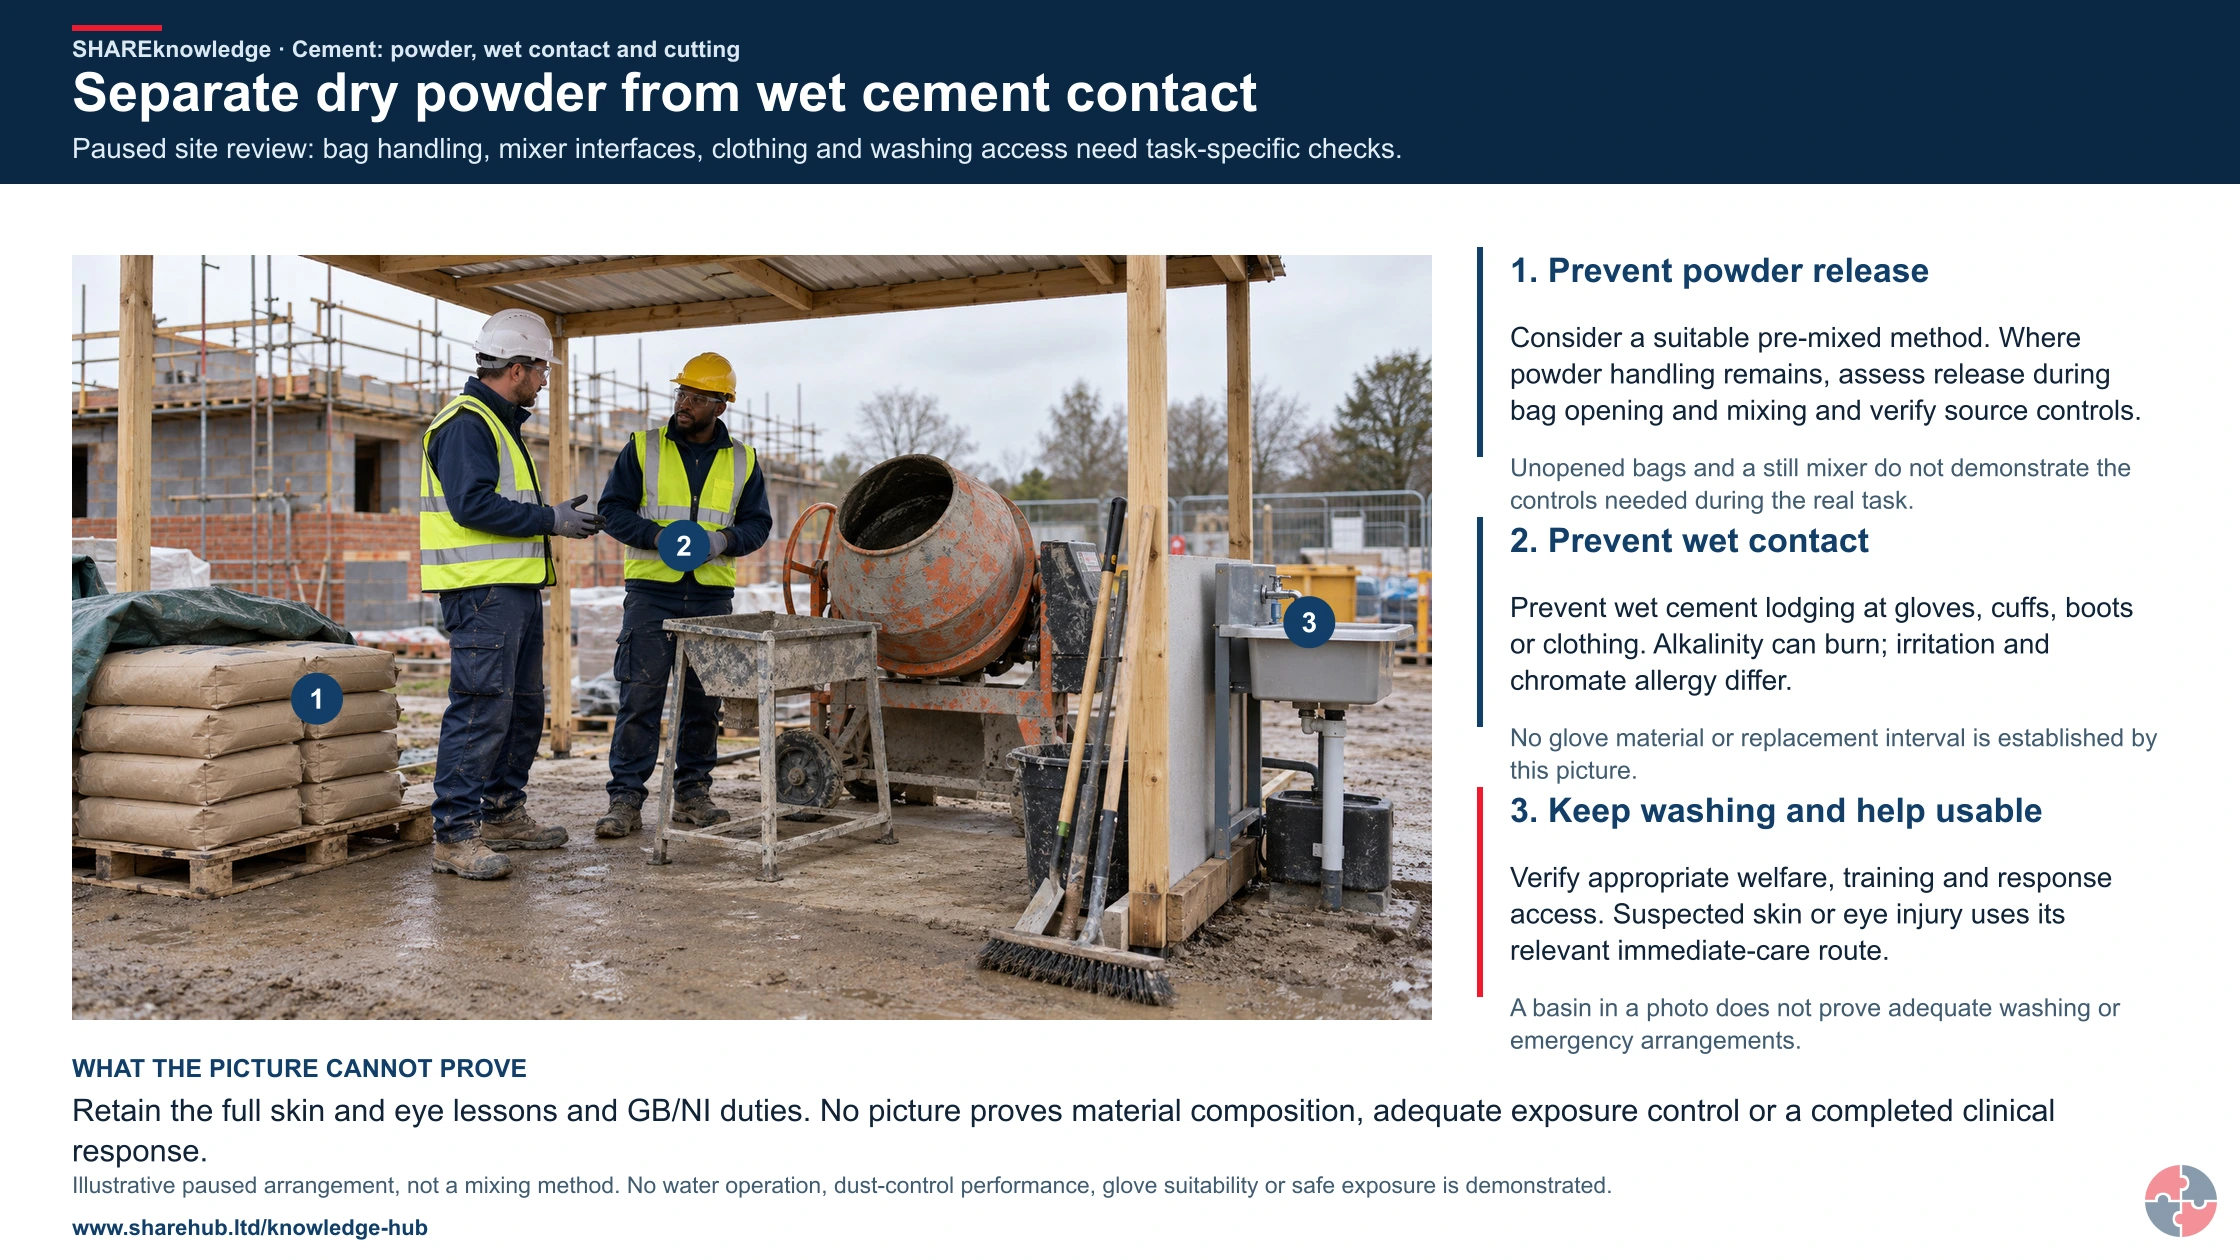
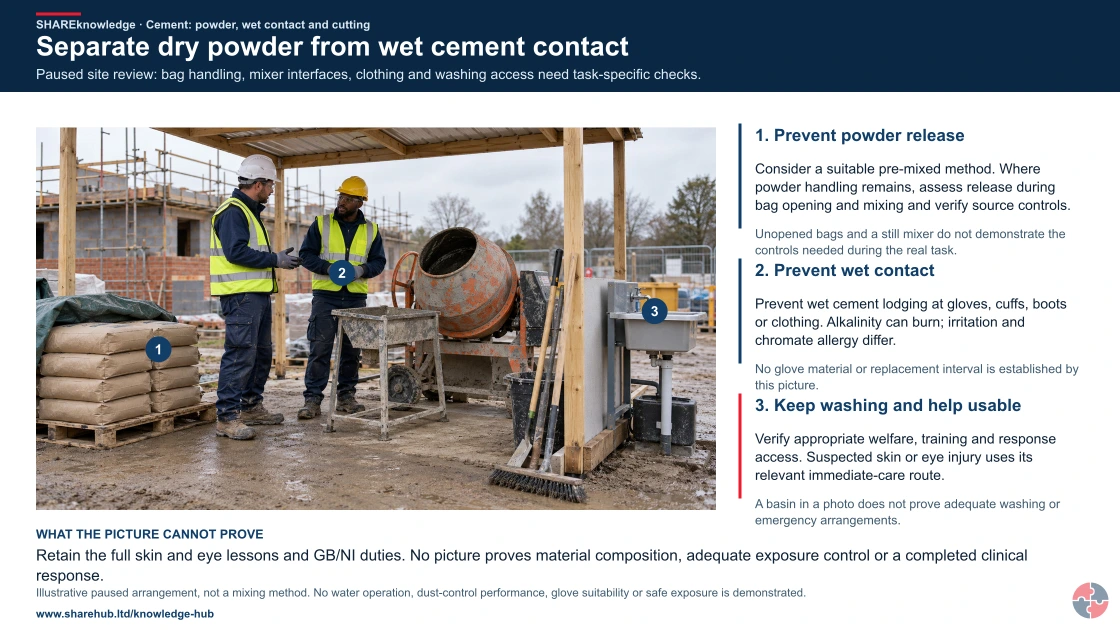
Separate dry powder from wet cement contact
Full written explanation
Paused site review: bag handling, mixer interfaces, clothing and washing access need task-specific checks.
- Prevent powder release. Consider a suitable pre-mixed method. Where powder handling remains, assess release during bag opening and mixing and verify source controls.
- Prevent wet contact. Prevent wet cement lodging at gloves, cuffs, boots or clothing. Alkalinity can burn; irritation and chromate allergy differ.
- Keep washing and help usable. Verify appropriate welfare, training and response access. Suspected skin or eye injury uses its relevant immediate-care route.
Change the pathway
- The shelter is not dust containment. Unopened bags and a still mixer do not demonstrate the controls needed during the real task.
- Check clothing and actual protection. No glove material or replacement interval is established by this picture.
- Use the correct response. A basin in a photo does not prove adequate washing or emergency arrangements.
Evidence check: Retain the full skin and eye lessons and GB/NI duties. No picture proves material composition, adequate exposure control or a completed clinical response.
Full skin/eye prevention and immediate-response guidance, with existing anatomy lessons
Primary references: HSE: cement contact risks (GB) · HSE: construction dust (GB) · HSE: skin-risk prevention (GB)
Open the complete HD image (new tab)Download image
Full skin/eye prevention and immediate-response guidance, with existing anatomy lessons
Primary references: HSE: cement contact risks (GB) · HSE: construction dust (GB) · HSE: skin-risk prevention (GB)
Best-practice guide: Cement Dust
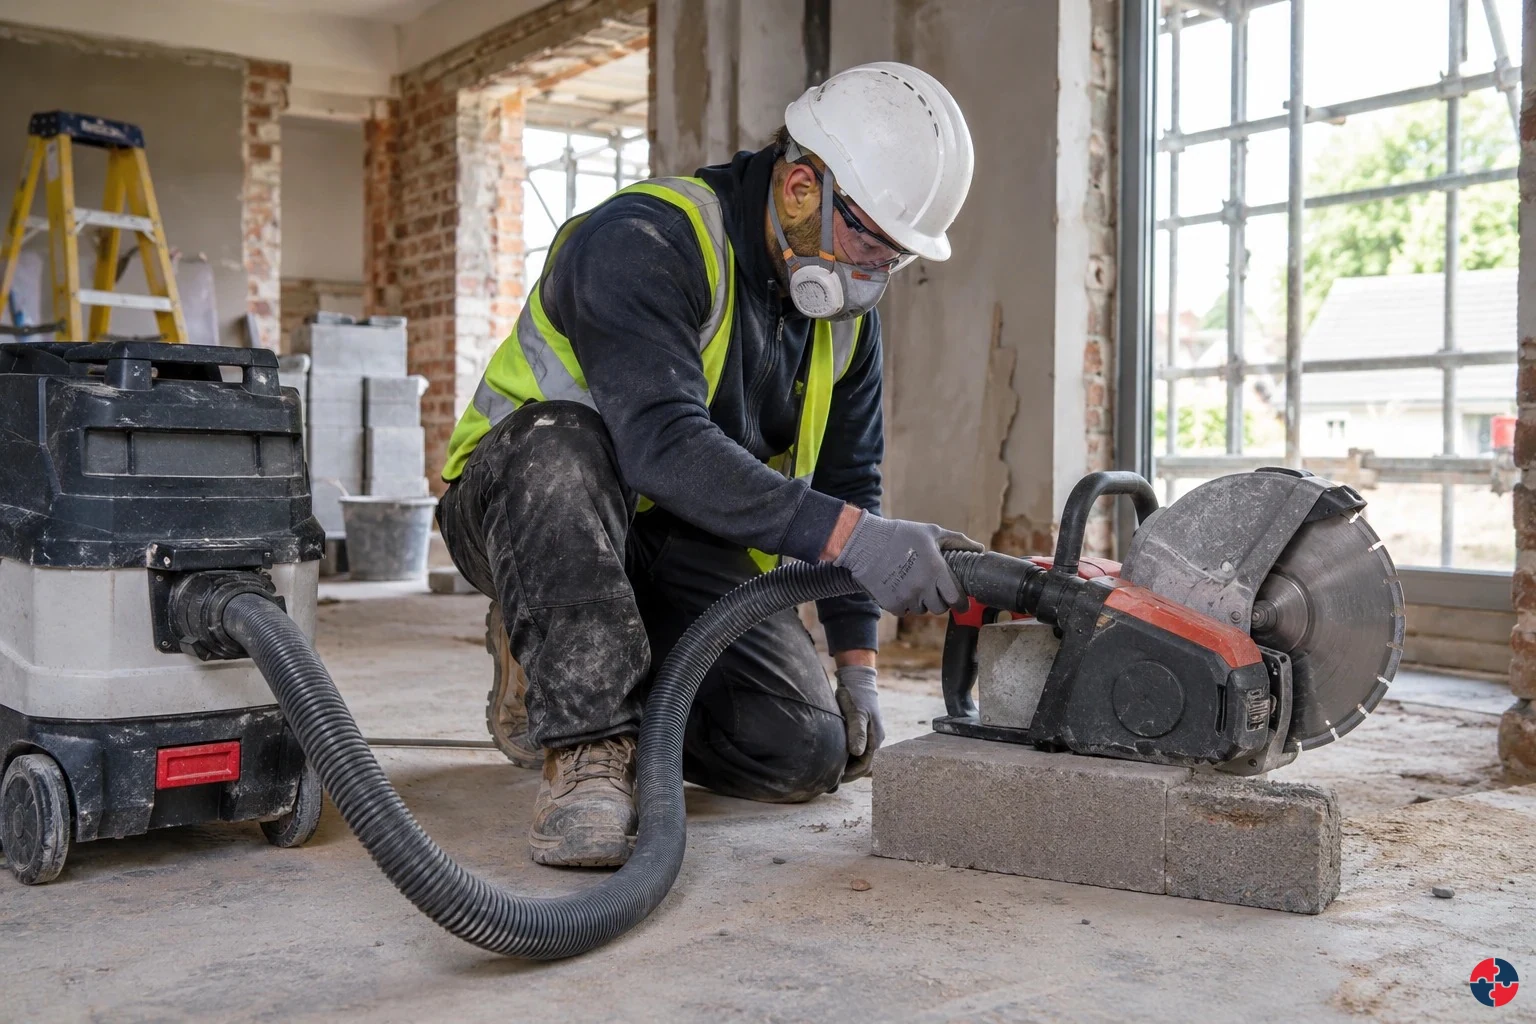
Choose dry powder, wet cement or hardened-material cutting
Compare three tasks. Emptying a cement bag calls for controlled handling of dry powder and its airborne and skin-contact routes. Dry cement powder irritates airways and skin; wet cement can cause serious alkaline burns and dermatitis.
Turn cement dust knowledge into a decision
Dry cement powder irritates airways and skin; wet cement can cause serious alkaline burns and dermatitis. Cutting hardened concrete or mortar can also release respirable crystalline silica, a separate long-term lung hazard. COSHH and construction dust assessment.
the site team management approach
Assess: Identifies dry dust, RCS, wet cement, skin and eye risks by task. Evidence / response: COSHH and construction dust assessment. Analyse: Reviews materials, methods, duration, location, nearby trades and welfare. Evidence / response: Pre-start risk review.
Health effects and warning signs
Airway irritation: Dust irritates nose, throat and airways. Silica-related lung disease: Fine RCS particles lodge deep in the lungs. Respiratory symptoms needing assessment: Cement powder irritates airways; assess the actual dust and other agents before attributing a disease.
Choose controls for cement dust
Eliminate: Avoid cutting or mixing on site by using pre-cut or pre-mixed products. Reduce: Reduce bag handling, cutting time, powder quantities and wet contact. Isolate: Segregate dusty work, use exclusion zones and protect adjacent trades. Control: Use water suppression, on-tool extraction, LEV, vacuum cleaning and welfare. PPE: Use suitable RPE, eye protection, gloves, clothing and footwear. Read the full control table for qualifications, ownership and verification. Use the actual task and applicable jurisdiction; existing technical approval remains unchanged.
Use the full cement dust lesson
Use the full topic for the decision points, practical examples, detailed control tables and source scope. HSE guidance applies to Great Britain; use HSENI for the Northern Ireland route and the source’s stated jurisdiction. A simplified guide does not change the page’s technical-review or approval status.
Read all six steps as text
1. Choose dry powder, wet cement or hardened-material cutting
Compare three tasks.
- Avoid / redesign: Avoid cutting or mixing on site by using pre-cut or pre-mixed products.
- Control the task: Segregate dusty work, use exclusion zones and protect adjacent trades.
- Verify before release: Design and procurement review.
Compare three tasks. Emptying a cement bag calls for controlled handling of dry powder and its airborne and skin-contact routes. Dry cement powder irritates airways and skin; wet cement can cause serious alkaline burns and dermatitis.
Apply it: Which part of this plan would you check at the workface before authorising the task?
2. Turn cement dust knowledge into a decision
Use the evidence to improve the actual work arrangement.
- Change at source: Avoid cutting or mixing on site by using pre-cut or pre-mixed products.
- Make it observable: Design and procurement review.
- Keep useful evidence: COSHH and construction dust assessment.
Dry cement powder irritates airways and skin; wet cement can cause serious alkaline burns and dermatitis. Cutting hardened concrete or mortar can also release respirable crystalline silica, a separate long-term lung hazard. COSHH and construction dust assessment.
Apply it: What evidence would show that the change improves this task, rather than only completing a record?
3. the site team management approach
Example: a practical application of the existing topic lesson.
- Assess: Identifies dry dust, RCS, wet cement, skin and eye risks by task.
- Analyse: Reviews materials, methods, duration, location, nearby trades and welfare.
- Train: Trains workers on dust, wet cement, RPE, skin protection and reporting.
Assess: Identifies dry dust, RCS, wet cement, skin and eye risks by task. Evidence / response: COSHH and construction dust assessment. Analyse: Reviews materials, methods, duration, location, nearby trades and welfare. Evidence / response: Pre-start risk review.
Apply it: At which point would you hold this example, and what evidence would allow it to proceed?
4. Health effects and warning signs
Connect the task, the route to the person and the control that can fail.
- Airway irritation: Dust irritates nose, throat and airways.
- Silica-related lung disease: Fine RCS particles lodge deep in the lungs.
- Respiratory symptoms needing assessment: Cement powder irritates airways; assess the actual dust and other agents before attributing a disease.
Airway irritation: Dust irritates nose, throat and airways. Silica-related lung disease: Fine RCS particles lodge deep in the lungs. Respiratory symptoms needing assessment: Cement powder irritates airways; assess the actual dust and other agents before attributing a disease.
Apply it: Who could be exposed, including other trades, cleaners, maintainers and people nearby?
5. Choose controls for cement dust
Start with the stronger practicable options and verify their effect.
- Eliminate: Avoid cutting or mixing on site by using pre-cut or pre-mixed products.
- Reduce: Reduce bag handling, cutting time, powder quantities and wet contact.
- Isolate: Segregate dusty work, use exclusion zones and protect adjacent trades.
- Control: Use water suppression, on-tool extraction, LEV, vacuum cleaning and welfare.
- PPE: Use suitable RPE, eye protection, gloves, clothing and footwear.
Eliminate: Avoid cutting or mixing on site by using pre-cut or pre-mixed products. Reduce: Reduce bag handling, cutting time, powder quantities and wet contact. Isolate: Segregate dusty work, use exclusion zones and protect adjacent trades. Control: Use water suppression, on-tool extraction, LEV, vacuum cleaning and welfare. PPE: Use suitable RPE, eye protection, gloves, clothing and footwear. Read the full control table for qualifications, ownership and verification. Use the actual task and applicable jurisdiction; existing technical approval remains unchanged.
Apply it: Which stronger option can be used here, and who will verify it before accepting the remaining risk?
6. Use the full cement dust lesson
Follow the official sources below and retain the task-specific evidence.
- Official guidance: HSE hierarchy of controls
- Official guidance: HSE cement health risks
- Task decision: COSHH and construction dust assessment.
Use the full topic for the decision points, practical examples, detailed control tables and source scope. HSE guidance applies to Great Britain; use HSENI for the Northern Ireland route and the source’s stated jurisdiction. A simplified guide does not change the page’s technical-review or approval status.
Apply it: Which official source and full-topic section will you use to resolve the next decision?
For each task identify the worker, nearby people, source-control method and a supervisor’s observable check. A missing water supply, ineffective extraction or unusable washing facility is a control failure to correct before work proceeds. Use the existing skin-and-eye route immediately after contact, then investigate the task and prevention arrangements separately; a normal air result does not establish safe skin contact.
BuildOut: a screed crew arrives before welfare is ready
Illustrative example. A crew has gloves and boots, but the wash point is unavailable and wet material may become trapped inside footwear.
Decision. The supervisor holds wet work until suitable washing and emergency arrangements work, and briefs prompt contamination reporting.
Evidence to check. Task-specific assessment, accessible water, suitable contact protection and a practised route from the workface.
Hold or escalation point. Do not start because PPE is present when the required welfare or emergency control is missing.
Follow-up. Check facilities during the shift and carry the learning into the next site’s pre-start arrangements.
Treat powder, wet cement and cutting as different tasks
Dry powder inhalation, wet cement contact and dust from hardened material are different exposure questions. The actual material composition matters.
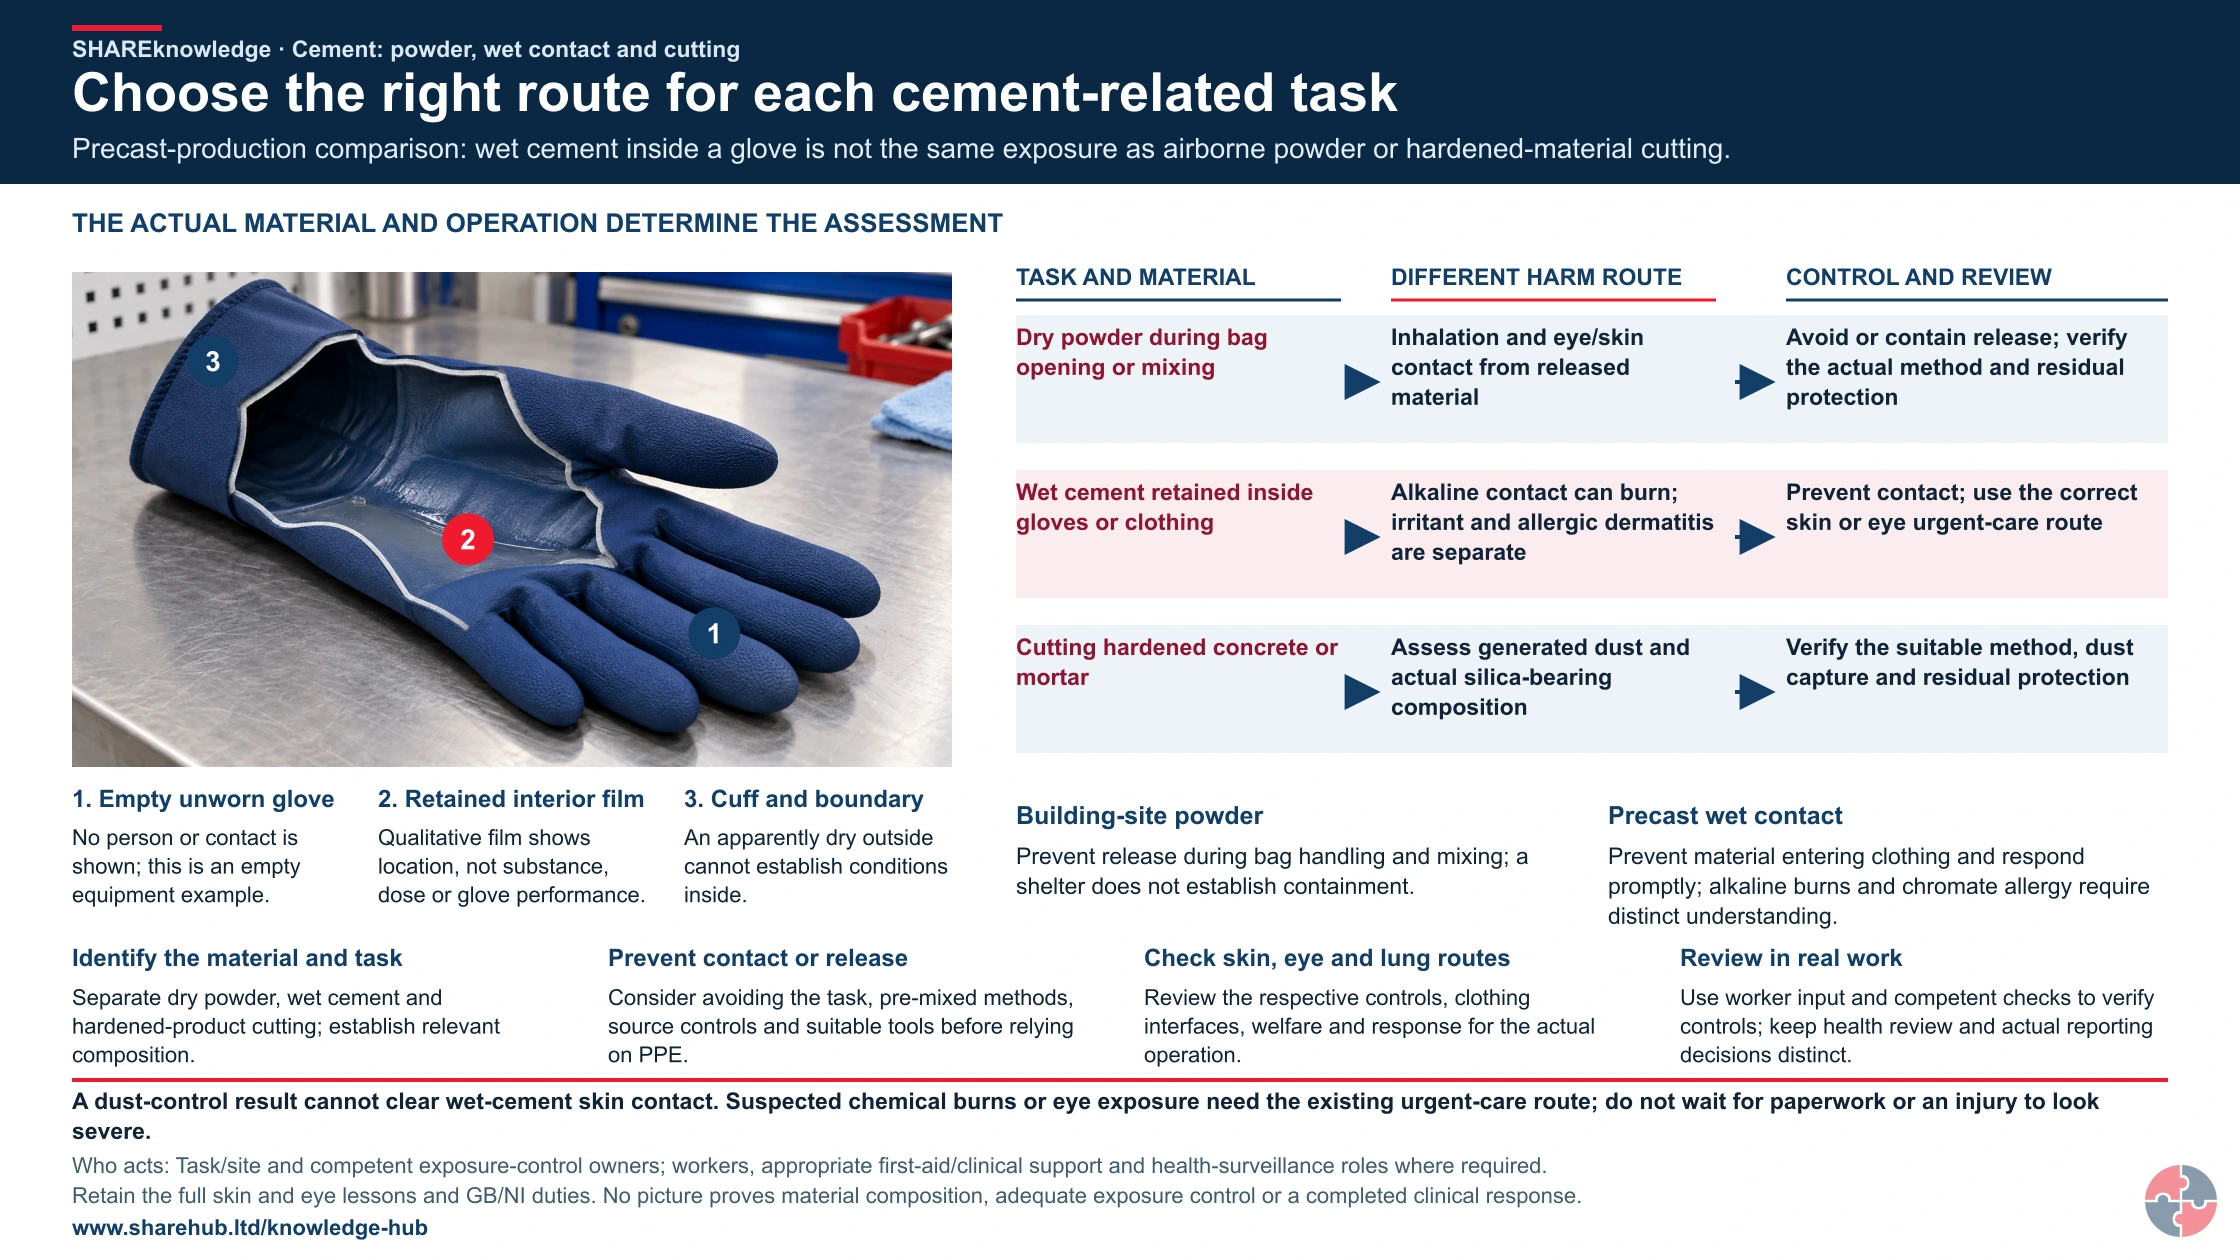
Choose the right route for each cement-related task
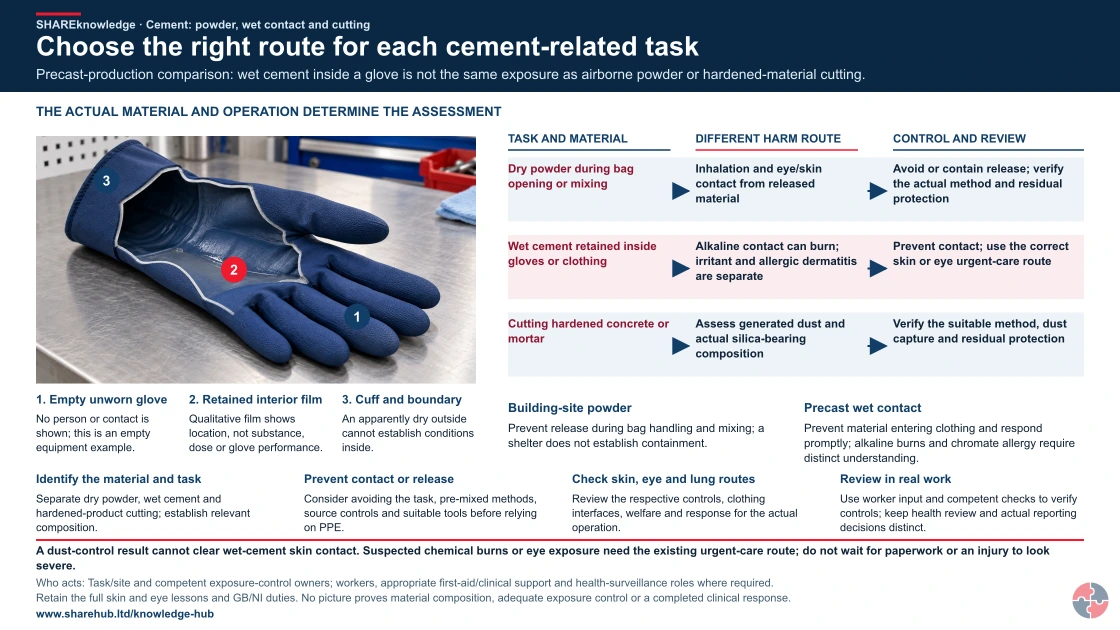
Full written explanation
An illustrative empty unworn glove cutaway shows five fingers, the cuff, a small qualitative film on an interior surface, and a dry exterior. Picture key: 1 identifies the empty unworn glove; 2 identifies the retained interior film; 3 identifies the cuff and boundary. There is no hand, skin, tissue, worn contamination or actual contact. The film illustrates an inside location only; it is not identified as cement, a chemical, water or a dose. The image supplies no glove material, thickness, compatibility, breakthrough, protection or performance result. It supports only the hidden interior-retention question; the workbench is not presented as a precast-production site. The complete original comparison keeps three distinct task rows: dry powder during bag opening or mixing, wet cement retained inside gloves or clothing, and cutting hardened concrete or mortar. Each row retains its own different harm route and control/review relationship. Their arrows stay within that row; the rows are not a common exposure or injury sequence. Alkaline burns, irritant effects and allergy remain distinct, and a dust-control result cannot clear wet contact. All four complete review checks remain alongside the matrix, with unnumbered independent headings. The original urgent skin and eye routes remain separate from task answers, paperwork and apparent severity. No active mixing, cutting, dust, splash, exposure, anatomy, injury, symptom, removal, cleaning, washing or treatment is demonstrated. Use the complete topic for its existing source, clinical, material-specific and GB/NI qualifications.
Precast-production comparison: wet cement inside a glove is not the same exposure as airborne powder or hardened-material cutting.
- Identify the material and task. Separate dry powder, wet cement and hardened-product cutting; establish relevant composition.
- Prevent contact or release. Consider avoiding the task, pre-mixed methods, source controls and suitable tools before relying on PPE.
- Check skin, eye and lung routes. Review the respective controls, clothing interfaces, welfare and response for the actual operation.
- Review in real work. Use worker input and competent checks to verify controls; keep health review and actual reporting decisions distinct.
When the evidence does not fit: A dust-control result cannot clear wet-cement skin contact. Suspected chemical burns or eye exposure need the existing urgent-care route; do not wait for paperwork or an injury to look severe.
Who acts: Task/site and competent exposure-control owners; workers, appropriate first-aid/clinical support and health-surveillance roles where required.
Changed workplace
Building-site powder: Prevent release during bag handling and mixing; a shelter does not establish containment.
Precast wet contact: Prevent material entering clothing and respond promptly; alkaline burns and chromate allergy require distinct understanding.
| TASK AND MATERIAL | DIFFERENT HARM ROUTE | CONTROL AND REVIEW |
|---|---|---|
| Dry powder during bag opening or mixing | Inhalation and eye/skin contact from released material | Avoid or contain release; verify the actual method and residual protection |
| Wet cement retained inside gloves or clothing | Alkaline contact can burn; irritant and allergic dermatitis are separate | Prevent contact; use the correct skin or eye urgent-care route |
| Cutting hardened concrete or mortar | Assess generated dust and actual silica-bearing composition | Verify the suitable method, dust capture and residual protection |
Evidence check: Retain the full skin and eye lessons and GB/NI duties. No picture proves material composition, adequate exposure control or a completed clinical response.
Full skin/eye prevention and immediate-response guidance, with existing anatomy lessons
Primary references: HSE: cement contact risks (GB) · HSE: construction dust (GB) · HSE: skin-risk prevention (GB)
Open the complete HD image (new tab)Download image
Full skin/eye prevention and immediate-response guidance, with existing anatomy lessons
Primary references: HSE: cement contact risks (GB) · HSE: construction dust (GB) · HSE: skin-risk prevention (GB)

Dry powder
Assess release at handling and bag-emptying points; avoid or contain dust and verify the selected source control.
Wet contact
Prevent wet cement reaching skin or eyes, including contaminated gloves, cuffs and clothing. Keep the task-specific washing and response arrangements usable.
Hardened product
Identify composition before cutting or grinding. Match dust capture/suppression and residual protection to the assessed task; do not assume all dust has identical silica content.
A photograph cannot establish composition or safe exposure. Retain the urgent chemical-burn and eye-response advice on this page.
What are the key facts about cement dust?
The key facts are that cement dust can harm the lungs, skin and eyes, and wet cement can burn before pain is obvious.
Wet cement can burn while trapped
Wet cement in boots, gloves, sleeves or clothing can keep damaging skin, and eye splashes need immediate washing arrangements.
Dry cement is a respiratory irritant
Dust can irritate the nose and throat and contribute to breathing symptoms.
Concrete cutting may release silica
Dried concrete, mortar and masonry can generate respirable crystalline silica when cut or broken.
Dermatitis can be irritant or allergic
Cement can abrade skin and chromate exposure can sensitise some workers.
Controls must be planned
Wet cutting, on-tool extraction, segregation and cleaning are stronger than relying on masks.
Health surveillance can reveal failures
Skin checks and respiratory review help show whether controls are working.
What is cement dust?
Cement dust is fine airborne or settled particulate from dry cement, cement-based products, mortar, concrete and related construction materials.
Cement dust appears during bag emptying, mixing, sweeping, dry handling, breaking, drilling, chasing, scabbling and cutting. Some tasks create visible clouds; others create fine dust that stays airborne or settles on surfaces, clothing and skin.
Cement dust is not one simple hazard. Dry powder can irritate the respiratory tract and skin. Wet cement can cause alkaline burns. Dried concrete or mortar can contain silica-bearing aggregates, so cutting or breaking it can release respirable crystalline silica.
That is why cement risk management needs both respiratory and skin controls. A site that provides masks but no washing facilities, or gloves but allows dry cutting, has only solved part of the problem.
| Aspect | Details | Workplace relevance |
|---|---|---|
| Dry cement powder | Fine powder used in concrete and mortar. | Can irritate skin, eyes and airways. |
| Wet cement | Cement mixed with water. | Highly alkaline and can burn skin and eyes. |
| Dried concrete or mortar dust | Dust produced by cutting or breaking hardened materials. | May contain respirable crystalline silica. |
| Settled dust | Dust on surfaces, clothing, tools and floors. | Can be re-suspended or contaminate skin. |
| Workplace category | Hazardous substance under COSHH. | Requires assessment, control and review. |
What forms can cement-related exposure take?
Cement exposure can occur as dry powder, airborne dust, wet slurry, splashes, contaminated surfaces, residues and silica-containing dust from hardened materials.
Understanding the form matters because each form needs different controls. Dry powder is controlled through closed handling, careful bag emptying, extraction and cleaning. Wet cement needs skin and eye protection, washing and contaminated-clothing controls. Hardened concrete dust may need silica controls.
Dust can also move beyond the worker doing the task. It can drift to adjacent trades, settle on welfare routes, contaminate vehicles and be swept back into the air. Good planning keeps dusty tasks away from other workers and members of the public.
The COSHH assessment should describe the substance form, task, exposure route, duration, frequency, control method and health surveillance decision.
| Form | Typical task | Primary concern |
|---|---|---|
| Dry powder | Bag emptying, mixing and batching. | Inhalation, eye irritation and skin contamination. |
| Airborne dust | Dry cutting, chasing, drilling and breaking. | Inhalation and silica risk where relevant. |
| Wet cement or mortar | Laying blocks, screeding, concreting and finishing. | Alkaline burns and dermatitis. |
| Splash | Mixing, pumping and pouring. | Eye and skin injury. |
| Settled dust | Sweeping, dry cleaning and dusty surfaces. | Re-suspension and contamination. |
| Contaminated PPE/clothing | Dust or wet cement trapped against skin. | Prolonged contact and burns. |
How can cement dust affect health?
Cement can affect health through airway irritation, silica-related lung disease, skin burns, dermatitis, eye injury and sensitisation.
Short-term inhalation can irritate the nose, throat and airways, causing coughing, sneezing, throat irritation or chest discomfort. Repeated high exposure may contribute to longer-term respiratory problems, particularly where silica-containing dust is involved.
Respirable crystalline silica is the serious long-term concern when cutting, drilling or breaking dried concrete, mortar, stone or masonry. Fine respirable particles can reach deep into the lungs and cause diseases such as silicosis and contribute to chronic obstructive pulmonary disease and lung cancer risk.
Skin and eye harm can be immediate. Wet cement is alkaline and may burn while trapped against skin, sometimes before the worker realises how serious it is. Cement can also abrade and irritate skin, while hexavalent chromium can cause allergic contact dermatitis in sensitised workers.
| Health effect | How it develops | Warning signs |
|---|---|---|
| Airway irritation | Dust irritates nose, throat and airways. | Coughing, sneezing, sore throat or chest tightness. |
| Silica-related lung disease | Fine RCS particles lodge deep in the lungs. | Persistent cough, breathlessness or reduced tolerance. |
| Respiratory symptoms needing assessment | Cement powder irritates airways; assess the actual dust and other agents before attributing a disease. | Wheeze, chest tightness or work-related breathing symptoms. |
| Alkaline burns | Wet cement trapped against skin causes chemical burns. | Redness, pain, blistering, ulceration or delayed pain. |
| Irritant dermatitis | Abrasive and alkaline contact damages skin barrier. | Dry, cracked, red or sore skin. |
| Allergic dermatitis | Chromate sensitisation triggers future reactions. | Recurring rash after small exposures. |
| Eye injury | Dust or splash irritates or burns the eye. | Pain, watering, redness or vision concern. |
How does cement dust enter or affect the body?
Cement affects the body through inhalation, eye contact, skin contact, wet cement contact, contaminated clothing and accidental ingestion from poor hygiene.
The main route for dust is inhalation. The smaller the particle, the deeper it can travel into the lungs. Respirable dust is not always obvious, so a lack of visible clouds does not prove exposure is controlled.
Skin contact is equally important. Cement powder and wet cement can get inside gloves, boots, sleeves and knee areas. Once trapped, it stays against the skin and can cause burns or dermatitis.
Ingestion is usually from poor hygiene: contaminated hands, dust on food, smoking with dusty fingers or drinking in contaminated areas. Welfare facilities and clean/dirty separation are therefore part of the control system.
| Route | How it happens | Controls |
|---|---|---|
| Inhalation | Breathing dust from mixing, cutting, drilling or sweeping. | Wet methods, extraction, segregation and RPE. |
| Skin contact | Dry powder or wet cement on hands, arms, knees or legs. | Gloves, clothing, washing and skin checks. |
| Eye contact | Dust or wet splash into eyes. | Goggles or face protection and eyewash. |
| Ingestion | Dust transferred from hands to mouth. | Hygiene, no eating in dusty areas and handwashing. |
| Secondary exposure | Dust on clothing, tools, vehicles or welfare areas. | Cleaning, separation and decontamination. |
Which cement tasks create the highest risk?
Higher-risk tasks are those that create airborne dust, involve wet cement contact, trap contamination against skin or disturb hardened silica-containing materials.
The highest dust tasks usually involve energy applied to dry or hardened materials: cutting, grinding, drilling, chasing, scabbling, breaking, sanding and dry sweeping. Mixing can also be high exposure if bags are tipped quickly or powders are poured from height.
The highest skin tasks involve prolonged wet contact: laying blocks, screeding, kneeling in wet concrete, cleaning tools, handling wet mortar, carrying contaminated boards or allowing cement into boots and gloves.
Risk rises when tasks are indoors, poorly ventilated, close to other trades, rushed, carried out without water suppression or extraction, or cleaned using dry brooms.
| Task | Main hazard | Control priority |
|---|---|---|
| Dry cutting concrete | RCS and nuisance dust. | Wet cutting or on-tool extraction. |
| Mixing cement powder | Airborne powder and skin/eye contact. | Low-dust method and eye/skin protection. |
| Breaking or chasing mortar | Dust and silica exposure. | Extraction, water suppression and segregation. |
| Screeding or concreting | Wet cement burns and dermatitis. | Skin protection, kneepads, washing and clothing control. |
| Cleaning tools | Wet cement contact and splashes. | Gloves, eyewash and wash facilities. |
| Dry sweeping | Re-suspends settled dust. | Vacuum or wet cleaning. |
Which other construction dusts are closely related?
Cement dust sits within a wider family of construction dusts that need separate but connected control strategies.
A worker cutting a concrete block may face cement dust, silica dust and general construction dust at the same time. A refurbishment worker may also disturb plasterboard dust, wood dust, asbestos or lead dust depending on the building and task.
Use the specific page for the dust actually created by the task. Do not rely on one generic dust assessment when the health effects, legal duties and controls differ.
| Dust type | Other construction dusts |
|---|---|
| Construction Dust | General term for dust generated by construction work, including silica, wood and lower-toxicity dusts. |
| Silica Dust | Fine respirable crystalline silica from cutting, drilling or breaking concrete, stone, brick, mortar and tiles. |
| Asbestos Dust | Hazardous asbestos fibres released when asbestos-containing materials are disturbed. |
| Wood Dust | Dust from cutting or sanding hardwood, softwood, MDF and timber-based products. |
| Plasterboard and Drywall Dust | Gypsum-based dust from cutting, sanding or demolishing plasterboard systems. |
| Lead Dust | Dust from old lead paint, cutting, sanding or burning lead-containing materials. |
How can the hierarchy of controls reduce cement-dust exposure and skin contact?
Cement exposure should be controlled by eliminating dusty work where possible, reducing dust generation, isolating people, controlling at source and using PPE/RPE correctly.
Control should start before work begins. Designers and planners should ask whether dusty work can be avoided through prefabrication, pre-cut materials, pre-mixed mortar, different fixings, safer sequencing or off-site cutting with better controls.
Where the task remains, control at source. Wet cutting, water suppression, on-tool extraction, enclosed mixing, low-drop transfer, vacuum cleaning and segregation are stronger controls than relying only on disposable masks.
PPE and RPE are still important where residual risk remains, but they need fit, compatibility, training, storage, maintenance and supervision. A worker wearing a mask incorrectly while dry cutting is not protected.
Check the shelf date when receiving and issuing cement, and rotate stock. HSE explains that the ingredient used to reduce hexavalent chromium is effective for a limited time; using stored bags after that date can increase allergic-dermatitis risk. A stores check should therefore cover the marked date as well as bag condition and dust control.
How can the ERICPD hierarchy of controls reduce cement-dust exposure and skin contact?

| ERICPD level | Control example | Verification |
|---|---|---|
| Eliminate | Avoid cutting or mixing on site by using pre-cut or pre-mixed products. | Design and procurement review. |
| Reduce | Reduce bag handling, cutting time, powder quantities and wet contact. | Method statement and task observation. |
| Isolate | Segregate dusty work, use exclusion zones and protect adjacent trades. | Site logistics and barriers. |
| Control | Use water suppression, on-tool extraction, LEV, vacuum cleaning and welfare. | Inspection and test records. |
| PPE | Use suitable RPE, eye protection, gloves, clothing and footwear. | Fit testing and PPE checks. |
| Discipline | Train, supervise, monitor, maintain and act on symptoms. | Briefings, audits and health surveillance. |
How can the ISO 45001 hierarchy of controls reduce cement-dust exposure and skin contact?

| ERICPD level | Control example | Verification |
|---|---|---|
| Eliminate | Avoid cutting or mixing on site by using pre-cut or pre-mixed products. | Design and procurement review. |
| Reduce | Reduce bag handling, cutting time, powder quantities and wet contact. | Method statement and task observation. |
| Isolate | Segregate dusty work, use exclusion zones and protect adjacent trades. | Site logistics and barriers. |
| Control | Use water suppression, on-tool extraction, LEV, vacuum cleaning and welfare. | Inspection and test records. |
| PPE | Use suitable RPE, eye protection, gloves, clothing and footwear. | Fit testing and PPE checks. |
| Discipline | Train, supervise, monitor, maintain and act on symptoms. | Briefings, audits and health surveillance. |
How should skin and eye exposure to wet cement be controlled?
Prevent wet cement reaching skin or eyes; if contact occurs, remove it promptly and follow the chemical-burn emergency route.
Wet cement is strongly alkaline. Contact trapped in boots, gloves or clothing can keep burning even if pain seems modest at first. Keep knees and feet out of wet concrete, use long-handled tools and barriers, and choose gloves suitable for high-pH alkalis with task-matched breakthrough time. Prevent cement entering the glove cuff; use suitable eye or face protection where splashes can occur. Provide nearby clean water, washing facilities and a plan to remove contaminated clothing safely.
For a suspected chemical burn or cement splash to skin or eyes, stop the task, protect helpers, call 999 and begin immediate flushing with plentiful cool or lukewarm water while help is arranged. Carefully remove contaminated clothing if safe; do not pull off material stuck to injured tissue or apply creams or neutralising chemicals. Follow the product safety data sheet and trained first-aid plan, and pass the product identity to clinicians. Do not send an affected worker back to wet work until medically assessed and the failed control is corrected.
On a small screen, scroll this table sideways to read all columns.
| Decision | Control and check | Stop or escalation point |
|---|---|---|
| Task design | Pre-mixed delivery, long handles, dry standing areas, splash guards and suitable water access. | Hold work if safe access or washing is unavailable. |
| Skin and eye protection | High-pH compatible gloves, boots and splash protection; check fit, condition and glove cuffs. | Replace damaged PPE or a method that traps slurry. |
| First response | Stop exposure, summon trained help, call 999 for suspected chemical burn and flush promptly. | Any eye splash, burn or continuing pain needs urgent medical assessment. |
| Surveillance | Early skin checks, private symptom reporting and control feedback. | Repeated dermatitis or wet-contact near miss triggers task reassessment. |
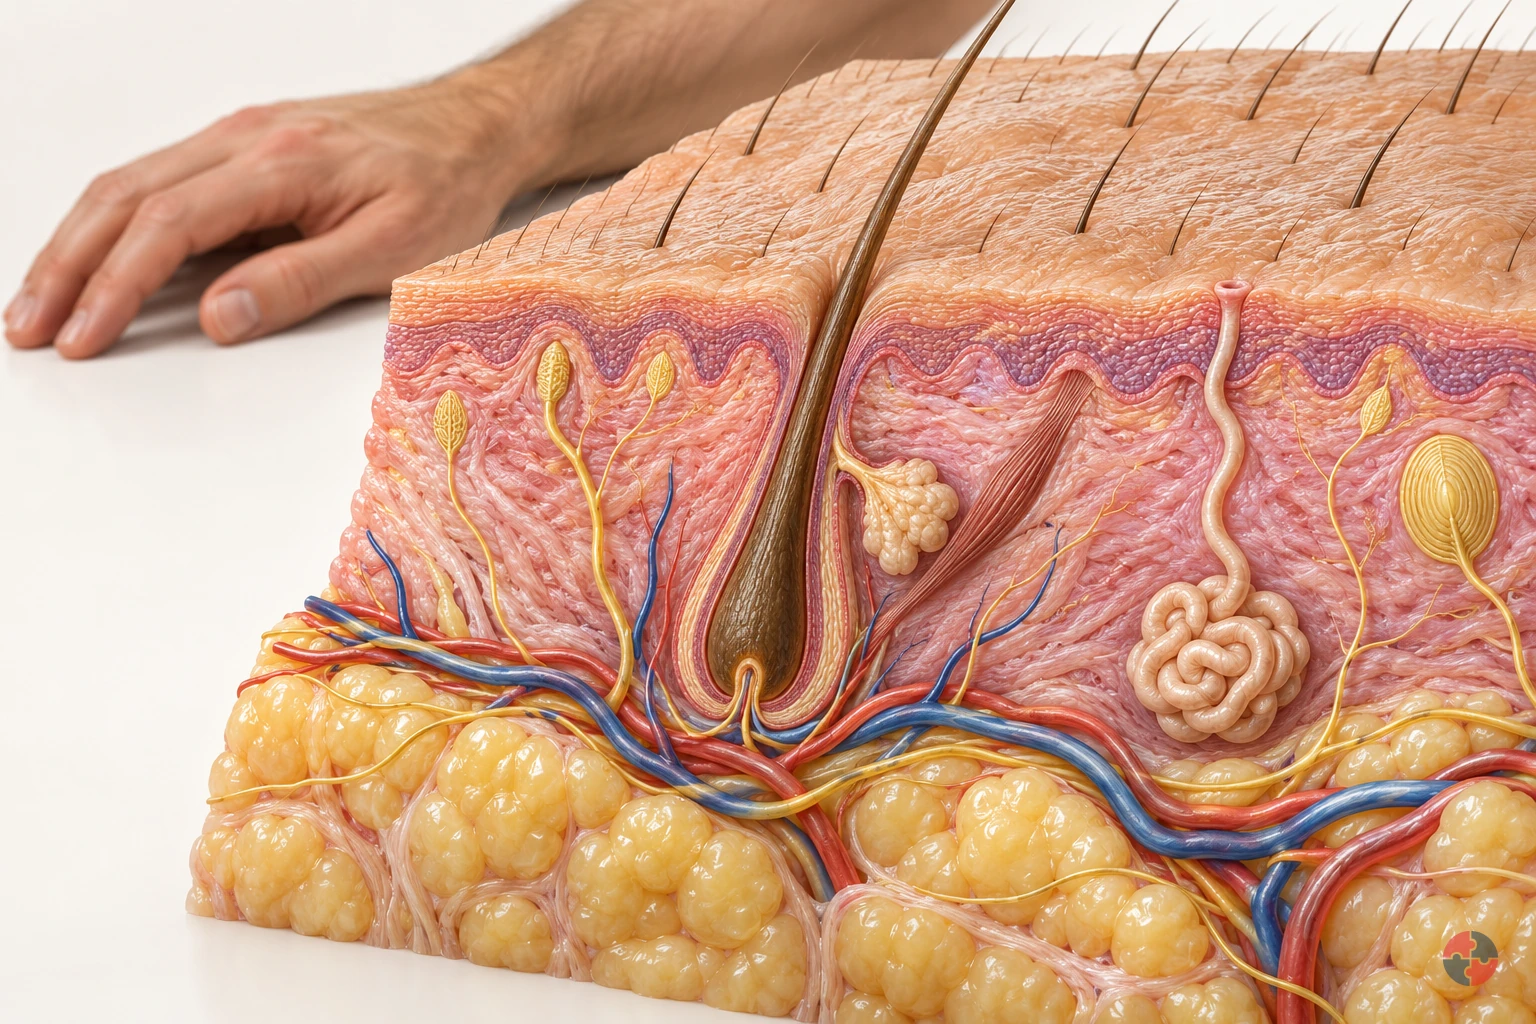
How does the skin barrier work, and how can workplace contact damage it?
Interactive anatomy · Skin barrier and injury · Updated 2026-10-23
Read all anatomy and process explanations without the viewer
General education about normal skin and example mechanisms; not diagnosis, treatment selection or a patient assessment. Hair-bearing forearm example. Vessels remain below the epidermis; the normal barrier has no large open holes. Image-based diagnosis or patch-testing simulation Treatment doses or guaranteed glove/barrier-cream protection Calculated injury depth, contact-dose thresholds or a number of safe washes Hydrofluoric-acid protocols and unreviewed named-substance injury overlays Immediate chemical-burn advice must remain readable outside the model and before any scenario answer.
Outer barrier
The outermost layer helps limit water loss and harmful contact. The outermost epidermal layer combines flattened cells with materials between them to help retain moisture and limit harmful contact. It is a selective protective barrier, rather than a waterproof coating. Use the magnified inset to locate its components. The model shows their relationship but cannot tell whether a particular substance will cross a person’s skin. Health and Safety Executive: Structure and functions of the skin
Barrier lipids
Lipids between surface cells help maintain the barrier. Repeated detergent contact can remove some of these fatty materials and overwhelm repair. Health and Safety Executive: Understanding the causes of skin disease
Epidermis
The outer skin layer continually renews. New cells form in the deeper epidermis and move towards the surface, becoming flattened as the outer layer is renewed and shed. The epidermis therefore contributes active renewal as well as surface protection. Follow its position above the dermis in the cutaway; the model enlarges a static structure rather than timing an individual’s cell renewal. Health and Safety Executive: Structure and functions of the skin
Dermis
Supporting tissue beneath the epidermis contains vessels, nerves and glands. The dermis is supporting tissue beneath the epidermis. It contains structures involved in supply, sensation and temperature regulation, including vessels, nerves and sweat glands. The cutaway enlarges selected components so their different functions can be followed. Their shared location does not mean that they form one open passage through the skin barrier. Oxford Health NHS Foundation Trust: The Skin — Community Tissue Viability Team
Subcutaneous tissue
Tissue and fat below the dermis help insulate and cushion. The lower layer supports the skin block; it is not part of the surface barrier. Health and Safety Executive: Structure and functions of the skin · Oxford Health NHS Foundation Trust: The Skin — Community Tissue Viability Team
Blood vessels
Vessels supply the deeper skin. These vessels supply the deeper skin tissues. They sit below the epidermal surface in the cutaway, alongside other supporting structures. Compare them with the nerve and sweat duct rather than interpreting every tube as the same pathway. The drawing explains location and function; its vessel size and colour are not measurements of circulation or skin temperature. Oxford Health NHS Foundation Trust: The Skin — Community Tissue Viability Team
Sensory nerves
Nerve endings help detect touch and temperature. The signalling symbol represents sensory information, not a visible electrical spark. Health and Safety Executive: Structure and functions of the skin · Oxford Health NHS Foundation Trust: The Skin — Community Tissue Viability Team
Sweat gland and duct
Sweat reaches the surface through a duct. A sweat gland produces sweat that reaches an opening at the surface through a duct. This contributes to the skin’s role in temperature regulation. Trace the coiled gland and its duct separately from the vessels and nerves. The enlarged path makes the connection visible; it does not measure sweating or represent every route by which a substance can enter skin. Health and Safety Executive: Structure and functions of the skin
Hair follicle
Hair grows from a follicle in hair-bearing skin. This forearm example includes a follicle. The palm has a different structure and must not use this site label. Health and Safety Executive: Structure and functions of the skin
Immune response inset
Skin participates in immune responses. In contact allergy, prior sensitisation can lead to an inflammatory response after later contact. Health and Safety Executive: Understanding the causes of skin disease · NHS: Contact dermatitis — causes
Open the complete process transcript
The process, step by step
Find the surface
Start with the forearm locator to establish where this sample of skin belongs. The enlarged block represents hair-bearing skin, with the epidermis on the outside, the dermis beneath it and deeper subcutaneous tissue below. The surface is only one part of this living organ. New epidermal cells are formed deeper down and move towards the outside, where flattened cells contribute to the protective layer. Use the block to connect the familiar body surface with these layers; it is an enlarged teaching section, not a standard thickness shared by every body site. Health and Safety Executive: Structure and functions of the skin
What to watch: Use the forearm locator first, then follow the enlarged block from the outer epidermis down through the dermis to the deeper tissue.
Why it matters: Locating the body site prevents the sample from being mistaken for every kind of skin. The outer layer, supporting tissues and deeper structures contribute different functions within the same organ.
Explore this step: Identify the outermost layer and the hair follicle before changing to the magnified barrier view.
Magnify the barrier
The outer barrier depends on both flattened surface cells and the fatty materials, or lipids, between them. The cells provide one part of the structure; the surrounding lipids help control the passage of water and substances through it. Look at their arrangement together rather than treating the skin as a single waterproof sheet. This is a selective barrier, not a complete seal against every material. The enlargement helps explain why a change in the material between cells can affect protection even when there is no large cut through the skin. Health and Safety Executive: Understanding the causes of skin disease
What to watch: Compare the flattened surface cells with the lipids between them, using the enlarged barrier inset rather than the whole skin block.
Why it matters: The arrangement helps limit unwanted passage through the surface while retaining moisture. Understanding both components explains why skin protection depends on more than whether the surface looks visibly broken.
Explore this step: Point out one surface cell and the surrounding lipid region, then describe how they work together.
Limit water loss
Water retention is part of healthy barrier function. The outer cells and the materials between them help limit water leaving the skin, while some water can still pass through. The labelled arrows represent that background loss; they are not streams from a wound or measurements of an individual’s hydration. Moisture matters because the outer layer needs appropriate hydration to remain flexible and function well. Read the arrows alongside the cell-and-lipid arrangement, so the explanation connects a movement across the surface with the structure that helps regulate it. Health and Safety Executive: Understanding the causes of skin disease
What to watch: Look at the labelled water-loss arrows beside the outer cells and lipids, noting their direction across the barrier surface.
Why it matters: Limiting water loss helps the outer layer retain the moisture needed for normal function. A barrier can perform this role without being impermeable, and the model cannot assess somebody’s skin hydration.
Explore this step: Compare this step with the barrier enlargement and explain why “limits water loss” is more accurate than “waterproof”.
Explore deeper structures
The deeper skin contains structures with different jobs. Blood vessels supply the deeper tissues, sensory nerves help carry information such as touch and temperature, and sweat glands connect to the surface through ducts. Follow each labelled structure separately instead of reading the cutaway as one channel running down through the skin. The enlarged vessels, nerves and gland are learning features within the supporting tissue; their positions explain relationships, not the route or speed of an absorbed substance. Notice that surface barrier function and these deeper functions are connected parts of skin health. Health and Safety Executive: Structure and functions of the skin · Oxford Health NHS Foundation Trust: The Skin — Community Tissue Viability Team
What to watch: Locate the vessels, sensory nerves and coiled sweat gland below the surface, then trace the gland’s duct towards its opening.
Why it matters: Supply, sensation and temperature regulation require different structures. Recognising those roles avoids mistaking every visible line for a chemical entry route or assuming the outer barrier carries out all skin functions.
Explore this step: Select the gland, nerve and vessel labels in turn and name a different function for each.
Connect structure and function
Return to the whole section and connect the functions you have explored. The renewing outer layer helps form a protective barrier and limit moisture loss. Deeper supporting tissues contain sensory structures, vessels and glands, while subcutaneous tissue contributes cushioning and insulation. These functions operate together rather than as a single switch that makes skin either completely protected or unprotected. Use the separate mechanism examples to explore particular changes only after locating the healthy structures. The cutaway explains relationships; its colours and enlarged components do not diagnose a skin condition or identify a safe contact time. Health and Safety Executive: Structure and functions of the skin · Oxford Health NHS Foundation Trust: The Skin — Community Tissue Viability Team
What to watch: Review the complete skin section, connecting the outer barrier with the supporting dermis, sensory structures, sweat gland and deeper tissue.
Why it matters: Skin both separates the body from its surroundings and helps it respond to them. Connecting protection, sensation and temperature functions gives a more useful picture than viewing the surface as a passive covering.
Explore this step: Choose one structure from the surface and one from deeper tissue, and explain how their jobs differ.
Mechanisms and their limits
Cumulative irritant dermatitis Repeated wet work or contact with detergents and other irritants can damage the barrier and cause inflammation. Strong irritants may act much more rapidly. Repeated task cards illustrate accumulated contact, not a threshold number of washes. One mild contact does not inevitably cause disease. Susceptibility varies. Dryness, cracking and discomfort need attention; colour alone does not show the cause. Health and Safety Executive: Understanding the causes of skin disease · NHS: Contact dermatitis — causes · NHS: Contact dermatitis — symptoms
HSE: prevent work-related skin problems
Allergic contact dermatitis A substance can sensitise the immune system. Later contact may trigger a delayed reaction, sometimes from a small amount. Sensitisation and later reaction are separate events with variable timescales. Irritation and allergy may coexist. This image cannot diagnose a rash. Protection must suit the substance and task; no glove or cream guarantees protection. Health and Safety Executive: Understanding the causes of skin disease · NHS: Contact dermatitis — causes · NHS: Contact dermatitis — symptoms
HSE: causes of work-related skin disease
HSE: contact controls and suitable gloves
Corrosive chemical injury A corrosive substance can directly damage skin. The affected depth and seriousness depend on the substance and exposure. Wet cement trapped against skin can cause a serious alkaline burn. The patterned region illustrates possible injury, not a calculated burn depth. Cement can also abrade and irritate skin, and chromate can cause allergy. These are parallel hazards, not successive disease stages. Do not wait for pain or finish an activity before seeking first aid. This general lesson does not cover hydrofluoric-acid protocols. Health and Safety Executive: Construction hazardous substances: Cement · NHS: Acid and chemical burns
NHS: immediate chemical-burn action
Cumulative irritant dermatitis — follow the anatomy
Look at: The rough, dry patch: raised flakes and branching cracks in the outer barrier.
What changes: Repeated wet work or irritants can disrupt the protective barrier. Flaking and fissures make the damaged surface visible in this example.
Why it matters: Skin may become dry, sore and cracked, making further exposure more damaging.
What to do: Reduce wet work and contact; use suitable gloves, gentle cleaning and skin care.
Repeated wet work at a commercial wash-up station
Catering: frequent washing and detergent contact repeatedly wet and dry the hands. Explicit time jump across repeated tasks and shifts: cumulative barrier damage does not develop at a fixed number of washes or within this 32-second clip. People differ in susceptibility; similar skin changes may have different causes. A short exposure does not inevitably produce dermatitis.
Look at the whole wet-work pattern The job combines water, detergent handling, hand cleaning and time in gloves. Review unnecessary skin contact and how tasks are organised. Health and Safety Executive: Understanding the causes of skin disease · Health and Safety Executive: How do I prevent skin problems in my business?
Repeated contact challenges the barrier The timeline jumps across separate contacts. Mild irritants can disrupt surface lipids and outpace the skin’s repair; prolonged wetness can also affect barrier function. Health and Safety Executive: Understanding the causes of skin disease
Irritant dermatitis: dry scales and cracked skin The lifted flakes and branching cracks show a dry, disrupted barrier. Irritation may also cause soreness, inflammation or blisters. Irritant and allergic dermatitis can look alike; these features alone do not identify the cause. Health and Safety Executive: Understanding the causes of skin disease · NHS: Contact dermatitis — causes · NHS: Contact dermatitis — symptoms
Reduce contact and report early changes Review the method, suitable protection, washing/drying and skin care. Encourage early reporting and appropriate medical advice instead of stronger scrubbing or assuming a cream makes contact safe. Health and Safety Executive: How do I prevent skin problems in my business?
Allergic contact dermatitis — follow the anatomy
Look at: The swollen patch with small raised, fluid-filled blisters, and the separate immune-response inset.
What changes: After sensitisation, later contact with an allergen can trigger a delayed immune reaction. This example shows swelling and small blisters at the surface.
Why it matters: An itchy, inflamed rash can recur after small exposures; it is not simply abrasion.
What to do: Identify and avoid the allergen with competent advice and suitable work controls.
Chromate sensitisation and a later skin reaction
Construction: a worker has repeated skin contact with cement products; a later contact is shown after sensitisation has occurred. Explicit time jumps separate initial sensitisation from later contact and a delayed reaction. None has a fixed duration in the 32-second explanation. Only some people become sensitised. Cement also causes irritation and burns; the allergy card does not replace those separate hazards.
Identify avoidable contact Cement work can expose skin to irritants and chromate sensitiser. Review methods, product condition, contact protection and welfare arrangements rather than identifying allergy by appearance. Health and Safety Executive: Construction hazardous substances: Cement · Health and Safety Executive: How do I prevent skin problems in my business?
Sensitisation occurs earlier in this example The timeline jumps past an earlier immune-sensitisation event. There may have been no visible change then; the illustration does not predict who becomes sensitised. Health and Safety Executive: Understanding the causes of skin disease
Allergic dermatitis: a delayed blistered rash example The raised fluid-filled blisters and swelling illustrate one possible contact-dermatitis appearance. The immune inset explains sensitisation followed by a later reaction. Irritant dermatitis can also blister, so appearance alone cannot diagnose an allergy. Health and Safety Executive: Understanding the causes of skin disease · Health and Safety Executive: Construction hazardous substances: Cement · NHS: Contact dermatitis — symptoms
Reduce exposure and obtain assessment Report the reaction and seek clinical advice; do not self-diagnose allergy from the animation. Review cement contact and suitable protection. No glove or barrier cream guarantees that exposure is harmless. Health and Safety Executive: How do I prevent skin problems in my business? · Health and Safety Executive: Construction hazardous substances: Cement
Corrosive chemical injury — follow the anatomy
Look at: The irregular chemical-contact patch, broken surface and damaged tissue extending into the cutaway.
What changes: A corrosive substance directly damages tissue. The broken barrier and disruption beneath it show possible injury beyond the surface.
Why it matters: Depth and severity depend on the substance and contact; wet cement burns may develop without early pain.
What to do: Prevent contact and follow the substance-specific emergency washing and medical guidance.
Wet cement becomes trapped inside a boot
Concrete work: wet cement enters a boot and stays against the skin. Contact injury may develop while exposure continues. Playback is not a waiting period, a safe contact time or a calculation of burn depth. Pain may not provide an early warning. The chemical-skin action is separate from eye irrigation and thermal-burn cooling; hydrofluoric acid remains outside this generic example.
Prevent cement entering clothing The pour arrangement allows wet cement to reach a boot opening. Review tools, working position and suitable clothing/footwear so the material cannot become trapped. Health and Safety Executive: Construction hazardous substances: Cement
Alkaline material remains on skin Trapped wet cement maintains chemical contact. This direct corrosive route is different from the later allergy example, although several cement hazards can coexist. Health and Safety Executive: Construction hazardous substances: Cement
Chemical injury: a broken surface and underlying tissue damage Follow the irregular wound edge into the disrupted tissue below the surface. The cutaway illustrates possible deeper chemical injury; appearance does not establish burn depth or severity. Wet cement can cause serious injury without an early pain warning. Health and Safety Executive: Construction hazardous substances: Cement
Stop contact and act immediately Get immediate chemical-burn first aid and medical help; follow the separate action panel for safe decontamination and water irrigation. Do not wait for pain, finish the clip or add a neutralising chemical. NHS: Acid and chemical burns · Health and Safety Executive: Construction hazardous substances: Cement
Read the practice situations and all answer explanations
SK-Q1: Which response addresses the work as well as the early skin changes?
Frequent wet work leaves a worker’s hands dry and sore.
Automatically diagnose an allergy. — Several causes are possible. A picture or short work history cannot establish an allergy; clinical assessment may be needed.
Report early changes and review harmful contact, suitable controls, cleaning and skin care. — Yes. Reduce harmful contact and review the work before problems worsen. Include suitable cleaning, drying, skin care and exposure controls.
Scrub the hands harder with solvent. — Solvents and harsh scrubbing can further damage the barrier. Use the suitable cleaning arrangements provided for the task.
NHS: Contact dermatitis — causes · Health and Safety Executive: How do I prevent skin problems in my business?SK-Q2: What takes priority now?
Wet cement is trapped inside a worker’s boot.
Stop exposure and obtain immediate first aid and medical help. — Correct. Wet cement can cause a serious chemical burn. The chemical-burn action panel is available immediately; do not wait for this lesson.
Wait to see whether it starts to hurt. — Do not wait for pain. Trapped wet cement can rapidly cause a serious burn. Stop exposure and obtain immediate help.
Neutralise the cement with an acidic household product. — Do not add another chemical or attempt neutralisation. Follow immediate chemical-burn first aid and obtain medical help.
Health and Safety Executive: Construction hazardous substances: Cement · NHS: Acid and chemical burnsSK-Q3: Which mechanism fits the example?
In this teaching example a sensitised worker reacts after later contact with the known allergen.
The skin must have worn through at that instant. — Allergic contact dermatitis does not require the surface to wear away at that moment. Mechanical injury and allergy are different mechanisms.
Any glove would have guaranteed protection. — Gloves must be selected for the substance and task, and used correctly. Any glove is not a guarantee.
A sensitised immune system can react after later contact. — Yes. Prior sensitisation and later contact are separate stages. Irritant and allergic mechanisms can occur together; this example does not diagnose a real person.
Health and Safety Executive: Understanding the causes of skin disease · Health and Safety Executive: How do I prevent skin problems in my business?Sources and how the model is made
The opening images are AI-generated anatomical illustrations. The interactive 3D models and labelled SVG diagrams use original procedural artwork. These teaching images are not medical scans or diagnostic tools. Source references support the learner explanations and do not grant artwork rights.
- Health and Safety Executive: Structure and functions of the skin — Three skin layers; renewal; sweat, hair, sensory, barrier and temperature functions. Factual reference only; no diagram copied.
- Oxford Health NHS Foundation Trust: The Skin — Community Tissue Viability Team — Layer and deeper vessel/nerve context, mechanical injury and skin-tone assessment considerations. No treatment regimen or illustration reused.
- Health and Safety Executive: Understanding the causes of skin disease — Barrier lipids and water retention; cumulative irritation; sensitisation, delayed contact allergy, small subsequent amounts and coexistence. Replaces the former separate dermatitis URL, which failed direct retrieval.
- NHS: Contact dermatitis — causes — Irritant versus allergic mechanisms and workplace wet work. Printed next-review date May 2026 is overdue; recheck at qualified clinical sign-off and corroborate with HSE.
- Health and Safety Executive: Construction hazardous substances: Cement — Alkaline burns from trapped cement; abrasive irritation; chromate sensitisation; task methods and suitable contact protection.
- Health and Safety Executive: How do I prevent skin problems in my business? — Avoid contact, suitable gloves, washing and drying, skin care, early checks/reporting and medical advice. No universal glove or cream claim.
- NHS: Acid and chemical burns — Immediate chemical skin-burn first aid: 999, avoid contamination, clothing and dry-chemical removal, copious water about one hour, no creams or other chemicals. Skin advice is not substituted for eye or thermal guidance.
- NHS: Cuts and grazes — General shallow-wound context and the need for professional help with serious wounds; not a visual diagnosis or full first-aid simulation.
- NHS: Contact dermatitis — symptoms — Dryness, cracking, inflammation and fluid-filled blisters can occur in contact dermatitis. Irritant and allergic appearances overlap. Original illustrative textures are not diagnostic photographs and no source artwork is copied.
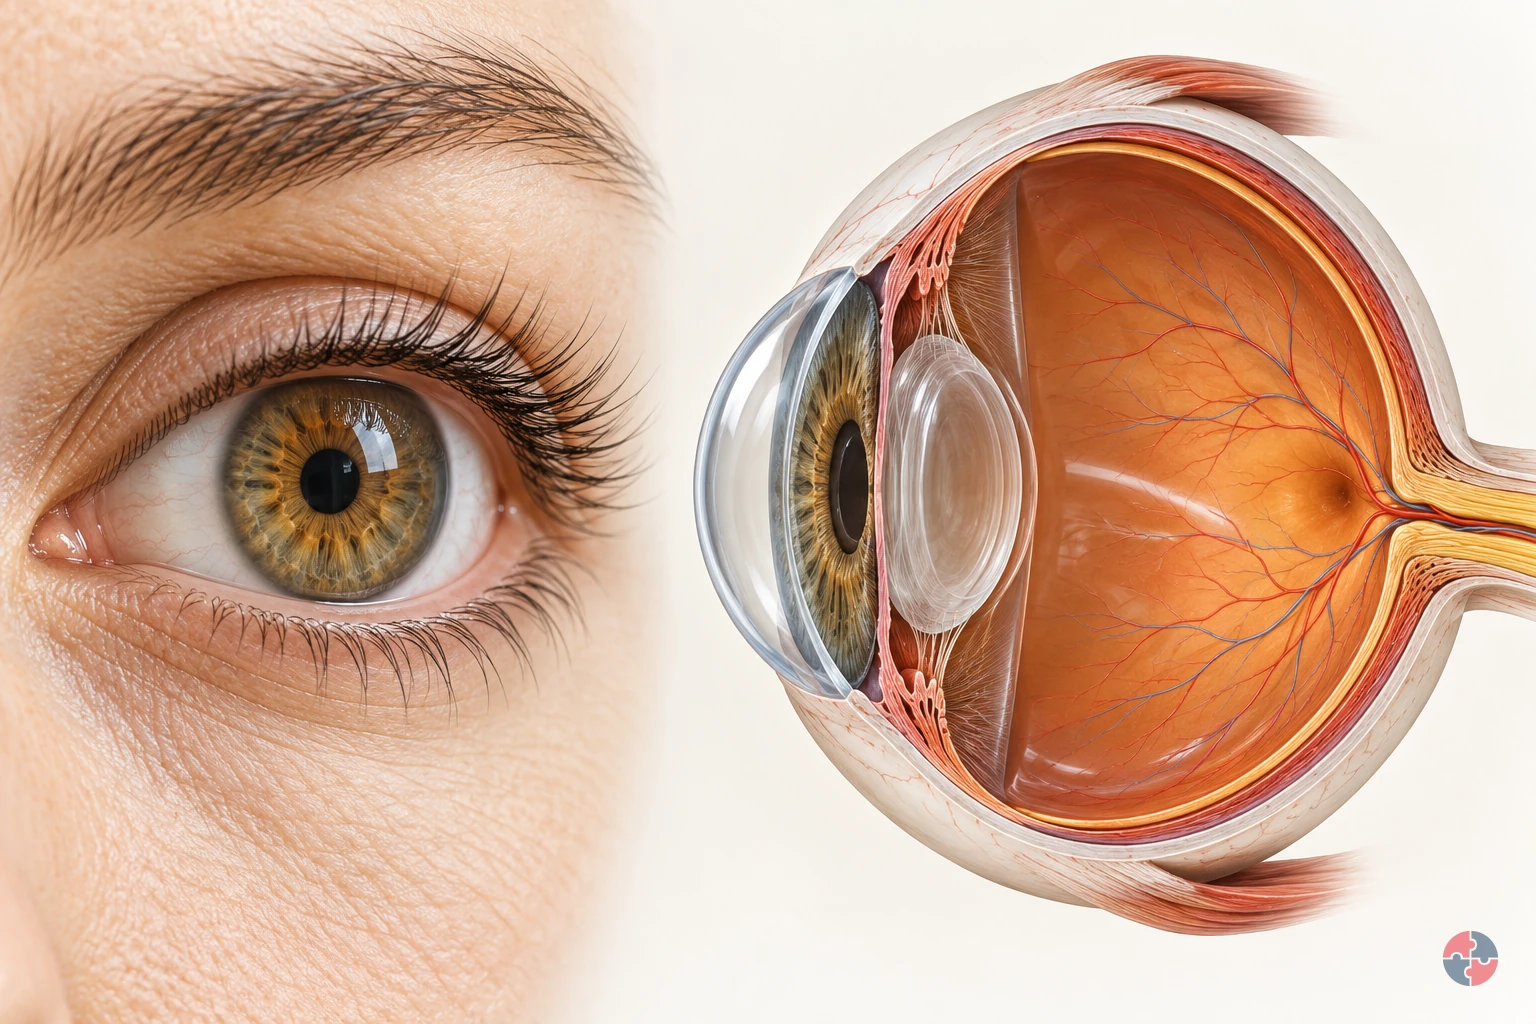
How does the eye turn light into vision, and how do workplace hazards injure it?
Interactive anatomy · Eye function and injury · Updated 2026-10-23
Read all anatomy and process explanations without the viewer
Educational illustration, not a diagnostic symptom checker or a reproduction of an individual’s vision. No acuity/brightness challenge, flashing screen, camera permission, eye-drop prescription, patching instruction, lens-removal manoeuvre or home-neutralisation exercise. Ordinary DSE comfort is separate from trauma; eyesight correction is separate from hazard protection.
Eyelids
Blinking spreads tears over the front of the eye. The eyelids pass over the exposed front of the eye when a person blinks. Their movement spreads the tear film, helping keep that surface moist and smooth. In the surface view, use the lid margins to locate the area they cover. This surface-maintenance role supports the optical pathway; the lid does not carry visual signals to the brain. Moorfields Eye Hospital NHS Foundation Trust: Dry eye: the tear film
Tear film
A thin tear layer keeps the surface moist and smooth. A thin film of tears covers the front of the eye. It lubricates the surface and contributes to a smooth boundary through which light passes. Blinking redistributes this film. Its thickness is enlarged in the teaching view so its position can be seen; it is a surface layer rather than a pool of liquid inside the eyeball. Moorfields Eye Hospital NHS Foundation Trust: Dry eye: the tear film
Cornea
The clear front surface bends incoming light. The transparent cornea forms the curved front of the eye, providing an outer protective boundary and bending incoming light. It works with the lens to focus the light towards the retina. Follow the rays through the front curve in the cutaway, then compare its location with the tear film lying over the surface. Moorfields Eye Hospital NHS Foundation Trust: What makes up your eye
Iris
The coloured ring controls the pupil opening. The iris is the coloured ring around the pupil. Its muscles change the size of the opening and so control how much light can enter the eye. Locate the ring separately from the transparent lens behind it. This light-entry role is different from the focusing work performed by the cornea and lens. Moorfields Eye Hospital NHS Foundation Trust: What makes up your eye
Pupil
An opening lets light enter the eye. The pupil is the central opening in the iris through which light passes. It looks dark when viewed from the front because it opens into the inside of the eye. It is not a solid black disc. In the cutaway, follow the route through this opening towards the transparent lens behind it. Moorfields Eye Hospital NHS Foundation Trust: What makes up your eye
Lens
The clear lens helps focus light on the retina. The transparent lens sits behind the iris and adds to the focusing action of the cornea. In a living eye its shape can change to help focus on objects at different distances. Use the cutaway to locate the lens between the pupil opening and the retina; the simplified ray diagram is not an eyesight test. Moorfields Eye Hospital NHS Foundation Trust: What makes up your eye
Retina
The light-sensitive layer lines the back of the eye. The retina is the light-sensitive tissue lining the inside of the back of the eye. Light focused by the cornea and lens reaches this layer, where specialised cells begin converting it into electrical information. Its position against the inner wall connects the whole-eye view with the separate enlarged photoreceptor inset. Moorfields Eye Hospital NHS Foundation Trust: What makes up your eye · Oxford University Hospitals NHS Foundation Trust: Tackling vision loss: normal signal pathway
Photoreceptors
Specialised retinal cells begin the light-to-signal conversion. Photoreceptors are specialised cells in the retina that respond to light and begin the conversion into electrical signals. Locate the retinal lining first, then connect it with the enlarged cell inset. That inset explains a change of process and scale; it does not represent a separate organ or every cell involved in retinal processing. Oxford University Hospitals NHS Foundation Trust: Tackling vision loss: normal signal pathway
Optic nerve
Visual signals travel from the eye towards the brain. The optic nerve carries electrical information from the retina towards the brain. In the model, the symbol changes from a light ray to a neural signal at the retina to distinguish these processes. Locate where the nerve leaves the back of the eye. Light itself does not travel along the nerve as a beam. Oxford University Hospitals NHS Foundation Trust: Tackling vision loss: normal signal pathway
Brain destination
The brain processes the incoming visual signals. The brain processes the visual information arriving from the eyes, helping us make sense of what we see. This marker shows a destination outside the eyeball rather than a structure within it. Follow the optic-nerve route to the marker after locating the retina; the detailed pathways inside the brain are not depicted here. Oxford University Hospitals NHS Foundation Trust: Tackling vision loss: normal signal pathway
Open the complete process transcript
The process, step by step
1 · Refresh the surface
A blink carries a thin layer of tears across the exposed front of the eye. This tear film keeps the surface moist and helps create a smooth first surface for incoming light. Look at the eyelids and the enlarged tear layer together: the lid spreads the film rather than pushing tears into the eyeball. The surface view separates these structures so their relationship is easier to see. This is the preparation for the optical pathway that follows; a clear view depends on the condition of the front surface as well as the structures deeper inside. Moorfields Eye Hospital NHS Foundation Trust: Dry eye: the tear film
What to watch: Locate the eyelid margins and the thin tear layer in front of the cornea, using the surface view to separate them.
Why it matters: The refreshed film lubricates the front of the eye and helps keep its surface smooth. It supports the passage of light before the cornea and lens focus that light deeper inside.
Explore this step: Select the eyelids, then the tear film, and describe which structure moves and which surface it covers.
2 · Bend incoming light
The cornea is the transparent, curved front of the eye. Incoming light changes direction as it passes through this surface, beginning the focusing process. In the whole-eye cutaway, trace the illustrative rays from outside the eye towards the lens. Their bend shows the cornea doing optical work rather than acting only as a window. The cornea also forms part of the protective outer boundary, so its clarity and shape matter to seeing. The rays simplify the route through a healthy eye; they are not a measurement of an individual person’s focus or vision. Moorfields Eye Hospital NHS Foundation Trust: What makes up your eye
What to watch: Find the clear curved front of the eye and follow where the incoming light rays change direction as they pass through it.
Why it matters: Beginning to direct the light here allows the cornea and lens to work together. A transparent front surface lets light enter while forming part of the eye’s protective boundary.
Explore this step: Trace one ray from outside the cornea to the lens and identify the first place its direction changes.
3 · Focus towards the back
After passing through the cornea, light enters through the pupil, the opening in the coloured iris. The iris changes the size of that opening to control how much light enters. Behind it, the transparent lens works with the cornea to bring light towards the retina at the back. Follow the model from front to back and distinguish the pupil opening from the solid lens. In a living eye the lens can change shape to help focus at different distances. This simplified view explains the route and the relationship between the structures, rather than testing accommodation or eyesight. Moorfields Eye Hospital NHS Foundation Trust: What makes up your eye
What to watch: Identify the iris around the pupil opening, the transparent lens behind it and the light-sensitive retina lining the back of the eye.
Why it matters: Controlling light entry and focusing it are different jobs. Together they allow light to reach the sensitive tissue at the back in a useful pattern for the next stage of vision.
Explore this step: Name the opening light passes through, then the transparent structure it reaches next; follow the route to the retina.
4 · Convert at the retina
The retina is the light-sensitive tissue lining the back of the eye. Its photoreceptor cells respond to light and begin converting it into electrical information. Locate the retinal lining, then use the enlarged cell inset to connect the whole-eye view with this smaller-scale event. The inset makes the conversion easier to discuss without suggesting that the cells are that large inside the eye. At this point the lesson changes from the path of light to the path of a nerve signal. The model does not show every retinal cell or all the processing that takes place between them. Oxford University Hospitals NHS Foundation Trust: Tackling vision loss: normal signal pathway
What to watch: Locate the retina on the inner back wall, then connect it with the enlarged photoreceptor inset outside the whole-eye cutaway.
Why it matters: This conversion connects the eye’s optical system with its nervous system. The focused light pattern can now be represented by signals that travel from the retina towards the brain.
Explore this step: Point to where the light pathway ends and explain why the enlarged cells are an inset rather than another organ.
5 · Carry and interpret the signal
Visual information leaves the retina through the optic nerve and travels towards the brain. The brain processes this incoming information so that we can recognise and make sense of what we see. Follow the model’s neural-signal symbol from the back of the eye to the external brain marker, and compare it with the earlier light rays. The symbols represent different processes: a nerve carries signals, not a beam of light or a miniature picture travelling through a tube. The brain marker identifies the destination outside the eyeball; the detailed visual pathways within the brain are beyond this simplified model. Oxford University Hospitals NHS Foundation Trust: Tackling vision loss: normal signal pathway
What to watch: Find where the optic nerve leaves the back of the eye and trace its route towards the separate brain destination marker.
Why it matters: The earlier stages deliver and convert light; this stage carries the resulting information onwards. Vision therefore depends on the retina, its nerve connection and the brain working with the eye’s optical structures.
Explore this step: Compare the light-ray and neural-signal symbols, then explain what travels through the pupil and what travels through the optic nerve.
Mechanisms and their limits
Chemical injury A chemical splash can harm the surface and front of the eye. The substance and exposure affect the injury; the overlay shows possible affected regions rather than a fixed depth. Immediate rinsing and emergency help take priority over the illustration. Acids, alkalis and named irritants are not interchangeable presets. No pH or penetration simulation is provided. University Hospitals Dorset NHS Foundation Trust: Chemical injury to the eye
Select suitable splash protection
Read current NHS chemical-eye first aid
Chemical injury — follow the anatomy
Look at: The front surface of the eye and the tissues beneath it.
What changes: A chemical can damage the surface and, depending on the substance, penetrate deeper.
Why it matters: A chemical burn can threaten sight even when the outside appearance seems limited.
What to do: Rinse immediately with plenty of clean, non-hot water; for a strong chemical, go to A&E or call 999 and keep rinsing while waiting.
A concentrated-cleaner splash to the eye
During cleaning, liquid splashes from an open transfer close to a worker’s face. Irrigation and help start immediately in reality. Thirty-two seconds is only the explanation length, not an acceptable delay or a complete rinse. Chemical type and exposure affect injury. The older chemical-eye leaflet supports the broad mechanism only; current NHS eye-injury guidance controls the immediate action.
Reduce the splash opportunity An open container is being handled at face level. Review transfer arrangements and eye/face protection selected for the chemical and task. HSE: Using the right type of PPE
Chemical reaches the eye surface The splash contacts the cornea and surrounding surface. This is a chemical-contact route, not a flying shard or a mechanical surface graze. University Hospitals Dorset NHS Foundation Trust: Chemical injury to the eye · NHS: Eye injuries
Surface and anterior injury are possible An annotated region shows possible injury to the front of the eye; some chemicals can penetrate further. The diagram does not predict depth from splash size, pH or pain. University Hospitals Dorset NHS Foundation Trust: Chemical injury to the eye
Rinse now and get emergency help Begin copious clean-water irrigation and follow the eye guidance for at least 20 minutes while arranging emergency assessment. Keep rinsing as directed; do not neutralise with another chemical or wait for playback. NHS: Eye injuries
Read the practice situations and all answer explanations
EY-Q1: What should happen first?
A strong cleaning chemical splashes into an eye. Immediate help is displayed before the question.
Watch the demonstration before taking action. — Do not delay rinsing or medical help for this lesson.
Begin rinsing with plenty of clean, non-hot water and get emergency help. — Hold the eye open and use a gentle water flow for at least 20 minutes; keep rinsing while waiting for help.
Add a household chemical to neutralise it. — Use the water-rinsing route and medical help, not improvised chemical neutralisation.
NHS: Eye injuries · University Hospitals Dorset NHS Foundation Trust: Chemical injury to the eyeEY-Q2: What is the appropriate response?
A fragment strikes an eye during grinding.
Seek emergency assessment; leave any pierced object in place. — High-speed impact needs emergency assessment. Do not rub the eye or remove a pierced object.
Pull out anything that appears to be stuck. — Do not attempt removal. Get emergency help.
Return to work if vision seems unchanged. — Feeling able to see is not clearance after a high-speed injury.
NHS: Eye injuries · University Hospital Southampton NHS Foundation Trust: Eye emergency departmentEY-Q3: Which statement is correct?
A worker is close to welding without a task-specific eye-protection assessment.
No immediate pain proves the eyes are unharmed. — Arc-eye pain may start several hours later. Lack of immediate pain does not establish safety.
Ordinary spectacles protect against every welding hazard. — Corrective spectacles are not a complete hazard assessment. Impact, splash and radiation protection require suitable selection.
Protection must match the radiation hazard, and pain may be delayed. — Correct. Control exposure and select appropriate protection for the task and nearby people. The lesson provides no safe viewing time.
HSE: Health risks from welding: arc-eye · HSE: Using the right type of PPESources and how the model is made
The opening images are AI-generated anatomical illustrations. The interactive 3D models and labelled SVG diagrams use original procedural artwork. These teaching images are not medical scans or diagnostic tools. Source references support the learner explanations and do not grant artwork rights.
- Moorfields Eye Hospital NHS Foundation Trust: What makes up your eye — Normal cornea, iris, pupil, lens and posterior eye layout; use anatomy text selectively. No image copied.
- Moorfields Eye Hospital NHS Foundation Trust: Dry eye: the tear film — Blinking spreads the tear film, which lubricates the eye and supports a smooth surface. No treatment instructions copied.
- Guy’s and St Thomas’ NHS Foundation Trust: Corneal abrasion — A scratch/graze of the cornea and the distinction between a superficial injury and complications; no healing-time promise or eye treatment prescribed.
- NHS: Eye injuries — March 2026 guidance: immediate chemical irrigation and emergency help; high-speed/penetrating injury; severe pain or sight changes. Minimum rinsing time is not a clearance test.
- University Hospitals Dorset NHS Foundation Trust: Chemical injury to the eye — Possible surface/anterior-segment damage only. Printed review date November 2023 is overdue; current emergency actions rely on EY-S4, not this leaflet alone.
- HSE: Health risks from welding: arc-eye — Welding radiation can injure the cornea, cause delayed pain and harm other eye structures; no safe viewing time.
- HSE: Using the right type of PPE — Eye protection must match impact, splash, dust or radiation hazards and fit the task/user.
- Oxford University Hospitals NHS Foundation Trust: Tackling vision loss: normal signal pathway — Photoreceptors convert light to electrical signals, carried through the optic nerve to the brain. Research treatment content is not reused.
- NHS Organ Donation: About cornea donation — Injury or disease can leave the cornea cloudy/distorted and affect vision. Source is factual context, not donation advice in this lesson.
- University Hospital Southampton NHS Foundation Trust: Eye emergency department — Chemical injury, penetrating trauma and severe visual symptoms require emergency eye care. Local opening hours/contact instructions are not generalised.
How should RPE and LEV be selected for cement dust?
RPE and LEV should be selected by task, dust type, exposure level, wearer, environment and maintenance requirements.
Local exhaust ventilation and on-tool extraction should capture dust at source. It needs suitable tool connection, airflow, filters, dust-class rating, maintenance, thorough examination and worker training. A vacuum that is not suitable for construction dust may simply spread exposure or fail quickly.
Respiratory protective equipment must be adequate and suitable. That means correct protection factor, face-fit testing for tight-fitting masks, clean-shaven policy where required, training, storage, maintenance and compatibility with eye protection or helmets.
RPE selection should consider whether the task creates silica dust. Cutting concrete is not the same as handling a small amount of damp mortar; the protection standard and controls may be very different.
| Area | What to check | Evidence |
|---|---|---|
| LEV/on-tool extraction | Captures dust at source and is suitable for task. | Inspection and test record. |
| Water suppression | Enough water reaches the cutting point. | Task observation. |
| RPE type | Adequate protection factor for dust and task. | RPE assessment. |
| Face fit | Tight-fitting masks fit the wearer. | Fit-test certificate. |
| Use and storage | RPE is worn correctly and kept clean. | Supervisor check. |
| Maintenance | Filters, seals and equipment are changed or serviced. | Maintenance record. |
What health surveillance may be needed for cement dust?
Health surveillance may be needed for dermatitis, respiratory symptoms or silica-related exposure where COSHH assessment shows continuing risk.
HSE cement guidance highlights skin checks where dermatitis risk remains. A trained responsible person can carry out basic skin checks if suitably trained, with occupational health input where problems are found or risk is more complex.
Respiratory health surveillance may be needed where workers are exposed to respirable crystalline silica or other respiratory risks. The decision should be made through COSHH assessment and competent occupational health or occupational hygiene advice.
Surveillance findings should feed back into controls. A rash, wheeze, cough or pattern of symptoms is not simply an individual health issue; it may indicate that dust, wet cement or PPE controls are failing.
| Area | What to check | Action |
|---|---|---|
| Skin baseline | Existing skin condition before cement work. | Record and advise controls. |
| Periodic skin checks | Dryness, cracking, redness, rash or burns. | Review PPE, washing and work method. |
| Respiratory symptoms | Cough, wheeze, chest tightness or breathlessness. | Review dust controls and refer if needed. |
| RCS exposure | Tasks involving concrete or mortar cutting. | Consider respiratory surveillance. |
| Trend review | Multiple workers with symptoms. | Investigate system failure. |
Which duties apply to cement dust and wet cement?
COSHH and construction planning require task-specific dust, silica and skin controls; use the GB or NI instrument for the work location.
In Great Britain, COSHH 2002 covers hazardous cement powder, wet cement and respirable crystalline silica generated by cutting silica-bearing concrete or mortar. In Northern Ireland, COSHH (NI) 2003 supplies the location-specific route. CDM project duties are also separate GB and NI instruments. Exposure limits in EH40 inform assessment but are not a target for poor control; skin and eye risks cannot be inferred from air results alone. An occupational disease or injury report requires a case-specific RIDDOR test under the relevant jurisdiction.
On a small screen, scroll this table sideways to read all columns.
| Decision | Great Britain | Northern Ireland |
|---|---|---|
| Dust and wet-cement assessment | COSHH 2002 with HSE cement, construction dust and skin guidance. | COSHH (NI) 2003 with HSENI guidance; use suitable task evidence. |
| Silica-bearing hardened materials | Assess RCS separately when cutting, drilling or grinding concrete/mortar. | Assess generated RCS under NI COSHH; use HSENI lung-risk route. |
| Construction coordination | CDM 2015 and GB welfare/first-aid rules as applicable. | CDM (NI) 2016 and NI welfare/first-aid rules as applicable. |
| Health surveillance and reporting | COSHH surveillance decision; GB RIDDOR only if criteria met. | NI COSHH surveillance decision; NI RIDDOR criteria and HSENI route. |
How could BuildOut Ltd manage cement dust?

BuildOut Ltd would manage cement dust through design planning, COSHH assessment, low-dust methods, wet cement controls, RPE management, welfare checks and health surveillance.
BuildOut Ltd
a construction and fit-out contractor delivering refurbishment, concrete repairs, blockwork, screeding, drainage and small civil engineering projects
BuildOut identifies cement exposure at tender and pre-start stage. The planner checks whether the work involves dry cutting, concrete breaking, mortar mixing, screeding, blockwork, grouting or repair mortar. The H&S adviser decides whether the task creates general cement dust, wet cement exposure, silica-containing dust or all three.
Control starts with method selection. Where possible, BuildOut orders pre-cut materials, pre-mixed mortar or off-site cutting. On site it uses wet cutting or on-tool extraction for concrete and mortar, low-drop mixing methods, H-class vacuum cleaning where needed, exclusion zones and dust controls before RPE is considered.
For wet cement, supervisors check waterproof alkali-resistant gloves, eye protection, suitable footwear, kneepads, washing facilities, clean/dirty separation and prompt contaminated-clothing removal. Skin checks are scheduled for workers with regular cement contact.
Assurance is practical. Frontline supervisors use daily binary checks on water suppression, extraction, RPE fit, eyewash, welfare and cleaning method. H&S advisers sample high-risk jobs and review health surveillance findings. Lessons from dermatitis, dust complaints, failed face-fit checks or poor welfare are reviewed at management meetings and built into procurement and subcontractor standards.
| Activity | How BuildOut manages it | Evidence |
|---|---|---|
| Assess | Identifies dry dust, RCS, wet cement, skin and eye risks by task. | COSHH and construction dust assessment. |
| Analyse | Reviews materials, methods, duration, location, nearby trades and welfare. | Pre-start risk review. |
| Train | Trains workers on dust, wet cement, RPE, skin protection and reporting. | Toolbox talks and training matrix. |
| Implement | Uses wet cutting, extraction, segregation, PPE/RPE, washing and skin checks. | Site inspections and health records. |
| Check | Verifies controls daily and audits higher-risk work. | Supervisor and H&S assurance checks. |
| Learn | Investigates dust complaints, skin symptoms and failed controls. | Incident and action tracker. |
| Improve | Updates methods, procurement and subcontractor requirements. | Revised standards and close-out evidence. |
What should each role learn and demonstrate?
Learning must match the decisions people make, from recognising danger to checking that controls work.
Briefings should tell people how to act, but attendance alone does not show competence. Assess the real decision or task, record who assessed it and revisit after a material change, failed control or incident. A local authorisation is task-specific; no universal external certificate is implied.
On a small screen, scroll this table sideways to read all columns.
| Role and learning | Demonstration and assessor | Record and reassessment trigger |
|---|---|---|
| Worker: distinguish powder, wet slurry and hardened-material dust. | Supervisor observes bag opening, cutting and skin-contact stop responses on site. | Task briefing and observation; repeat after product or method change. |
| Tool operator: suppression, on-tool extraction and RPE. | Competent assessor checks setup, airflow/water, face fit and shutdown on failure. | Task authorisation, RPE fit and equipment record; review after failed check. |
| Supervisor: segregation, cleaning and washing. | Safety lead tests a cross-trade dust scenario and a wet cement contamination response. | Site inspection and corrective action; revisit after exposure report. |
| Buyer/designer: lower-exposure method. | Hygiene/construction specialist reviews pre-cut, pre-mixed and tool specifications against actual task. | Procurement and method decision; recheck after redesign. |
| Safety/OH: surveillance and jurisdiction. | Competent adviser records whether skin or respiratory surveillance is indicated and separates GB/NI legal route. | Dated professional judgement; review after symptoms or exposure change. |
How does cement dust support qualification study and professional development?
Cement dust helps learners connect COSHH, construction dust, silica, dermatitis, RPE, health surveillance, welfare and supervision.
For the NEBOSH Construction Certificate, cement dust is a strong health-risk example because it combines immediate burns, chronic dermatitis, respiratory irritation and silica-related lung disease where hardened materials are cut or broken.
For the NEBOSH National General Certificate, the topic supports hazardous substances, hierarchy of control, PPE limitations, health surveillance and worker training. For Diploma study, it supports occupational hygiene, exposure monitoring and management-system assurance.
A scenario answer should always control the source first: avoid dry cutting, use water suppression or extraction, segregate, provide welfare, select RPE properly, train workers and monitor whether controls work.
| Learning context | What to know | Scenario application |
|---|---|---|
| NEBOSH Construction Certificate | Construction dust, COSHH, silica, dermatitis, welfare and RPE. | Workers dry cut concrete blocks in a refurbishment area. |
| NEBOSH National General Certificate | Hazardous substances and health surveillance. | Labourer develops hand dermatitis from wet cement. |
| NEBOSH Diploma | Occupational hygiene and assurance. | Audit finds no face-fit testing or dust monitoring evidence. |
| Supervisor CPD | Daily control verification and stop-work triggers. | Wet cutting water supply fails during cutting. |
How can a management system sustain effective decisions?
Give each hazard or support route an owner, a control, a check and a response to failure.
Join design, procurement, COSHH assessment, tool maintenance, washing, surveillance and subcontractor assurance. A supervisor should observe the actual cut or mix and verify that dust capture and skin protection work, then close defects before restart. An owner should sample actual work and corrective actions, not accept a policy or certificate as evidence that the controls work.
The free GB regulator guide HSE Managing for health and safety (HSG65) explains a plan–do–check–act approach: assign controls and owners, involve workers, check work as done, and correct failures. For Northern Ireland, use HSENI risk assessment guidance for the local duty. A certificate alone does not demonstrate that a control works.
What are the warning signs that cement dust is not controlled?
Warning signs include visible dust clouds, dry sweeping, wet cement on skin, poor welfare, unfitted masks and skin or breathing symptoms.
Visible dust is an obvious warning sign, but invisible respirable dust can still harm. Supervisors should look for task method, water supply, extraction, cleaning, dust on clothing and whether other trades are being exposed.
Wet cement warning signs are just as important: workers kneeling in wet concrete, cement in boots, gloves full of slurry, no eyewash, no washing facilities or workers continuing after skin irritation.
Management warning signs include generic COSHH assessments, no silica distinction, no face-fit testing, no skin checks, poor subcontractor control and no action after symptoms.
| Warning sign | How harm can develop | Improvement action |
|---|---|---|
| Dry cutting | RCS and cement dust exposure rises. | Use wet methods or on-tool extraction. |
| Dry sweeping | Settled dust is re-suspended. | Use suitable vacuum or wet cleaning. |
| Unfitted RPE | Mask may leak and fail. | Fit test and train. |
| Cement in boots or gloves | Wet cement burns can develop. | Stop, wash and change contaminated PPE. |
| No welfare | Workers cannot decontaminate. | Provide washing before work starts. |
| Skin symptoms | Dermatitis or burns may be developing. | Review controls and arrange skin checks. |
| Dust complaints from nearby trades | Controls are not protecting others. | Improve segregation and source control. |
Cement dust FAQs: what do people ask?
People usually ask about cement dust health effects, wet cement burns, silica, RPE, skin protection, welfare and health surveillance.
What is cement dust?
Cement dust is airborne or settled dust from dry cement, mortar, concrete or cement-based products.
Is cement dust hazardous?
Yes. It can irritate the airways, harm skin and eyes, and may involve respirable crystalline silica when cutting or breaking dried concrete or mortar.
What is the difference between cement dust and silica dust?
Cement dust may be an irritant dust, while cutting or breaking concrete, mortar, stone or masonry can release respirable crystalline silica.
Can wet cement burn skin?
Yes. Wet cement is alkaline and can cause serious burns if trapped against skin or inside boots or gloves.
Can cement cause dermatitis?
Yes. Cement can cause irritant dermatitis and allergic contact dermatitis, including chromate-related sensitisation.
What controls are best for cement dust?
Eliminate dusty work where possible, use pre-mixed products, wet methods, on-tool extraction, segregation, cleaning controls and suitable RPE where residual risk remains.
Is RPE enough for cement dust?
No. RPE is a final protective layer and should be used with dust suppression, extraction, task design and supervision.
What PPE is needed for wet cement?
Suitable alkali-resistant gloves, eye/face protection, protective clothing and footwear may be needed based on task risk.
What welfare is needed?
Workers need washing facilities, clean water, skin-care arrangements, clean/dirty separation and a way to remove contaminated clothing promptly.
When is health surveillance needed?
Skin checks may be needed where cement contact can cause dermatitis, and respiratory surveillance may be needed where respiratory risks remain.
What training should cement workers receive?
They should understand dust risks, wet cement burns, dermatitis, RPE, PPE, welfare, cleaning and early symptom reporting.
What should happen after cement enters the eye?
Stop work, call 999 for suspected chemical eye injury and flush the eye immediately with plentiful cool or lukewarm water while help is arranged; follow the SDS and trained first-aid plan.
Chemical hazard symbols: what do they mean?

Exploding bomb
Explosive, self-reactive or organic peroxide hazards.
Flame
Flammable, self-heating or pyrophoric substances.

Flame over circle
Oxidising substances that can intensify fire.

Gas cylinder
Gas under pressure.
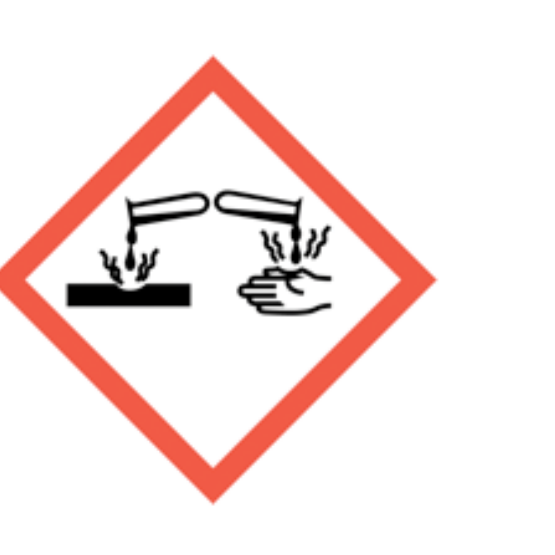
Corrosion
Skin burns, eye damage or corrosive to metals.

Skull and crossbones
Acute toxicity.

Exclamation mark
Irritation, harmful effects or skin sensitisation; some classifications cover drowsiness, dizziness or ozone-layer hazard. Read the actual hazard statements. Skin sensitisation differs from respiratory sensitisation.
Health hazard
Serious health hazards, including organ damage, aspiration hazard, respiratory sensitisation, cancer and reproductive effects; some can follow a single exposure.
Environment
Hazardous to the aquatic environment.
Which acronyms are useful for cement dust?
Acronyms help readers follow dust, respiratory, COSHH, RPE and health-surveillance language.
| Acronym or term | Meaning | Why it matters |
|---|---|---|
| COSHH | Control of Substances Hazardous to Health Regulations | Main framework for cement, dust and silica control. |
| RCS | Respirable Crystalline Silica | Fine silica dust that can cause serious lung disease. |
| RPE | Respiratory Protective Equipment | Breathing protection used where residual dust risk remains. |
| PPE | Personal Protective Equipment | Gloves, eye protection, clothing and other worn protection. |
| LEV | Local Exhaust Ventilation | Engineering control that captures dust at source. |
| APF | Assigned Protection Factor | RPE performance measure. |
| OH | Occupational Health | Supports health surveillance and work-related health advice. |
| SDS | Safety Data Sheet | Substance hazard and control information. |
| RIDDOR | Reporting of Injuries, Diseases and Dangerous Occurrences Regulations | Reporting route for some occupational diseases where criteria are met. |