SHARE Knowledge Hub
Hand-Arm Vibration Syndrome (HAVS)
Hand-arm vibration syndrome (HAVS) is lasting injury to blood vessels, nerves and other hand-arm tissues after repeated vibration from hand-held tools, hand-guided machines or vibrating workpieces. Tingling, numbness, finger blanching and loss of grip can make ordinary tasks unsafe and may become permanent. The key workplace decision is to reduce vibration at source, combine every tool’s actual trigger time into the daily exposure assessment, and act early on symptoms.
Understanding Hand-Arm Vibration Syndrome (HAVS)
Hand-arm vibration (HAV) is vibration transmitted into the hands and arms from a hand-held, hand-guided or hand-fed powered process.
Why this matters at work
Reduced sensation or grip also has secondary safety implications: a worker may lose control of a knife, grinder or steering/control element, drop an object, miss a heat or sharp-edge cue, or be unable to perform rescue-critical manual tasks.
Use scheduling to support elimination, mechanisation, suitable low-vibration equipment and effective maintenance. Rotation only reduces individual exposure if replacement tasks do not add comparable vibration; spreading hazardous work among more people is not elimination. Consider grip force, posture, workpiece support and sharp suitable accessories as part of the real task. Avoid claiming a generic safe trigger time for every model or material. Warm, dry hands and suitable clothing can support circulation and comfort, but anti-vibration gloves should not be credited as cancelling the exposure. Check compatibility with other hazards and equipment. Train workers in control indicators, defect reporting and early symptoms, and verify that work plans are followed during peak demand. Use proportionate monitoring or observation to check representative trigger times and review after changes. Occupational-health recommendations may alter an individual's work even when a calculated value appears low. Record action owners and effectiveness evidence, keeping clinical details private and distinguishing daily exposure calculations from technical equipment acceptance and work authorisation.
How organisations manage this in practice
Take the report seriously, prevent avoidable further exposure and arrange suitable occupational-health or clinical assessment. These symptoms can have different causes; a manager or chat answer should not diagnose HAVS, carpal tunnel syndrome or Raynaud's. Do not wait for a definite occupational diagnosis before reviewing exposure and control concerns. Prompt reporting and early intervention can help prevent worsening harm.
The legal file should contain an activity and tool inventory, representative vibration-data source, exposure estimates, control options, purchasing criteria, maintenance and training records, consultation, health-surveillance arrangements, individual exposure and medical-action decisions under proper privacy controls, and periodic review.
Grounds staff use several powered tools during one round. The manager assesses their combined exposure and tests equipment selection, maintenance and work planning. The crew records actual use during a typical round to check whether the change worked.
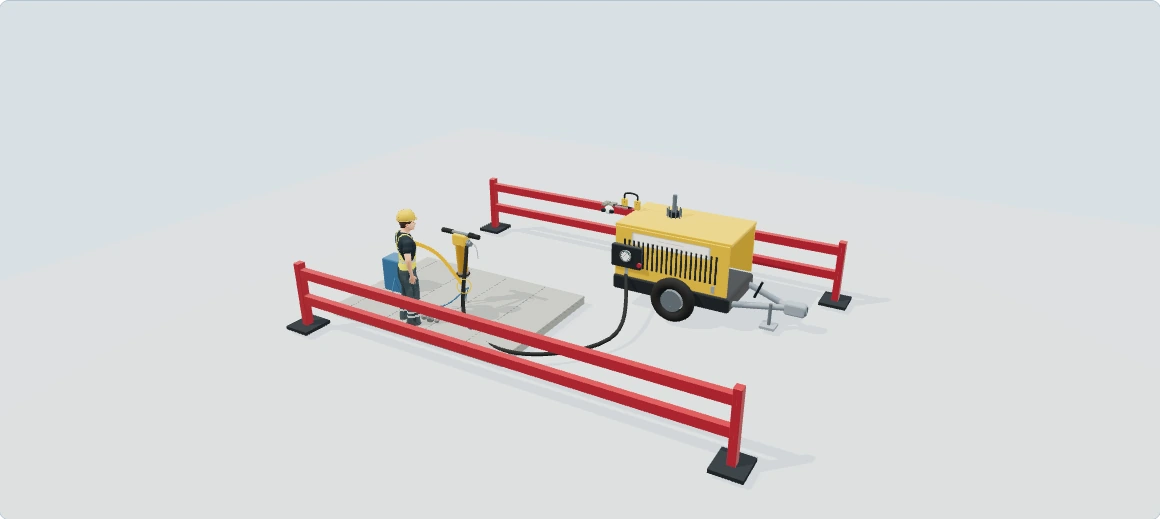

Pneumatic breaking: vibration, stored air and the people nearby
Explore how this equipment can harm its users and other people, then follow the practical measures that interrupt each pathway. This is a hazards and good-practice lesson; the separate checklist remains the pre-use/safety-check activity.
Hazards and good practice: learn what can hurt people during use, change and maintenance. Pre-use and safety checks stay in the separate checklist.
Checksheets and risk assessments
Equipment checksheets
Risk assessment forms
- Hand-arm vibration task/exposure assessment · Word
- Task and personal noise-exposure assessment · Word
Risk assessment examples
Forms and tools
Full written walkthrough — all 8 steps
1. Remove or redesign the breaking task
What is happening: The breaker, hose and compressor form one work system; the tool is shown stationary.
How harm can occur: Breaking can expose the operator to vibration, flying material, dust and high effort.
Best practice to apply: Consider design changes, prefabrication or a suitable mechanised/remote method before selecting a hand-held tool.
Why this works: Removing hand-held breaking can prevent transmission through the hands instead of only rationing exposure.
Vibration at Work · What is hand-arm vibration and whole-body vibration?2. Trace vibration into the hands
What is happening: The handle is the interface where mechanical vibration reaches the user during contact.
How harm can occur: Repeated exposure can damage blood vessels, nerves, muscles and joints; early symptoms may be overlooked.
Best practice to apply: Select a suitable productive lower-vibration method and tool, then assess the actual hand-contact exposure.
Why this works: Lower transmission and shorter productive contact reduce the exposure pathway; the animation is not a vibration measurement.
Vibration at Work · How can hand-arm vibration affect blood flow, sensation and everyday hand function?3. Understand trigger time and the full day
What is happening: Actual contact with a vibrating tool differs from the length of the booking or shift.
How harm can occur: Under-counted bursts and other tools can leave cumulative exposure unmanaged.
Best practice to apply: Observe representative work, include every relevant tool and task, and use suitable data and work-pattern information.
Why this works: A whole-day picture prevents a short-looking individual job concealing a larger combined exposure.
Vibration at Work · How do HAV trigger time and points work?4. Keep the tool working efficiently
What is happening: Bit condition, lubrication, handle isolation and the material affect the effort and time required.
How harm can occur: A blunt bit or defective mounting can increase vibration, force and duration.
Best practice to apply: Maintain the tool and consumables for the material; stop for abnormal vibration and verify repairs before return.
Why this works: An efficient maintained tool avoids prolonged contact and avoids treating job rotation as the main control.
Vibration at Work · What is hand-arm vibration and whole-body vibration?5. Control compressed-air release
What is happening: The hose and coupling contain energy independently of the operator's trigger position.
How harm can occur: A failed connection or released hose can whip, strike or inject material; trapped air may remain after shutdown.
Best practice to apply: Use the specified hose, connections and restraint arrangements; isolate and release stored pressure by the actual procedure before disconnection.
Why this works: Removing the energy before opening the connection addresses the release mechanism directly.
Vibration at Work · How is a defensible vibration assessment made?6. Protect the surrounding work area
What is happening: The compressor and breaking point also affect people who are not holding the tool.
How harm can occur: Noise, exhaust, dust, flying fragments and trailing hoses can harm nearby trades and passers-by.
Best practice to apply: Provide suitable ventilation, source controls, separation, route management and substance-specific precautions.
Why this works: The task boundary must include bystanders and the compressor, not only the tool user's hands.
Vibration at Work · What is hand-arm vibration and whole-body vibration?7. Act on symptoms and changed work
What is happening: Changes in grip, difficulty, numbness or tingling need a response rather than normalisation.
How harm can occur: Continued exposure can worsen injury and make a worker less able to control the task.
Best practice to apply: Report symptoms promptly and use occupational-health and exposure-review arrangements; do not diagnose HAVS from this model.
Why this works: Early reporting can trigger preventive changes before more harm occurs; gloves are not a substitute for vibration control.
Vibration at Work · When is health surveillance needed?8. Separate servicing from production
What is happening: Maintenance can expose stored air, hot parts and components held under load.
How harm can occur: Unexpected operation or energy release can injure the fitter and the next user.
Best practice to apply: Use competent task-specific shutdown, isolation and maintenance; update the equipment/exposure information after material changes.
Why this works: A repair needs a verified return to work, not only a closed defect record.
Vibration at Work · What evidence should management sample?
Illustrative awareness learning. Geometry, colours and movement do not establish safe distances, capacity, exposure, isolation or work permission. Use the actual assessment, equipment information and competent arrangements.
The wider workplace has its own account and subscription access. Exploring this lesson does not grant access, record course completion or authorise work.
UK guidance for further reading
HSE: Pneumatic breakingHow can I practise this topic in 3D?

Numb fingers after repeated sanding

A damaged breaker is used for excessive trigger time
All related inspection points 2 across 2 locations
Garage workshop 1 inspection point
Construction site 1 inspection point
Practice in the SHAREhub environment. Browser practice is separate from workplace competence and formal learning records.
What are the key facts about Hand-Arm Vibration Syndrome?
The key facts are that HAVS is preventable, often progressive and strongly linked to tool choice, task design and exposure time.
Best-practice guide: Hand-Arm Vibration Syndrome (HAVS)

What are the key facts about Hand-Arm Vibration Syndrome?
The key facts are that HAVS is preventable, often progressive and strongly linked to tool choice, task design and exposure time. Hand-arm vibration syndrome (HAVS) is lasting injury to blood vessels, nerves and other hand-arm tissues after repeated vibration from hand-held tools, hand-guided machines or vibrating workpieces.
Turn hand-arm vibration syndrome (havs) knowledge into a decision
Hand-arm vibration syndrome (HAVS) is lasting injury to blood vessels, nerves and other hand-arm tissues after repeated vibration from hand-held tools, hand-guided machines or vibrating workpieces. Tingling, numbness, finger blanching and loss of grip can make ordinary tasks unsafe and may become permanent. HAVS risk register, task activity map, tool-user list, RAMS review and exposure assessment.
the site team worked example
Assessing: the site team identifies all vibrating-tool activities at tender, pre-construction and task-planning stages. It records workers, subcontractors, tools, accessories, materials, expected trigger time, task frequency, cold exposure and whether several tools may be used by the same person in one day. Evidence / response: HAVS risk register, task activity map, tool-user list, RAMS review and exposure assessment. Baseline monitoring: Before setting limits, supervisors observe representative work such as breaking out channels, drilling anchor holes, cutting masonry and grinding steel. They time actual trigger use, record tool model and consumable condition, then calculate likely A(8) and exposure points for normal and peak days. Evidence / response: Trigger-time observation sheets, daily exposure calculations, tool tag data and worker feedback.
Harm Chain
Exposure route 1: Breaker, grinder or sander handle transmits vibration through the grip Finger blood vessels: cold-triggered blanching and painful rewarming. Repeated tool or vibrating workpiece contact: Hand nerves: tingling, numbness and reduced touch sensitivity; fine control can deteriorate. Exposure route 3: Long or forceful use, awkward posture and worn consumables Muscles, joints and grip may be affected; handling and tool control can become unsafe.
Choose controls for hand-arm vibration syndrome (havs)
Elimination: Change the design or use a suitable preformed section so the concrete breakout is unnecessary. Substitution: Use an assessed remote or lower-vibration demolition method where it suits the concrete, access and structural conditions. Engineering controls: Locate services and segregate the breakout area; protect people from fragments and equipment movements. Engineering controls: Provide suitable tool support and effective dust control with compatible maintained breaking equipment. Administrative controls: Confirm services and structural limits, then plan actual vibration exposure, dust control and noise for the work. Read the full control table for qualifications, ownership and verification. Use the actual task and applicable jurisdiction; existing technical approval remains unchanged.
Use the full hand-arm vibration syndrome (havs) lesson
Use the full topic for the decision points, practical examples, detailed control tables and source scope. HSE guidance applies to Great Britain; use HSENI for the Northern Ireland route and the source’s stated jurisdiction. A simplified guide does not change the page’s technical-review or approval status.

Read all six steps as text
1. What are the key facts about Hand-Arm Vibration Syndrome?
The key facts are that HAVS is preventable, often progressive and strongly linked to tool choice, task design and exposure time.
- Avoid / redesign: Change the design or use a suitable preformed section so the concrete breakout is unnecessary.
- Control the task: Locate services and segregate the breakout area; protect people from fragments and equipment movements.
- Verify before release: If the hazardous step remains, retain a task assessment and select the stronger feasible remaining controls.
The key facts are that HAVS is preventable, often progressive and strongly linked to tool choice, task design and exposure time. Hand-arm vibration syndrome (HAVS) is lasting injury to blood vessels, nerves and other hand-arm tissues after repeated vibration from hand-held tools, hand-guided machines or vibrating workpieces.
Apply it: Which part of this plan would you check at the workface before authorising the task?
2. Turn hand-arm vibration syndrome (havs) knowledge into a decision
Use the evidence to improve the actual work arrangement.
- Change at source: Change the design or use a suitable preformed section so the concrete breakout is unnecessary.
- Make it observable: If the hazardous step remains, retain a task assessment and select the stronger feasible remaining controls.
- Keep useful evidence: HAVS risk register, task activity map, tool-user list, RAMS review and exposure assessment.
Hand-arm vibration syndrome (HAVS) is lasting injury to blood vessels, nerves and other hand-arm tissues after repeated vibration from hand-held tools, hand-guided machines or vibrating workpieces. Tingling, numbness, finger blanching and loss of grip can make ordinary tasks unsafe and may become permanent. HAVS risk register, task activity map, tool-user list, RAMS review and exposure assessment.
Apply it: What evidence would show that the change improves this task, rather than only completing a record?
3. the site team worked example
Example: a practical application of the existing topic lesson.
- Assessing: the site team identifies all vibrating-tool activities at tender, pre-construction and task-planning stages.
- Baseline monitoring: Before setting limits, supervisors observe representative work such as breaking out channels, drilling anchor holes, cutting masonry and grinding steel.
- Analysing: The project team challenges the work method before accepting exposure.
Assessing: the site team identifies all vibrating-tool activities at tender, pre-construction and task-planning stages. It records workers, subcontractors, tools, accessories, materials, expected trigger time, task frequency, cold exposure and whether several tools may be used by the same person in one day. Evidence / response: HAVS risk register, task activity map, tool-user list, RAMS review and exposure assessment. Baseline monitoring: Before setting limits, supervisors observe representative work such as breaking out channels, drilling anchor holes, cutting masonry and grinding steel. They time actual trigger use, record tool model and consumable condition, then calculate likely A(8) and exposure points for normal and peak days. Evidence / response: Trigger-time observation sheets, daily exposure calculations, tool tag data and worker feedback.
Apply it: At which point would you hold this example, and what evidence would allow it to proceed?
4. Harm Chain
Connect the task, the route to the person and the control that can fail.
- Exposure route 1: Breaker, grinder or sander handle transmits vibration through the grip Finger blood vessels: cold-triggered blanching and painful rewarming.
- Repeated tool or vibrating workpiece contact: Hand nerves: tingling, numbness and reduced touch sensitivity; fine control can deteriorate.
- Exposure route 3: Long or forceful use, awkward posture and worn consumables Muscles, joints and grip may be affected; handling and tool control can become unsafe.
Exposure route 1: Breaker, grinder or sander handle transmits vibration through the grip Finger blood vessels: cold-triggered blanching and painful rewarming. Repeated tool or vibrating workpiece contact: Hand nerves: tingling, numbness and reduced touch sensitivity; fine control can deteriorate. Exposure route 3: Long or forceful use, awkward posture and worn consumables Muscles, joints and grip may be affected; handling and tool control can become unsafe.
Apply it: Who could be exposed, including other trades, cleaners, maintainers and people nearby?
5. Choose controls for hand-arm vibration syndrome (havs)
Start with the stronger practicable options and verify their effect.
- Elimination: Change the design or use a suitable preformed section so the concrete breakout is unnecessary.
- Substitution: Use an assessed remote or lower-vibration demolition method where it suits the concrete, access and structural conditions.
- Engineering controls: Locate services and segregate the breakout area; protect people from fragments and equipment movements.
- Engineering controls: Provide suitable tool support and effective dust control with compatible maintained breaking equipment.
- Administrative controls: Confirm services and structural limits, then plan actual vibration exposure, dust control and noise for the work.
Elimination: Change the design or use a suitable preformed section so the concrete breakout is unnecessary. Substitution: Use an assessed remote or lower-vibration demolition method where it suits the concrete, access and structural conditions. Engineering controls: Locate services and segregate the breakout area; protect people from fragments and equipment movements. Engineering controls: Provide suitable tool support and effective dust control with compatible maintained breaking equipment. Administrative controls: Confirm services and structural limits, then plan actual vibration exposure, dust control and noise for the work. Read the full control table for qualifications, ownership and verification. Use the actual task and applicable jurisdiction; existing technical approval remains unchanged.
Apply it: Which stronger option can be used here, and who will verify it before accepting the remaining risk?
6. Use the full hand-arm vibration syndrome (havs) lesson
Follow the official sources below and retain the task-specific evidence.
- Official guidance: HSE hand-arm vibration overview
- Official guidance: HSENI hand-arm vibration
- Task decision: HAVS risk register, task activity map, tool-user list, RAMS review and exposure assessment.
Use the full topic for the decision points, practical examples, detailed control tables and source scope. HSE guidance applies to Great Britain; use HSENI for the Northern Ireland route and the source’s stated jurisdiction. A simplified guide does not change the page’s technical-review or approval status.
Apply it: Which official source and full-topic section will you use to resolve the next decision?
HAVS can become permanent
Early tingling or numbness should never be ignored because established nerve and vascular damage may not fully recover.
Trigger time is often overestimated or underestimated
Assessment should measure actual time on the trigger, not the whole task duration or shift length.
Daily exposure is cumulative
A worker who uses a breaker, grinder and hammer drill in one day needs all exposure contributions counted together.
Tool selection is a control
Lower-vibration tools, sharper consumables and alternative methods can reduce exposure before relying on worker rotation.
Maintenance matters
Worn bearings, blunt bits, damaged discs, poor balance and old tools can increase vibration and force.
Digital monitoring needs judgement
Tool tags, timers and wearable systems help with trigger-time evidence, but they do not replace a competent HAVS assessment.
Health surveillance is a control loop
It finds early symptoms, prompts exposure review and prevents continued harm.
What should readers understand before using HAVS information?
HAVS information supports workplace risk control and early reporting, but diagnosis and fitness advice need qualified occupational-health or medical input.
Workers should report tingling, numbness, blanching, pain, reduced grip or reduced dexterity early. Supervisors should respond by reviewing exposure and arranging the appropriate health-surveillance route rather than waiting for symptoms to worsen.
This page is not medical advice. If symptoms affect safe work, progress, or are severe or unusual, the person should use occupational health, GP or qualified medical advice. Confidential health details should not be exposed through routine site records.
| Situation | Workplace action | Boundary |
|---|---|---|
| Early symptoms | Stop treating exposure as routine and refer into health surveillance. | Do not diagnose or tell the worker to carry on. |
| Confirmed HAVS | Review restrictions, alternative work and exposure controls. | Use occupational-health fitness advice. |
| Safety-critical tasks | Consider grip, dexterity and sensation implications. | Do not make informal medical judgements. |
| Health records | Protect medical confidentiality and keep management records proportionate. | Do not circulate symptom details. |
| New symptoms after high exposure | Review recent tools, trigger time and controls. | Do not assume symptoms are unrelated to work. |
What is Hand-Arm Vibration Syndrome?
HAVS is a group of vascular, neurological and hand-function effects caused by repeated vibration entering the hands and arms.
Harm Chain


Read the complete visual as text
- Breaker, grinder or sander handle transmits vibration through the grip: Affected system and harm: Finger blood vessels: cold-triggered blanching and painful rewarming. Early warning: White or pale fingers in cold, colour change or pain. Stop and escalation: Report promptly; supervisor reduces exposure and refers for occupational-health assessment.
- Repeated tool or vibrating workpiece contact: Affected system and harm: Hand nerves: tingling, numbness and reduced touch sensitivity; fine control can deteriorate. Early warning: Pins and needles after use, difficulty with buttons or small parts. Stop and escalation: Stop the exposure-producing task pending competent review; do not wait for permanent numbness.
- Long or forceful use, awkward posture and worn consumables: Affected system and harm: Muscles, joints and grip may be affected; handling and tool control can become unsafe. Early warning: Reduced grip, clumsiness, pain or repeated dropped items. Stop and escalation: Check task, tool condition, trigger time and health-surveillance advice before further use.
The hazard is vibration transmitted from a tool, hand-guided machine or vibrating workpiece, not the worker or their symptoms. Repeated exposure can disturb finger circulation and sensation and impair grip and fine movement. Cold can trigger blanching attacks and make work harder, but warmth alone does not prevent vibration injury. Some loss of function may become permanent, so the first tingling or numbness matters.
| Source and route | Affected system and harm | Early warning | Stop and escalation |
|---|---|---|---|
| Breaker, grinder or sander handle transmits vibration through the grip | Finger blood vessels: cold-triggered blanching and painful rewarming. | White or pale fingers in cold, colour change or pain. | Report promptly; supervisor reduces exposure and refers for occupational-health assessment. |
| Repeated tool or vibrating workpiece contact | Hand nerves: tingling, numbness and reduced touch sensitivity; fine control can deteriorate. | Pins and needles after use, difficulty with buttons or small parts. | Stop the exposure-producing task pending competent review; do not wait for permanent numbness. |
| Long or forceful use, awkward posture and worn consumables | Muscles, joints and grip may be affected; handling and tool control can become unsafe. | Reduced grip, clumsiness, pain or repeated dropped items. | Check task, tool condition, trigger time and health-surveillance advice before further use. |
The amount of vibration, actual contact time, number of tools, force, posture, consumable condition and previous exposure change the risk. Early reporting permits exposure reduction and confidential clinical assessment. HSE health-effects and employer advice; HSENI HAV guidance.
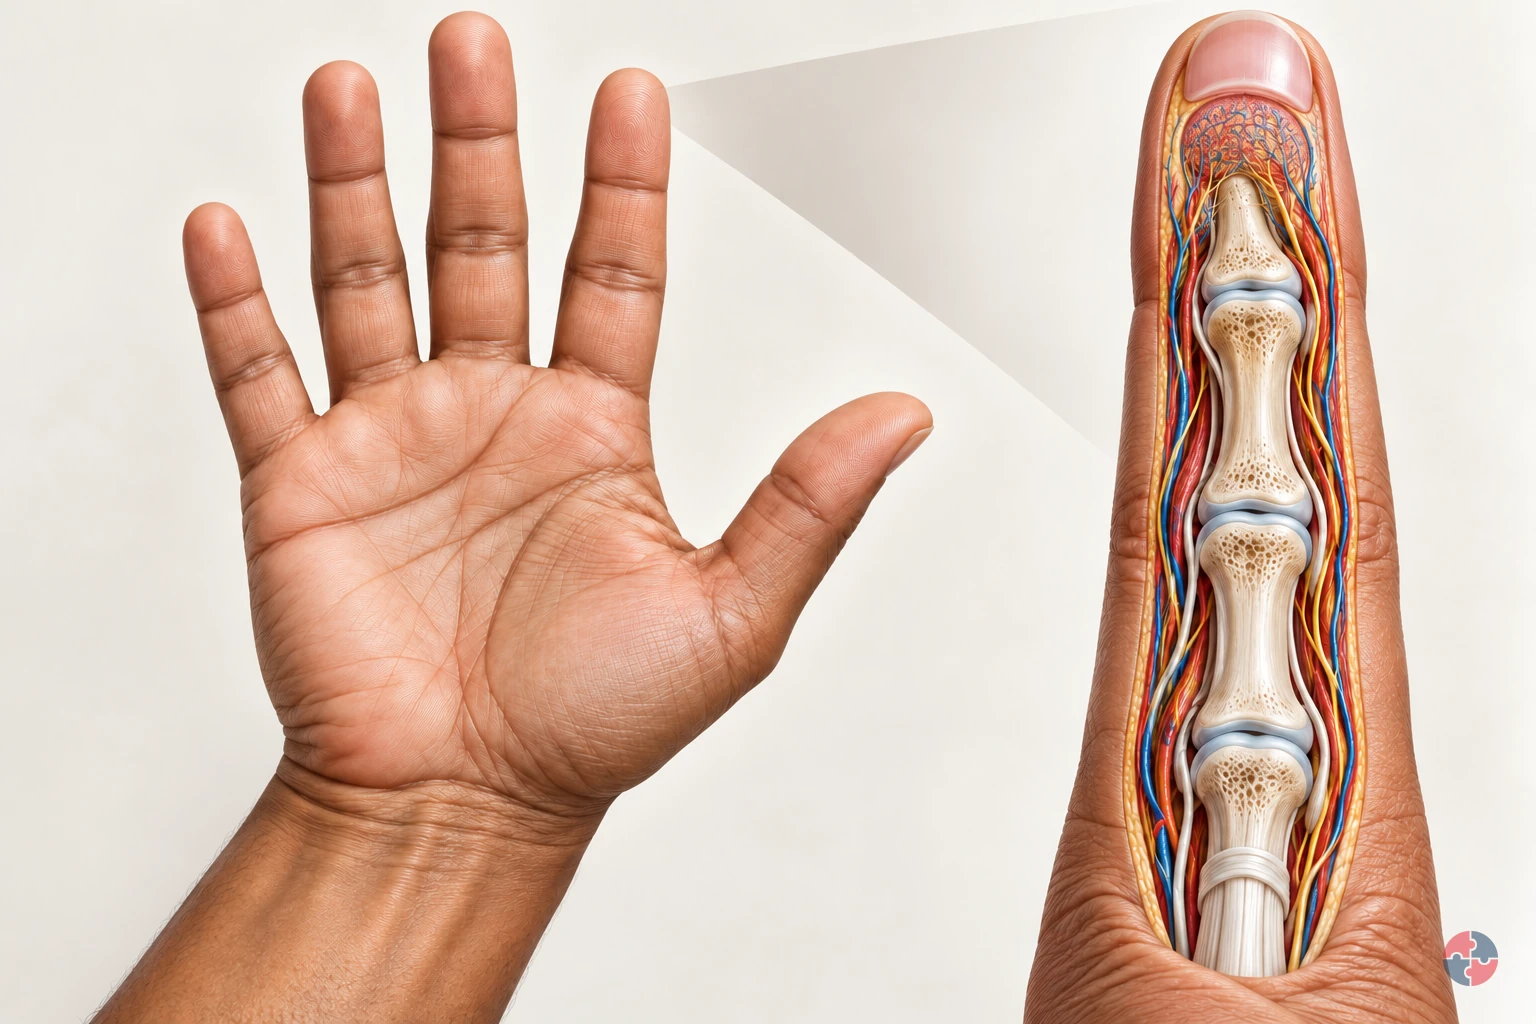
How can hand-arm vibration affect blood flow, sensation and everyday hand function?
Interactive anatomy · Hand-arm vibration: circulation, sensation and function · Updated 2026-10-23
Read all anatomy and process explanations without the viewer
Normal function and example health effects, not a personal exposure calculator or clinical assessment. Whole-body vibration and back effects require a separate lesson. Trigger-time or safe-remaining-time calculations Symptom diagnosis, disease staging or fitness-for-work clearance Hand-colour based risk scores or glove-based clearance Personal health questionnaires, employer surveillance records or dexterity tests Warmth may alter episode context; it cannot erase lasting effects or return a cured state.
Hand surface
The hand combines blood supply, sensation, movement and support. The hand combines tissue support, blood supply, sensation and movement in the same small space. Use the skin outline, nail and joints as landmarks when opening the enlarged finger cutaways. The separated layers help identify different functions; they do not imply that vessels, nerves or tendons are normally detached from their neighbouring tissues. Health and Safety Executive: Hand-arm vibration: A guide for employees, INDG296
Digital artery
Small arteries carry blood towards finger tissues. Digital arteries carry blood towards the tissues of the fingers as part of the wider circulation. Trace the supply route into the enlarged finger before following the smaller vessels and the separate return route. The model enlarges the artery and uses symbols to make the direction clear; it does not measure the person’s blood flow. Manchester University NHS Foundation Trust: Blood Vessels
Small-vessel network
Smaller vessels distribute blood through the tissues. The small-vessel network distributes the blood supply through the finger tissues, supporting their need for oxygen and nutrients. Locate the branches between the larger supply and return routes. The pattern is a simplified teaching layout, not a scan of an individual’s vessels, and its size and colours are used to distinguish circulation from the nearby sensory pathway. Manchester University NHS Foundation Trust: Blood Vessels
Venous return
Veins return blood from the hand. Veins provide the return route for blood leaving the finger tissues, connecting the hand back towards the wider circulation. Follow the return arrow after tracing the arterial supply and smaller vessels. Supply and return form connected parts of the circulation; the blood does not stop permanently at the fingertip or become a sensory nerve signal. Manchester University NHS Foundation Trust: Blood Vessels
Sensory nerve
Sensory nerves carry information such as touch. Sensory nerves carry information such as touch from the hand towards the central nervous system. In the enlarged finger, follow the nerve separately from the blood vessels. The moving message is a symbol for communication, not a spark or liquid inside a tube. This pathway helps explain sensation without testing or diagnosing an individual’s nerve function. NHS: Peripheral neuropathy
Fingertip sensation
Feeling small objects helps with precise tasks. Fingertip sensation helps a person detect contact and handle small objects precisely. The sensory information works alongside the separate muscle and tendon system that moves the fingers. Use the small-object illustration to connect this function with an ordinary task. It is an explanation of why feeling matters, not a dexterity test or an assessment of a worker’s symptoms. Health and Safety Executive: Worried about your hands? · Health and Safety Executive: Hand-arm vibration: Guidance on Regulations L140, second edition
Muscle and tendon
Muscles and tendons work together to grip and move. Muscles generate a pull that tendons transmit to the finger bones, allowing the joints to bend and the hand to close around an object. Trace the muscle–tendon relationship separately from nerves and vessels. The tendon carries mechanical force; the sensory nerve carries information, and the blood supply supports the living tissues involved. Gloucestershire Hospitals NHS Foundation Trust: Flexor Tendon Injuries
Joint
A joint allows neighbouring bones to move relative to one another. A joint is where neighbouring bones meet and can move relative to each other. Finger joints allow the hand to bend around a handle as muscles pull through tendons. Use their positions to orient the enlarged finger view and distinguish movement from the circulation and sensory pathways. This contextual structure does not depict a particular arthritis or establish an injury diagnosis. Health and Safety Executive: Hand-arm vibration: Guidance on Regulations L140, second edition · NHS: Arthritis
Tool contact
Vibration can enter the hand through a powered tool or vibrating workpiece. The source is outside the body. In the task view, an articulated hand wraps around a powered-drill handle. Tool and hand move together at the contact. Exposure depends on the actual equipment and how it is used; the visible movement is a teaching demonstration. Health and Safety Executive: Construction vibration questions · Health and Safety Executive: Hand-arm vibration: A guide for employees, INDG296
Cold-trigger context
Cold can trigger blanching episodes in people with vibration-related vascular effects. Cold is a context outside the hand. Warming may affect an episode; it does not prove lasting effects have gone away. Health and Safety Executive: Worried about your hands? · Health and Safety Executive: Hand-arm vibration: Guidance on Regulations L140, second edition
Median-nerve cross-link
Carpal tunnel syndrome is a separate nerve-compression condition. It can also be associated with vibration exposure. The carpal-tunnel lesson explains the median nerve at the wrist separately. Health and Safety Executive: Hand-arm vibration: A guide for employees, INDG296 · NHS: Carpal tunnel syndrome
Open the complete process transcript
The process, step by step
Follow circulation
The hand needs a continuing blood supply to support its tissues. Arteries bring blood towards the fingers, smaller vessels distribute it through the tissues, and veins provide a return route towards the body. Start with the whole hand, locate the highlighted index finger and use the enlarged view to trace this supply-and-return arrangement. The skin, nail and joints help orient the cutaway. The vessels and flow symbols are enlarged for teaching rather than showing a person’s actual vessel sizes or circulation rate. Keep this route separate from the sensory nerve, which carries information rather than blood. Manchester University NHS Foundation Trust: Blood Vessels
What to watch: Find the highlighted index finger, then locate the artery, small-vessel network and venous return in the enlarged circulation view.
Why it matters: Circulation delivers the oxygen and nutrients that tissues need to function. The return route completes the local pathway, connecting the finger with the wider circulation rather than ending at the fingertip.
Explore this step: Trace the supply and return in order, using the nail and joints to keep your orientation in the enlarged finger.
Follow touch
Touch information from the finger travels along sensory nerves towards the central nervous system. This information helps a person feel contact and handle small objects, alongside the separate nerves and muscles that control movement. In the enlarged finger, locate the sensory pathway and compare its symbolic messages with the circulation route from the previous step. A nerve signal is communication, not blood flowing through another vessel. The fingertip and small-object illustration connect this internal pathway with a familiar task. They demonstrate why sensation matters for precise work; they do not test an individual’s nerve function or dexterity. NHS: Peripheral neuropathy
What to watch: Locate the fingertip sensory area and follow the sensory nerve in the enlarged cutaway, keeping it distinct from the blood vessels.
Why it matters: Sensation helps a person recognise contact and guide precise handling. It works alongside movement, but its information pathway has a different role from the blood supply and the muscle–tendon system.
Explore this step: Compare the sensory and circulation layers, then describe what each pathway carries and why both matter when holding a small object.
Locate the source
In the task view, the fingers bend around the drill handle and the thumb closes on the other side to form a grip. Muscles and tendons create finger movement; the contact between hand and handle provides a route by which vibration from powered equipment can enter the hand and arm. Locate the trigger and chuck to connect the body view with the external source. The illustrated hand and handle move together so this contact is clear. Their slowed, enlarged movement explains the pathway only; it does not calculate tool vibration, grip force, daily exposure or a safe operating time. Health and Safety Executive: Hand-arm vibration: A guide for employees, INDG296
What to watch: Find the fingers and opposing thumb around the handle, then locate the trigger and chuck to identify the powered tool as the source.
Why it matters: Grip allows the hand to guide equipment, but contact also links the external source to body tissues. This source-to-hand relationship explains why the actual tool and working method matter when assessing exposure.
Explore this step: Trace the contact from handle to fingers and thumb, and distinguish the visible teaching movement from an exposure measurement.
Separate the effects
Return to the healthy circulation and sensory layers before comparing the separate vibration-related examples. Blood vessels supply the tissues, whereas sensory nerves carry information about touch and other sensations. Vibration-related vascular and neurological effects can affect these functions differently and may occur independently. They are not compulsory stages that every person passes through in one sequence. Use the normal layer to identify the structure and its job, then compare only the corresponding example. A change in the illustration explains a possible mechanism; it does not diagnose a cause, determine severity or predict the outcome for a particular worker. Health and Safety Executive: Hand-arm vibration: Guidance on Regulations L140, second edition
What to watch: Compare the artery and sensory nerve with their own normal layers, using the labelled finger structures to keep the two functions separate.
Why it matters: Separating these functions makes the examples easier to understand and avoids treating one symptom pattern as proof of another. Normal circulation and sensation provide different reference points for the two explanations.
Explore this step: State the normal job of each structure, then compare one example at a time without placing the effects in a compulsory order.
Change the work
The prevention step takes attention back to the work that creates exposure. Consider whether the process can avoid hand-held vibration, then examine suitable lower-vibration equipment, maintenance and the way exposure is planned across the task. These choices act on the source and the contact route shown earlier. Warmth and suitable clothing address cold conditions, but gloves should not be treated as reliable vibration protection. Use the task illustration to consider where a change in equipment or work organisation would act. Discussing prevention does not represent the repair of nerves or blood vessels. The model does not establish whether a particular workplace arrangement is adequate. Health and Safety Executive: How employers can protect workers from hand-arm vibration · Health and Safety Executive: Construction vibration questions
What to watch: Return to the hand–handle contact and the surrounding task, and consider where a change in equipment or work organisation would act.
Why it matters: Changing the work can reduce the vibration that reaches the hand. Linking a control to the source and contact route helps explain its purpose, separately from the medical assessment of any existing symptoms.
Explore this step: Identify which part of the source-to-hand pathway a proposed work control would change. The model does not provide an interactive control comparison.
Mechanisms and their limits
Vascular example: reduced finger circulation Vibration-related vascular effects can include episodes of reduced finger blood flow. Cold may trigger blanching. Flow returning can be painful. Fewer arrows and patterned episode frames illustrate reduced flow; they are not a measured severity scale. Finger appearance varies. Colour alone cannot establish HAVS or occupational causation. No artery is shown full of debris, and warming does not mean the condition is cured. Health and Safety Executive: Worried about your hands? · Health and Safety Executive: Hand-arm vibration: Guidance on Regulations L140, second edition · NHS: Raynaud’s
HSE: protect workers from hand-arm vibration
HSE: recognise and report hand symptoms
Sensory example: altered feeling Numbness, tingling and reduced feeling may occur without a blanching episode. The sensory comparison keeps the skin appearance unchanged and alters only the labelled signal. The nerve is not depicted as severed. This is a functional illustration, not a scan. Absence of white fingers does not exclude vibration-related health effects. Other conditions can also cause similar symptoms. Health and Safety Executive: Worried about your hands? · Health and Safety Executive: Hand-arm vibration: Guidance on Regulations L140, second edition · NHS: Peripheral neuropathy
HSE: symptoms and early reporting
Everyday function: grip and fine tasks Reduced sensation or strength can make handling small objects and working with tools harder. This example connects several possible effects to everyday function. A small-object illustration is not a clinical dexterity test or a disease stage. Symptoms differ between people. The viewer does not decide fitness for work or continued tool use. Health and Safety Executive: Worried about your hands? · Health and Safety Executive: Hand-arm vibration: Guidance on Regulations L140, second edition · Health and Safety Executive: Hand-arm vibration: A guide for employees, INDG296
HSE: control exposure and arrange appropriate assessment
Vascular example: reduced finger circulation — follow the anatomy
Look at: The small blood vessels supplying the fingers.
What changes: Vessels can narrow during an attack, reducing blood flow to the fingertips.
Why it matters: Fingers may turn white and feel cold; returning circulation can be painful.
What to do: Reduce vibration at source, keep hands warm and report early symptoms.
Repeated breaker use and a later cold-triggered episode
Road maintenance: a worker regularly uses a concrete breaker, then later experiences a cold/wet episode affecting finger circulation. Explicit time jump across repeated vibration exposure and a later cold trigger. Vascular disease does not develop during 32 seconds of tool use. Cold-triggered colour change is not a diagnostic test or proof of occupational cause. Warmth does not reverse established injury.
Identify the vibration source The breaker transmits vibration through the handle to the hands. Review whether the work can be done another way and whether suitable lower-vibration equipment is available. Health and Safety Executive: Worried about your hands? · Health and Safety Executive: How employers can protect workers from hand-arm vibration
Repeated exposure, then a later cold context The timeline jumps across repeated work to a later cold/wet episode. Tool vibration and cold are different factors, not two names for the same injury. Health and Safety Executive: Worried about your hands? · Health and Safety Executive: How employers can protect workers from hand-arm vibration
Possible circulation effects An illustrative narrowed finger-vessel pattern explains impaired blood supply during an episode. Labels and texture carry meaning; a skin colour or flow animation cannot diagnose HAVS. Health and Safety Executive: Worried about your hands? · Health and Safety Executive: Hand-arm vibration: Guidance on Regulations L140, second edition · NHS: Raynaud’s
Act early on exposure and symptoms Report symptoms promptly and arrange appropriate occupational-health advice. Review method, tool selection, maintenance and exposure management; keeping warm is supportive, not a substitute for vibration controls. Health and Safety Executive: Worried about your hands? · Health and Safety Executive: How employers can protect workers from hand-arm vibration
Sensory example: altered feeling — follow the anatomy
Look at: The sensory nerves running into the fingers.
What changes: Repeated vibration can damage nerves and alter the signals they carry.
Why it matters: Tingling or numbness can affect touch, even without white fingers.
What to do: Use lower-vibration methods, limit exposure and report changes in sensation.
Needle-scaler work and later reduced fingertip sensation
Fabrication maintenance: repeated hand-held needle-scaler use is followed by a separate example of altered sensation. Explicit time jump: cumulative nerve effects and later symptoms are not real-time results from this 32-second task illustration. Numbness can have several causes and can occur without white-finger episodes. This is not whole-body vibration or a self-administered sensitivity test.
Notice repeated hand-tool exposure A needle scaler is used for repeated surface preparation. Consider alternative processes and suitable equipment before treating the tool vibration as unavoidable. Health and Safety Executive: Worried about your hands? · Health and Safety Executive: How employers can protect workers from hand-arm vibration
A separate cumulative exposure period The timeline moves across repeated exposures. Sustained vibration can affect sensory structures; no personal exposure value, trigger time or nerve-damage dose is calculated. Health and Safety Executive: Worried about your hands? · Health and Safety Executive: Hand-arm vibration: Guidance on Regulations L140, second edition
Sensory signals may be affected The nerve example changes the labelled touch-signal path towards the fingertip. Tingling or reduced sensation does not require the vascular layer to turn white or a tendon to tear. Health and Safety Executive: Worried about your hands? · Health and Safety Executive: Hand-arm vibration: Guidance on Regulations L140, second edition · NHS: Peripheral neuropathy
Report and reduce the source Arrange early reporting and suitable assessment, and review the task, maintained tools and exposure management. The controls change future work demands; they do not animate damaged nerves back to normal. Health and Safety Executive: Worried about your hands? · Health and Safety Executive: How employers can protect workers from hand-arm vibration
Everyday function: grip and fine tasks — follow the anatomy
Look at: The fingertips, nerves and muscles used for a controlled grip.
What changes: Loss of sensation and strength can make fine hand movements harder.
Why it matters: Small objects, fasteners and safe tool handling may become more difficult.
What to do: Change the work to reduce exposure and seek occupational-health advice promptly.
From vibrating workshop tools to difficulty with small fasteners
A repair worker with repeated vibration exposure later notices difficulty handling screws and other small items. Explicit time jump from a work-exposure history to a later functional example. No speed or dexterity score is used to diagnose disease. This card shows what health effects can mean in daily work, not a third universal lesion or a test that clears someone to use a tool.
Understand the worker’s actual tasks Grinders and other hand-held tools may be used across maintenance jobs. Review the combined work pattern rather than judging one short demonstration. Health and Safety Executive: Worried about your hands? · Health and Safety Executive: How employers can protect workers from hand-arm vibration
Move forward to a reported difficulty The timeline jumps to a later task involving small fasteners. The worker describes reduced feeling or grip; the learner is not asked to prove symptoms through a timed challenge. Health and Safety Executive: Worried about your hands? · Health and Safety Executive: Hand-arm vibration: A guide for employees, INDG296
Explain function without inventing a lesion Changes in sensation or hand strength can make small objects harder to manipulate. Nerve, tendon, muscle and joint labels stay distinct; the picture cannot identify the individual cause. Health and Safety Executive: Worried about your hands? · Health and Safety Executive: Hand-arm vibration: A guide for employees, INDG296
Take the report seriously Arrange appropriate occupational-health advice and review tasks and equipment. Suitable aids and exposure reduction support safer work; there is no automatic fitness decision, cure animation or glove-based clearance. Health and Safety Executive: Worried about your hands? · Health and Safety Executive: How employers can protect workers from hand-arm vibration
Read the practice situations and all answer explanations
HV-Q1: What is the appropriate response?
A tool user reports tingling but has not noticed white fingers.
Exclude HAVS because there is no blanching. — Sensory effects can occur without circulation changes. The absence of blanching does not exclude a problem.
Report the symptoms promptly and arrange appropriate assessment. — Yes. Report early and obtain appropriate assessment. Review the exposure controls instead of waiting for visible changes.
Use the hand image to diagnose a disease stage. — The viewer cannot diagnose or stage disease. Similar symptoms may have other causes.
Health and Safety Executive: Worried about your hands? · Health and Safety Executive: Hand-arm vibration: Guidance on Regulations L140, second edition · Health and Safety Executive: Hand-arm vibration: A guide for employees, INDG296HV-Q2: Which review is needed?
A contractor proposes anti-vibration gloves as the only control.
Approve the gloves because they remove vibration risk. — Gloves are not an effective replacement for controlling vibration exposure.
Consider avoiding vibration, suitable lower-vibration equipment, maintenance and exposure management; gloves may help warmth. — Correct. Address the source and work method. Suitable gloves may keep hands warm but must not be relied on for vibration protection.
Use warm fingers as proof the exposure is safe. — Warmth is not an exposure measurement and cannot provide clearance to work.
Health and Safety Executive: How employers can protect workers from hand-arm vibration · Health and Safety Executive: Construction vibration questionsHV-Q3: How should exposure be assessed?
Two different vibrating tools were used in a shift.
Choose a hand colour to calculate safe remaining minutes. — Hand appearance cannot calculate exposure or a safe time. This viewer produces no exposure result.
Use reliable exposure information and an appropriate separate assessment method. — Yes. Consider the relevant tools and processes, using suitable vibration and use-time information in a separate assessment.
Count only the tool used for longest. — More than one tool or process can contribute. Do not discard the other exposure.
Health and Safety Executive: How employers can protect workers from hand-arm vibration · Health and Safety Executive: Construction vibration questionsSources and how the model is made
The opening images are AI-generated anatomical illustrations. The interactive 3D models and labelled SVG diagrams use original procedural artwork. These teaching images are not medical scans or diagnostic tools. Source references support the learner explanations and do not grant artwork rights.
- Health and Safety Executive: Worried about your hands? — Sensory, vascular and functional symptoms, cold context, potential lasting effects and prompt reporting. No tool-time thresholds transferred.
- Health and Safety Executive: How employers can protect workers from hand-arm vibration — Avoid/reduce vibration, appropriate equipment, maintenance, work planning and health surveillance. Gloves are for warmth, not reliable vibration protection.
- Health and Safety Executive: Hand-arm vibration: Guidance on Regulations L140, second edition — Pages 43–44: vascular, neurological and musculoskeletal effects may occur independently; episodes, cold triggers and functional impact. No clinical staging/test procedure copied.
- Health and Safety Executive: Construction vibration questions — Gloves do not effectively control vibration; assessment includes relevant exposure from multiple tools/processes and suitable information.
- Health and Safety Executive: Hand-arm vibration: A guide for employees, INDG296 — Exposure from tools/workpieces, systems affected, separate CTS and reporting/control principles. No exercise prescription or copied illustration.
- NHS: Raynaud’s — Circulation episode context, varying skin appearance and alternative causes. Does not diagnose vibration causation. Printed review date July 2026 requires recheck.
- NHS: Peripheral neuropathy — Normal sensory/motor nerve roles and multiple possible causes of symptoms only. No general neuropathy prognosis transferred to HAVS; printed review date October 2025 overdue.
- Manchester University NHS Foundation Trust: Blood Vessels — Supply through arteries and smaller vessels, venous return; factual normal-circulation context only.
- Gloucestershire Hospitals NHS Foundation Trust: Flexor Tendon Injuries — Normal muscle–tendon connection and finger movement only. No repair/treatment guidance reused.
- NHS: Arthritis — Context for joints and movement only. The module does not illustrate or diagnose a specific arthritis.
- NHS: Carpal tunnel syndrome — Separate median-nerve compression example; no substitution for the distinct HAVS components.
What HAVS symptoms should be reported early?
Early symptoms include tingling, numbness, reduced feeling, blanching, pain, poor grip and loss of finger control.
Symptoms often start subtly and may appear after work or in cold conditions. Workers may notice pins and needles, numb fingertips, clumsiness with buttons or screws, white fingers, pain in the hands or reduced grip. These signs should trigger review even if the worker can still complete the job.
A good culture makes reporting normal. Workers should not fear losing work for reporting symptoms; otherwise the business may discover the problem only after permanent injury.
| Symptom | What it may suggest | Workplace response |
|---|---|---|
| Tingling after tool use | Early nerve irritation or exposure concern. | Report and review exposure. |
| Numb fingertips | Reduced sensation and possible neurological effect. | Health surveillance referral and trigger-time review. |
| White fingers in cold | Vascular effect consistent with vibration white finger. | Occupational-health assessment and exposure control. |
| Loss of grip | Musculoskeletal or neurological impairment. | Review safety-critical tasks and tool use. |
| Clumsiness | Reduced dexterity. | Check work quality and fitness for fine control tasks. |
| Pain or weakness | Possible progressing hand-arm disorder. | Seek competent health advice and reduce exposure. |
How should HAV exposure values and trigger time be understood?
Whose daily exposure is being estimated?
Each total concerns one person in one day, or people with a demonstrably identical representative exposure pattern. Never add exposure across different people. Record the tool-data source, task variability and actual contact duration. An empty duration means unknown exposure, not zero; do not accept or export a completed assessment until every active row is resolved.
HAV exposure depends on vibration magnitude and actual trigger time, combined into daily exposure A(8).
The exposure action value is 2.5 m/s2 A(8). At or above this level, employers must act to reduce exposure, provide information and training, and arrange health surveillance where appropriate. The exposure limit value is 5.0 m/s2 A(8), and daily exposure must not exceed it.
Trigger time is not how long the worker is assigned to the job. It is the time the tool is actually vibrating in the hands. A worker may spend four hours breaking out concrete but only have 45 minutes of actual trigger time; another worker may spend a whole day on light grinding and accumulate a similar or greater exposure because the tool is used repeatedly.
For mixed-tool work, add each tool’s exposure points (or squared A(8) contribution) into the same daily total; never add the raw A(8) magnitudes. A site operative who uses a breaker in the morning, an angle grinder before lunch and a hammer drill in the afternoon should not be assessed against each tool in isolation. The practical control question is whether the total day remains below the exposure action value or, if exposure is still significant, whether the work has been reduced as far as reasonably practicable.
| Concept | Meaning | Practical use |
|---|---|---|
| Vibration magnitude | How much vibration the tool transmits. | Use supplier data cautiously and check real-use conditions. Source: HSE employer responsibilities Source: HSENI hand-arm vibration |
| Trigger time | Time the tool is actually operating in the hands. | Measure or estimate from task observation. Source: HSE employer responsibilities Source: HSENI hand-arm vibration |
| A(8) | Daily vibration exposure normalised to an eight-hour reference period. | Compare against action and limit values. Source: HSE employer responsibilities Source: HSENI hand-arm vibration |
| Exposure points | Alternative way to express the same daily exposure. | 100 points equals the action value; 400 points equals the limit value. Source: HSE employer responsibilities Source: HSENI hand-arm vibration |
| Exposure action value | 2.5 m/s2 A(8), equal to 100 exposure points. | Triggers control, information and health-surveillance action. Source: HSE employer responsibilities Source: HSENI hand-arm vibration |
| Exposure limit value | 5.0 m/s2 A(8), equal to 400 exposure points. | Must not be exceeded. Source: HSE employer responsibilities Source: HSENI hand-arm vibration |
| Multiple tools | Exposure from different tools combines. | Add each tool’s exposure points, not its raw A(8), into one daily total. Source: HSE employer responsibilities Source: HSENI hand-arm vibration |
| Regularity | Risk increases with repeated daily, weekly and long-term exposure. | Assess the pattern of work, not one convenient low-use day. Source: HSE employer responsibilities Source: HSENI hand-arm vibration |
Two-tool example. If representative in-use vibration is 5 m/s² for one hour of actual trigger time and 4 m/s² for two hours, the first tool contributes 50 exposure points and the second 64: 114 points in total, equivalent to about 2.67 m/s² A(8). That exceeds the 100-point action value, although it is below the 400-point limit. Use the HSE calculator with verified magnitudes and actual trigger times; the figures here are illustrative, not safe-use allowances.
SHARE HUB · DAILY EXPOSURE TOOL
Hand-arm vibration calculator
Add the tools and processes used by one person in one working day. Enter representative vibration magnitudes and actual vibration contact times. The calculator combines every tool’s contribution.
Each tool shows points per hour, time to EAV and ELV, partial A(8) and exposure points. EAV = 100 points; ELV = 400 points. Threshold times assume no other exposure and are not safe-use allowances. HSE profiles are initial estimates; check the actual tool and task.
Combined daily exposure
Add a tool to calculate.
Record details
Profile saving currently stores the record in this browser for your signed-in profile. It is not synced to other devices. Download PDF or Word to keep a separate copy. The document includes all tool details, calculated results and assessment notes.
Method: HSE hand-arm vibration exposure calculator guidance. SHARE calculator; no HSE or Pulsar endorsement.
Which tools and tasks create hand-arm vibration risk?
The tool, task and total daily contact time determine vibration exposure. Use the profiles below to make an initial estimate, then check that the data represents your equipment and how it is used.
Browse by tool and task below. The vibration ranges and initial assessment values come from HSE’s typical vibration table. Each profile explains what changes exposure, practical controls and when to review the assessment.
Read the times as exposure benchmarks
EAV: 2.5 m/s² A(8), or 100 points. ELV: 5 m/s² A(8), or 400 points. EAV requires action; ELV must not be exceeded. These are not safe-use allowances. Reduce exposure through the work method and equipment, and add every tool’s contribution to the person’s daily total.
The times assume continuous exposure at the initial assessment value and no other vibration that day. “Trigger time” means time the hands are exposed while the equipment or workpiece vibrates, not the whole job or shift. A higher actual magnitude reaches the thresholds sooner.
Generic ranges cannot establish a specific tool’s exposure. Record make, model, accessory, material, operating mode and actual contact time; obtain representative supplier or measured data where needed. A manufacturer's test value may not represent your task. Breaks do not erase accumulated exposure, and anti-vibration gloves receive no reduction credit.
Find your tool. Understand the exposure.
12 tool groups · 24 task profiles · vibration levels and trigger-time benchmarks
Angle grinders3 profiles · time to EAV: 37.0–187.5 min at initial values
Angle grinders: vibration and exposure profile
- Typical tasks
- Weld dressing, metal cutting, deburring, fettling and surface preparation. Match the disc and diameter to the actual operation.
- What changes exposure
- Disc damage or imbalance, an unsuitable accessory, hard material, forceful feed and repeated finishing runs can change exposure.
- Practical controls
- Design out repeated grinding; use prepared components or a supported process where practicable. Select the correct disc, keep it in good condition and maintain handles and bearings.
- When to review
- Reassess when the disc, diameter, material or process changes, when vibration increases, or when the daily number of cuts or finishing passes rises.
| Tool / task profile | Typical range m/s² | Initial value m/s² | Time to EAV | Time to ELV |
|---|---|---|---|---|
| 100–180 mm angle grinder | 3–10 | 7 | 1.02 h (61.2 min) | 4.08 h (244.9 min) |
| 100/125 mm angle grinder with flapper disc | 2–5 | 4 | 3.12 h (187.5 min) | 12.50 h (750.0 min) · beyond 8 h |
| 220–300 mm angle grinder | 4–11 | 9 | 37.0 min | 2.47 h (148.1 min) |
Concrete breakers1 profile · time to EAV: 15.3 min at initial values
Concrete breakers: vibration and exposure profile
- Typical tasks
- Breaking slabs, footings and concrete during groundworks, demolition and utilities work.
- What changes exposure
- Long breakout runs, hard or reinforced material, worn chisels, damaged suspension and awkward working angles can increase exposure.
- Practical controls
- Consider machine-mounted breaking, crushing, splitting or a redesigned removal method. For hand-held work, select a suitable vibration-reduced tool and maintain the chisel and suspension.
- When to review
- Check the exact model and anti-vibration system. Reassess harder material, slower progress, damaged mounts or a change in the amount of breakout.
The breaker profile is for vibration-reduced models, as qualified in L140 Appendix 3. Do not apply it to an unverified older road breaker.
| Tool / task profile | Typical range m/s² | Initial value m/s² | Time to EAV | Time to ELV |
|---|---|---|---|---|
| Vibration-reduced breaker | 7–18 | 14 | 15.3 min | 1.02 h (61.2 min) |
Chainsaws1 profile · time to EAV: 1.02 h (61.2 min) at initial values
Chainsaws: vibration and exposure profile
- Typical tasks
- Felling, cross-cutting, tree dismantling and timber clearance. Count repeated cuts across the whole day.
- What changes exposure
- Chain sharpness and tension, worn mounts, saw condition, working position and the amount of cutting affect exposure. Cold conditions add to the health risk.
- Practical controls
- Select a saw appropriate to the cut; maintain the chain, bar and isolation mounts. Use mechanised processing where practicable and plan work to reduce hand contact time.
- When to review
- Reassess a different saw, bar or chain, storm-clearance workload, damaged mounts, increased cutting effort or symptoms reported by the operator.
| Tool / task profile | Typical range m/s² | Initial value m/s² | Time to EAV | Time to ELV |
|---|---|---|---|---|
| Chainsaw | 3–7 | 7 | 1.02 h (61.2 min) | 4.08 h (244.9 min) |
Drills and rotary hammers5 profiles · time to EAV: 9.3–120.0 min at initial values
Drills and rotary hammers: vibration and exposure profile
- Typical tasks
- Fixing holes, service penetrations, core drilling and repetitive assembly. Separate ordinary drilling, impact drilling and heavy rotary-hammer work.
- What changes exposure
- The drilling mode, bit or core size, material, blunt bits, repeated holes, tool condition and pushing force all matter.
- Practical controls
- Reduce drilling through design or prefabrication. Use a suitable sharp bit, disable hammer action where unnecessary and consider a supported drilling rig for the task.
- When to review
- Record mode, bit diameter, material and holes per shift. Reassess reinforcement, harder aggregate, worn bits or slower drilling. Do not assign the ordinary-drill value to a heavy rotary hammer.
| Tool / task profile | Typical range m/s² | Initial value m/s² | Time to EAV | Time to ELV |
|---|---|---|---|---|
| Ordinary drill with standard bit | 2–5 | 5 | 2.00 h (120.0 min) | 8.00 h (480.0 min) |
| Drill with hole saw | 4–12 | 10 | 30.0 min | 2.00 h (120.0 min) |
| Core drill, 78–107 mm | 6–8 | 8 | 46.9 min | 3.12 h (187.5 min) |
| Impact drill, 5 and 8 mm masonry bits | 7–13 | 11 | 24.8 min | 1.65 h (99.2 min) |
| Demolition or rotary hammer | 10–21 | 18 | 9.3 min | 37.0 min |
Sanders2 profiles · time to EAV: 20.8–37.0 min at initial values
Sanders: vibration and exposure profile
- Typical tasks
- Panel finishing, feathering, joinery and surface preparation. Small repeated jobs can add up to substantial contact time.
- What changes exposure
- Pad balance, clogged abrasives, worn bearings, excessive pressure, awkward reach and long finishing runs affect exposure.
- Practical controls
- Improve the finish upstream; consider automated or supported sanding. Match the abrasive to the work, replace worn pads and maintain the tool. Assess hand contact with vibrating workpieces at fixed machines too.
- When to review
- Reassess a different pad, abrasive, material or finishing workload. Belt and floor sanders need representative task-specific data; these orbital values are not a substitute.
| Tool / task profile | Typical range m/s² | Initial value m/s² | Time to EAV | Time to ELV |
|---|---|---|---|---|
| Random-orbital sander | 6–14 | 12 | 20.8 min | 1.39 h (83.3 min) |
| Orbital sander | 4–12 | 9 | 37.0 min | 2.47 h (148.1 min) |
Jackhammers2 profiles · time to EAV: 4.8–9.3 min at initial values
Jackhammers: vibration and exposure profile
- Typical tasks
- Road and trench breakout, heavy demolition and foundation removal. “Jackhammer” is a broad name: identify the actual tool mechanism.
- What changes exposure
- Sustained impacts, worn chisels, damaged handle mounts, incorrect air supply and forceful or awkward handling can increase exposure.
- Practical controls
- Prefer remote or machine-mounted breaking where practicable. Select suitable vibration-reduced equipment, maintain it and follow the specified air supply and lubrication requirements.
- When to review
- Verify whether the tool fits the pneumatic-hammer, demolition-hammer or vibration-reduced-breaker profile. Reassess changes in material, tool condition or breakout workload.
Jackhammer and breaker names overlap. Choose the matching mechanism and model; do not count the same task twice under different names.
| Tool / task profile | Typical range m/s² | Initial value m/s² | Time to EAV | Time to ELV |
|---|---|---|---|---|
| Pneumatic hammer | 10–29 | 25 | 4.8 min | 19.2 min |
| Demolition or rotary hammer | 10–21 | 18 | 9.3 min | 37.0 min |
Impact wrenches2 profiles · time to EAV: 30.0–120.0 min at initial values
Impact wrenches: vibration and exposure profile
- Typical tasks
- Wheel and tyre work, plant maintenance, rail fixings and bolted connections. Add the contact time from many short bursts.
- What changes exposure
- Seized fasteners, extended hammering, drive size, worn sockets or anvils, air supply and awkward access affect exposure.
- Practical controls
- Choose a suitable fastening method, such as an appropriate torque system. Use correct sound sockets, maintain the tool and prepare seized fasteners using an approved method.
- When to review
- Reassess drive size, tool model, fastening duty and the number of joints. A small impact driver is not automatically represented by an impact-wrench profile.
| Tool / task profile | Typical range m/s² | Initial value m/s² | Time to EAV | Time to ELV |
|---|---|---|---|---|
| Impact wrench, 3/8, 1/2 or 3/4 inch drive | 3–6 | 5 | 2.00 h (120.0 min) | 8.00 h (480.0 min) |
| Impact wrench, 1 inch drive | 7–11 | 10 | 30.0 min | 2.00 h (120.0 min) |
Disc cutters and cut-off saws1 profile · time to EAV: 17.8 min at initial values
Disc cutters and cut-off saws: vibration and exposure profile
- Typical tasks
- Cutting masonry, kerbs, paving and concrete. The published profile below is for masonry cutting.
- What changes exposure
- Disc condition, tool maintenance, cut depth, feed force, material and repeated cuts affect exposure.
- Practical controls
- Use pre-cut components or a suitable supported cutting system where practicable. Select and maintain the correct disc and control dust, kickback and other cutting hazards alongside vibration.
- When to review
- Reassess a different material, disc, saw or cutting method. Do not transfer the masonry figure to every petrol or electric cutter without checking task suitability.
| Tool / task profile | Typical range m/s² | Initial value m/s² | Time to EAV | Time to ELV |
|---|---|---|---|---|
| Cut-off saw cutting masonry | 5–14 | 13 | 17.8 min | 1.18 h (71.0 min) |
Needle guns and needle scalers2 profiles · time to EAV: 8.3–61.2 min at initial values
Needle guns and needle scalers: vibration and exposure profile
- Typical tasks
- Rust and coating removal, descaling, weld-spatter removal and steel surface preparation.
- What changes exposure
- A non-reduced tool, needle condition, air supply, heavy scale, tight grip and repeated short jobs can produce substantial daily exposure.
- Practical controls
- Consider a different preparation method, such as an enclosed or mechanised process. If scaling remains necessary, choose vibration-reduced equipment and maintain needles, air supply and lubrication.
- When to review
- Identify whether the tool is vibration-reduced. Reassess deteriorated needles, coating or scale changes, maintenance defects and accumulated contact time.
| Tool / task profile | Typical range m/s² | Initial value m/s² | Time to EAV | Time to ELV |
|---|---|---|---|---|
| Needle scaler, not vibration-reduced | 12–26 | 19 | 8.3 min | 33.2 min |
| Vibration-reduced needle scaler | 3–8 | 7 | 1.02 h (61.2 min) | 4.08 h (244.9 min) |
Chipping hammers2 profiles · time to EAV: 3.1–7.5 min at initial values
Chipping hammers: vibration and exposure profile
- Typical tasks
- Chipping welds or removing stone, concrete and rust. These are separate HSE profiles.
- What changes exposure
- Impact duty, material, chisel condition, grip force and sustained surface preparation can raise exposure.
- Practical controls
- Change or mechanise the preparation process where practicable. Use suitable maintained chisels and minimise hand-held impact work.
- When to review
- Reassess the material and chipping operation, chisel wear and the total amount of preparation. Weld chipping has a particularly short benchmark time.
| Tool / task profile | Typical range m/s² | Initial value m/s² | Time to EAV | Time to ELV |
|---|---|---|---|---|
| Chipping hammer on welds | 20–32 | 31 | 3.1 min | 12.5 min |
| Chipping hammer on stone, concrete or rust | 11–22 | 20 | 7.5 min | 30.0 min |
Plate compactors2 profiles · time to EAV: 9.3–187.5 min at initial values
Plate compactors: vibration and exposure profile
- Typical tasks
- Hand-guided compaction during groundworks, paving and reinstatement.
- What changes exposure
- Handle isolation, machine condition, ground conditions and time holding the operating machine affect hand-arm exposure.
- Practical controls
- Consider remote compaction or an appropriate alternative. Select effective handle isolation and maintain the machine and its mounts.
- When to review
- Verify the vibration-reduction system. Reassess ground conditions, defective mounts, a different machine or increased compaction work.
| Tool / task profile | Typical range m/s² | Initial value m/s² | Time to EAV | Time to ELV |
|---|---|---|---|---|
| Plate compactor, not vibration-reduced | 9–22 | 18 | 9.3 min | 37.0 min |
| Vibration-reduced plate compactor | 2–7 | 4 | 3.12 h (187.5 min) | 12.50 h (750.0 min) · beyond 8 h |
Pedestal grinding1 profile · time to EAV: 46.9 min at initial values
Pedestal grinding: vibration and exposure profile
- Typical tasks
- Grinding or finishing a workpiece held against a fixed grinding wheel. A stationary machine can still transmit vibration through the workpiece.
- What changes exposure
- Wheel condition, workpiece size, contact force, work-rest setup and repeated finishing affect exposure.
- Practical controls
- Use appropriate rests, jigs or a supported or automated process to reduce hand contact. Maintain the wheel and follow safe grinding-machine practice.
- When to review
- Check vibration at the hand contact with the workpiece. Reassess a new wheel, workpiece, fixture, duty or increased finishing time.
| Tool / task profile | Typical range m/s² | Initial value m/s² | Time to EAV | Time to ELV |
|---|---|---|---|---|
| Pedestal grinder | 2–11 | 8 | 46.9 min | 3.12 h (187.5 min) |
No matching tools. Try another tool name or clear the search.
Use the figures in a daily assessment
- Choose a profile that matches the tool and task; replace the generic initial value with representative evidence when available.
- Observe actual vibration contact time. Add all tools and processes used by that person in the day.
- Calculate daily exposure and plan controls. For example, 10 m/s² for 15 minutes gives 50 points; another tool at 5 m/s² for 60 minutes gives another 50 points. Together they reach EAV, even though neither task reaches it alone.
Method: A(8) = a × √(t / 8), where a is vibration in m/s² and t is hours. Time to EAV = 3000 / a² minutes; time to ELV = 12000 / a² minutes. Exposure points per hour = 2a². For multiple tasks, add their points or squared partial A(8) values.
HSE’s generic dataset is an initial screening aid, not a catalogue of current branded models. L140 describes its underlying tool data and selection assumptions. Any equivalent Northern Ireland assessment must also apply the local duties described elsewhere on this page.
Structured tool data
Each record has a stable tool/profile ID, numeric magnitudes and times, units, tasks, exposure drivers, controls, review triggers, calculation assumptions and source links. JSONL contains one self-contained retrieval record per profile.
How does the vibration decision change across sectors?
Different industries use different tools and work patterns, but the same worker’s tool exposures must be assessed together over the day.
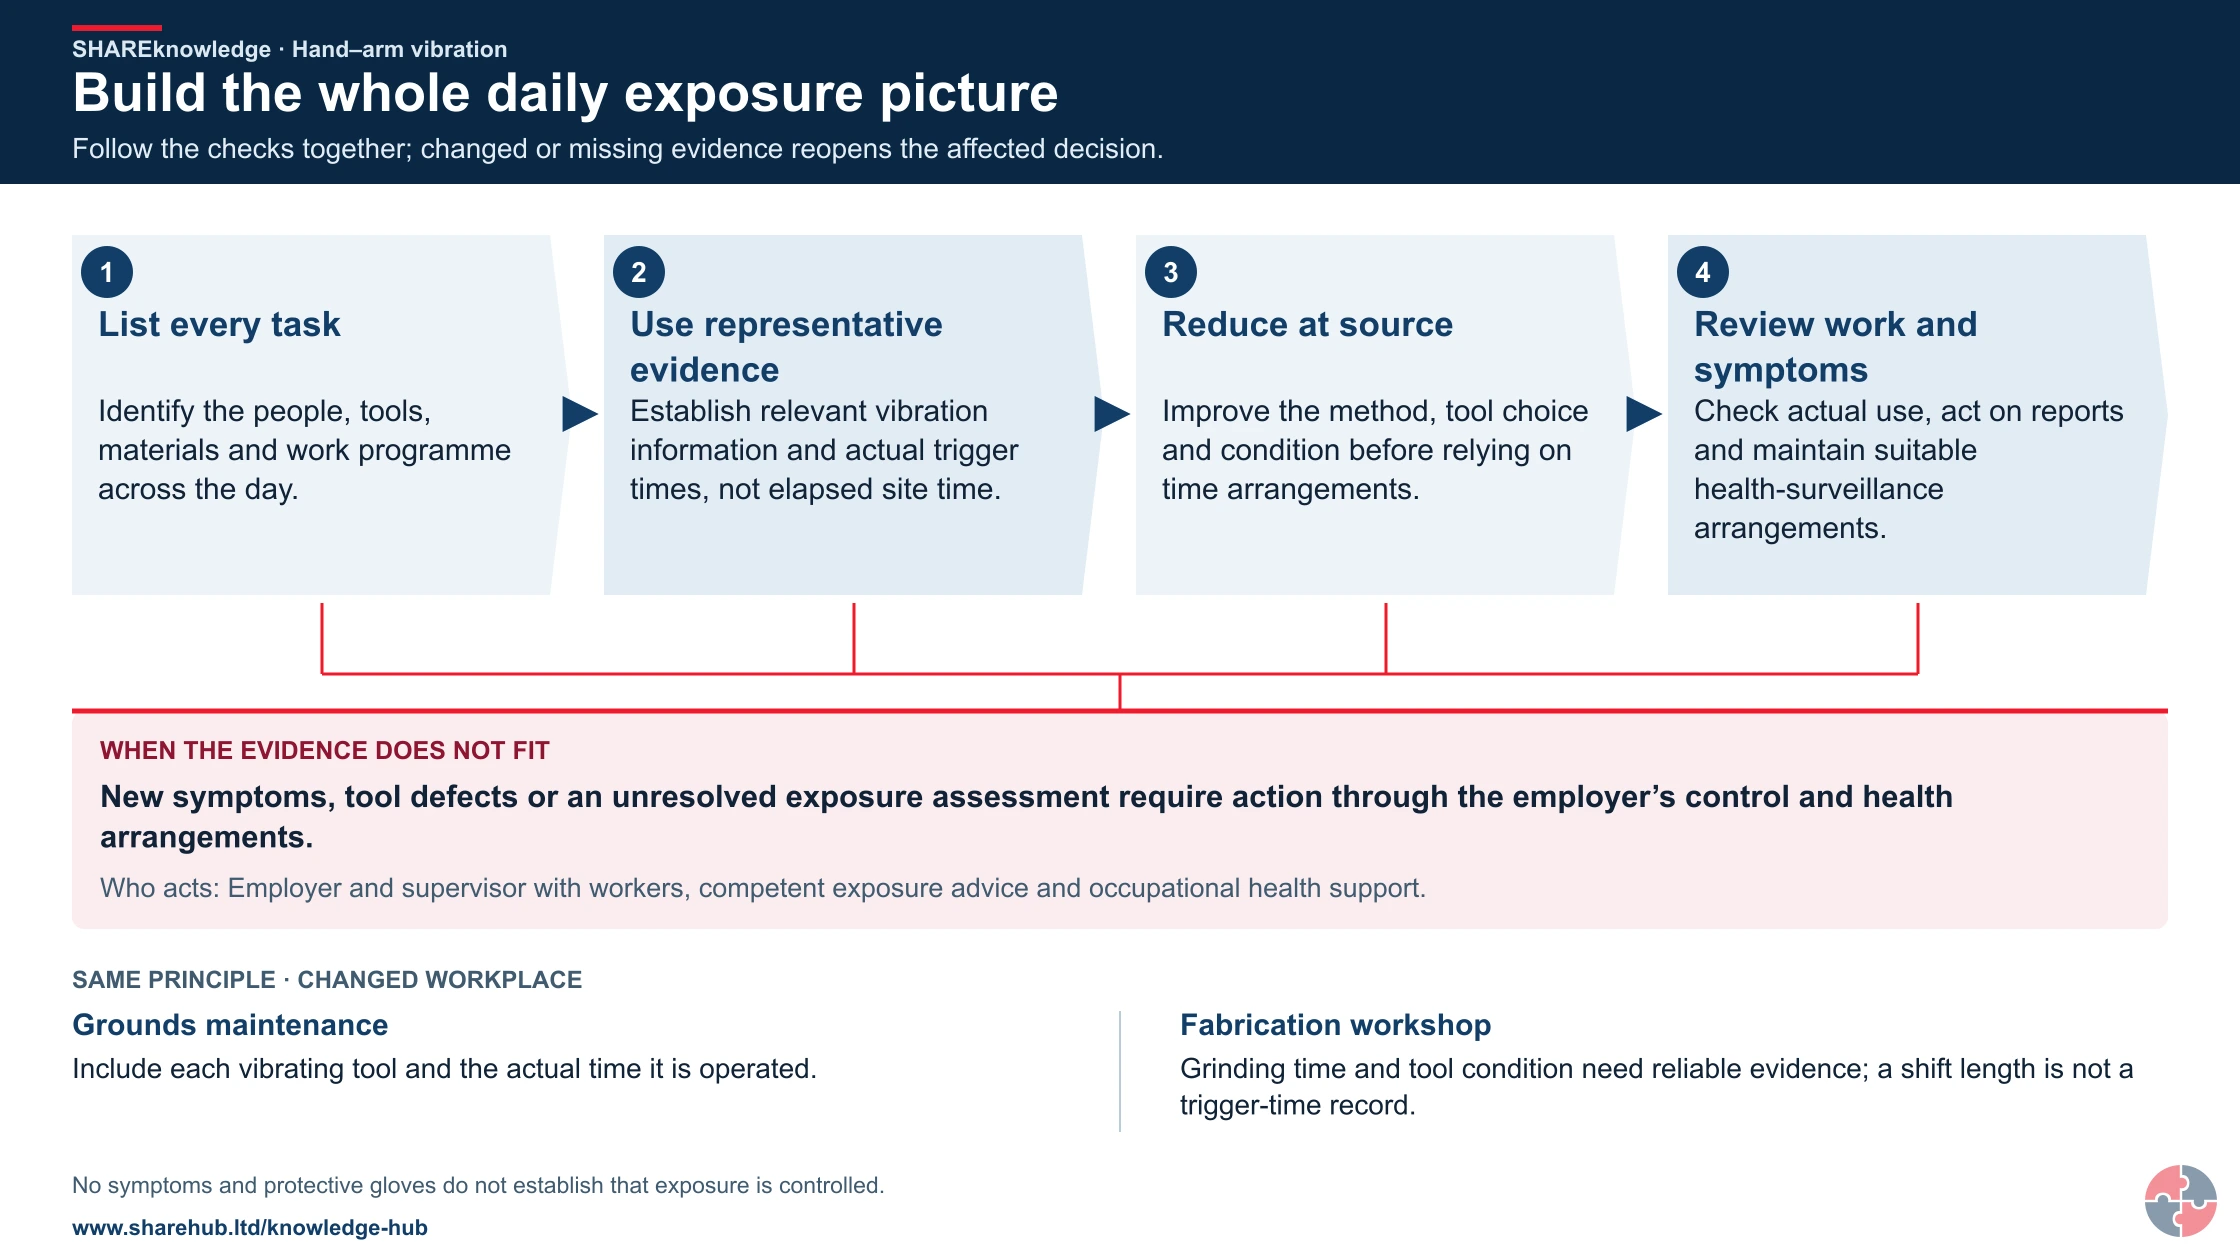
Build the whole daily exposure picture
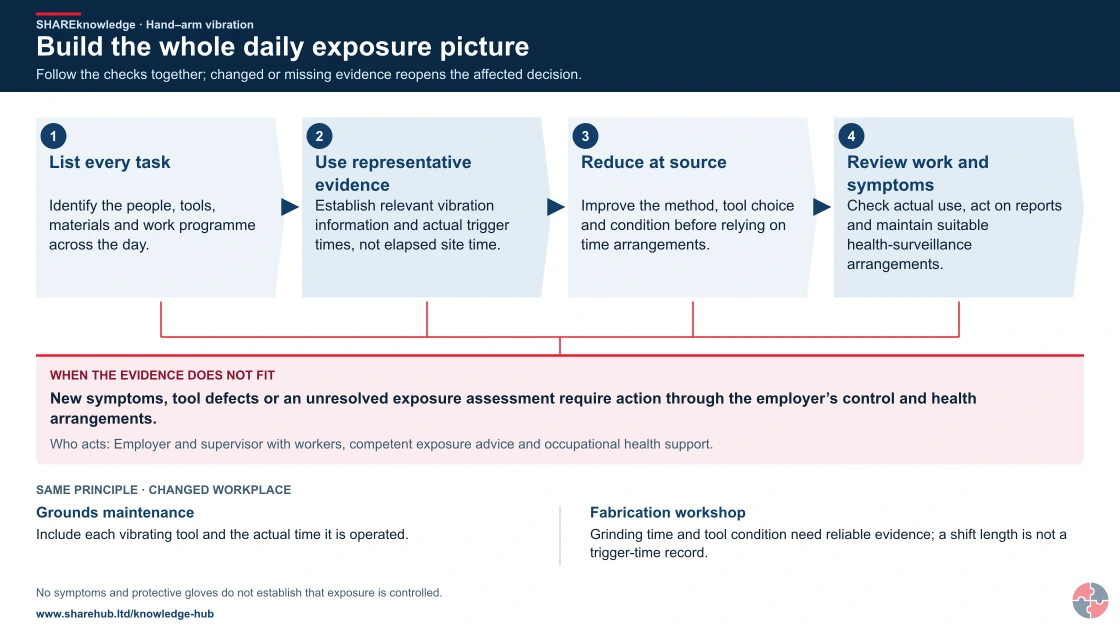
Full written explanation
- List every task. Identify the people, tools, materials and work programme across the day.
- Use representative evidence. Establish relevant vibration information and actual trigger times, not elapsed site time.
- Reduce at source. Improve the method, tool choice and condition before relying on time arrangements.
- Review work and symptoms. Check actual use, act on reports and maintain suitable health-surveillance arrangements.
When the evidence does not fit: New symptoms, tool defects or an unresolved exposure assessment require action through the employer’s control and health arrangements.
Who acts: Employer and supervisor with workers, competent exposure advice and occupational health support.
Changed workplace
Grounds maintenance: Include each vibrating tool and the actual time it is operated.
Fabrication workshop: Grinding time and tool condition need reliable evidence; a shift length is not a trigger-time record.
Evidence check: No symptoms and protective gloves do not establish that exposure is controlled.
The examples identify plausible tasks, not universal tool vibration values. A lower-emission tool can still produce a high daily exposure when used for long periods. The supervisor tests an alternative method and the actual trigger time before issuing a daily plan.
| Sector, task and people | Harm route and outcome | Strongest feasible control | Residual check or stop |
|---|---|---|---|
| Manufacturing: fettling castings; fettlers and maintainers | Grinding and chipping transfer vibration to hands; vascular or nerve harm can develop. | Redesign casting and use supported or lower-vibration finishing where suitable. | Check consumables, actual trigger time and symptoms; stop on an exceeded plan. |
| Construction: drilling or breaking; trades and nearby workers | Repeated hand-held impact vibration can cause HAVS and impaired tool handling. | Preform holes or use machine-mounted breaking before allocating hand-held work. | Add all tools in the day; stop before the limit value and investigate unexpected duration. |
| Hospitality: grounds or maintenance equipment; gardeners and technicians | Regular powered hedge trimmers or hand-guided tools can transmit vibration; hand symptoms may follow. | Choose a low-vibration suitable machine and redesign lengthy tasks. | Check real-use data, maintenance and trigger time; no assumed safe time from job title. |
| Logistics: fleet repair impact tools; mechanics | Impact wrench, grinder and sander contributions combine for the same mechanic. | Use suitable lower-vibration tools and efficient maintenance methods. | Check the combined day and symptoms; stop on tool defect or unplanned overtime exposure. |
The accident-repair example below shows why a seemingly modest tool set can accumulate exposure. Specialist forestry and foundry work may be higher risk and needs its own assessment.
How can HAVS arise in an accident repair workshop?
HAVS can arise in lower-vibration tool sets when trigger time is long, repeated or spread across several tools in one day.
Accident repair workshop HAVS learning example — part 1 of 2


Read the complete visual as text
- Panel sanding: Why exposure can build: Orbital or DA sanders may run for long trigger times when preparing a whole side of a vehicle. Good control: Measure actual sanding time, use efficient abrasives, maintain tools and plan breaks or task sharing.
- Polishing large panels: Why exposure can build: Polishers can be used continuously during finishing and rework. Good control: Use suitable pads, avoid excessive force, maintain tool balance and include polishing in daily totals.
- Small reciprocating saws: Why exposure can build: Short bursts may combine with other tools during cut-out and repair. Good control: Record as part of the same daily exposure rather than ignoring short-duration tools.
- Drilling spot welds or fixings: Why exposure can build: Repeated drilling can add exposure and grip force, especially with blunt bits. Good control: Use sharp bits, correct technique and task counts for exposure estimates.
Accident repair workshop HAVS learning example — part 2 of 2


Read the complete visual as text
- Compressed-air or die grinding: Why exposure can build: Fine finishing tools may be underestimated because they are small. Good control: Check vibration data, air pressure, tool condition and trigger time.
- Heavy repair or overtime day: Why exposure can build: Several moderate tasks can combine into action-value exposure. Good control: Use exposure points, digital monitoring or supervisor checks to manage the full day.
- Health surveillance: Why exposure can build: Symptoms may be missed if the trade is not treated as a HAVS-risk group. Good control: Screen regular users and act early on tingling, numbness, grip or dexterity changes.
A panel beater or accident-repair technician may not use a concrete breaker or road drill, but they may spend long periods using orbital sanders, small reciprocating saws, polishers, drills, die grinders or impact tools. Each tool may look relatively low risk on its own, yet a long day preparing and refinishing panels can build a meaningful daily exposure.
For example, a technician repairing one side of a vehicle may cut out damaged sections, drill spot welds, sand filler, feather paint edges, polish a large panel area and then carry out final finishing. The risk assessment should not simply say 'bodyshop tools are low vibration'. It should baseline the actual trigger time for sanding and polishing, add the contribution from drills and saws, check tool vibration data, review consumable condition, and identify whether the worker is regularly approaching or exceeding the exposure action value.
This is where tool tags, trigger-time timers or wearable monitoring can be helpful. They can show that a normal day is low, but a heavy repair day, overtime shift or rework job creates a higher exposure pattern. The management response should be to plan work, rotate only where totals are understood, keep pads and abrasives effective, maintain tools, use lower-vibration equipment, train technicians to report symptoms early and place regularly exposed workers into health surveillance where needed.
| Work activity | Why exposure can build | Good control |
|---|---|---|
| Panel sanding | Orbital or DA sanders may run for long trigger times when preparing a whole side of a vehicle. | Measure actual sanding time, use efficient abrasives, maintain tools and plan breaks or task sharing. |
| Polishing large panels | Polishers can be used continuously during finishing and rework. | Use suitable pads, avoid excessive force, maintain tool balance and include polishing in daily totals. |
| Small reciprocating saws | Short bursts may combine with other tools during cut-out and repair. | Record as part of the same daily exposure rather than ignoring short-duration tools. |
| Drilling spot welds or fixings | Repeated drilling can add exposure and grip force, especially with blunt bits. | Use sharp bits, correct technique and task counts for exposure estimates. |
| Compressed-air or die grinding | Fine finishing tools may be underestimated because they are small. | Check vibration data, air pressure, tool condition and trigger time. |
| Heavy repair or overtime day | Several moderate tasks can combine into action-value exposure. | Use exposure points, digital monitoring or supervisor checks to manage the full day. |
| Health surveillance | Symptoms may be missed if the trade is not treated as a HAVS-risk group. | Screen regular users and act early on tingling, numbness, grip or dexterity changes. |
How should HAVS risk assessment be carried out?
HAVS assessment should identify who is exposed, which tools are used, actual trigger time, vibration magnitude, symptoms and control options.
Tool vibration reaches the hand and arm
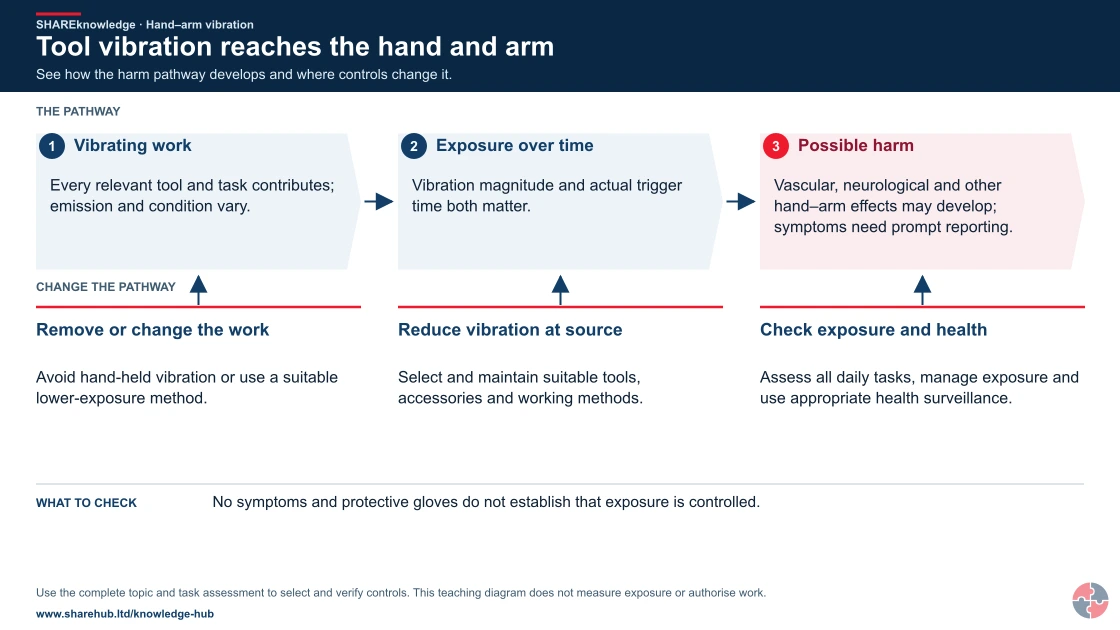
Full written explanation
- Vibrating work. Every relevant tool and task contributes; emission and condition vary.
- Exposure over time. Vibration magnitude and actual trigger time both matter.
- Possible harm. Vascular, neurological and other hand–arm effects may develop; symptoms need prompt reporting.
Change the pathway
- Remove or change the work. Avoid hand-held vibration or use a suitable lower-exposure method.
- Reduce vibration at source. Select and maintain suitable tools, accessories and working methods.
- Check exposure and health. Assess all daily tasks, manage exposure and use appropriate health surveillance.
Evidence check: No symptoms and protective gloves do not establish that exposure is controlled.
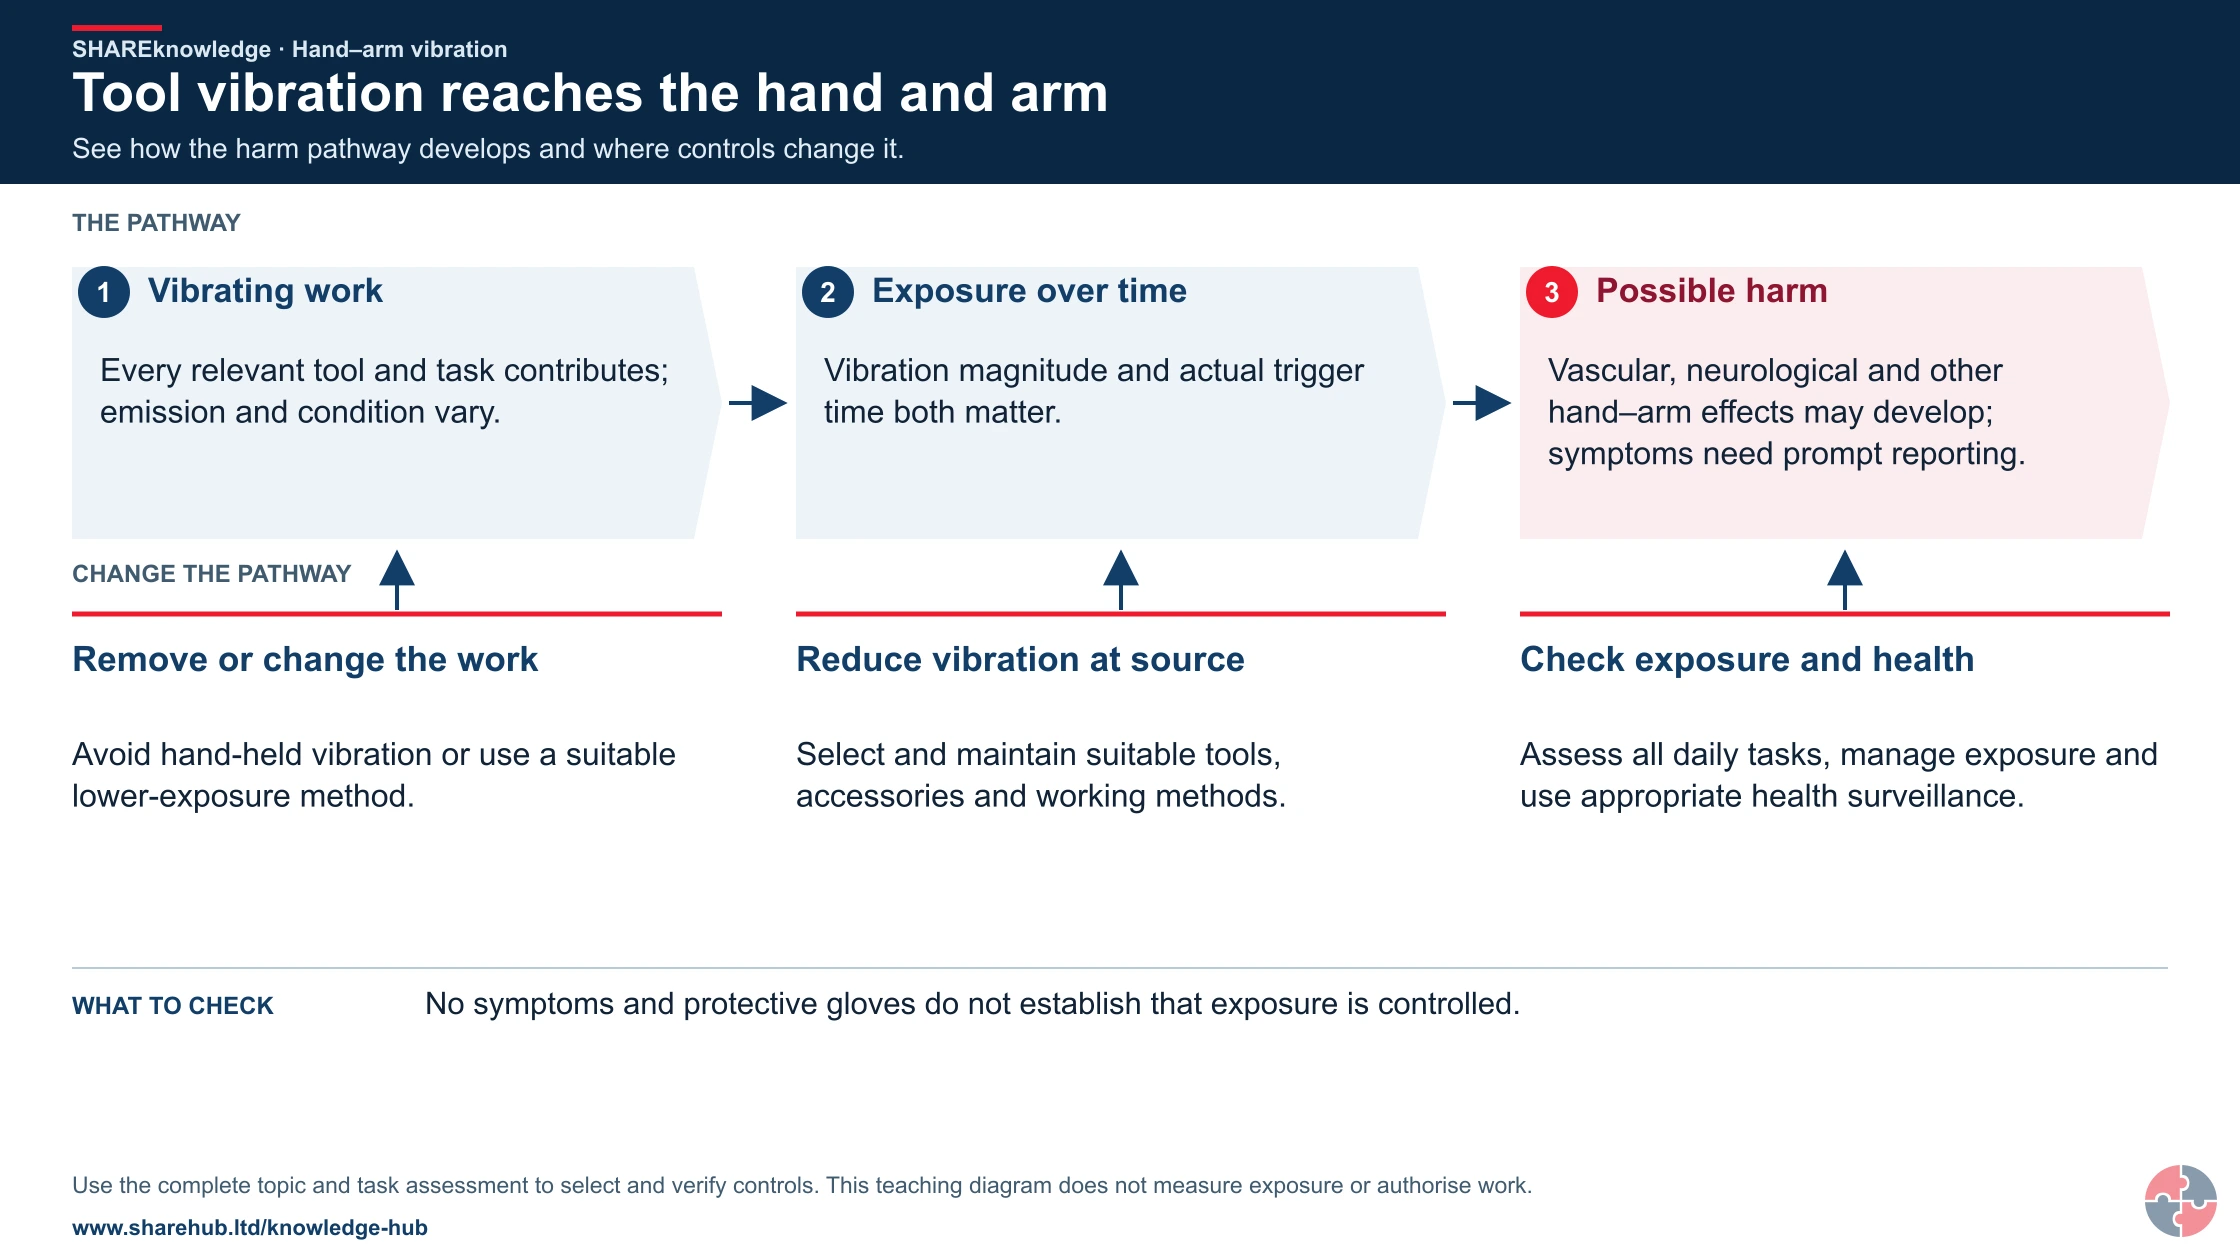
A useful assessment starts with the work programme. Who uses vibrating tools, how often, for how long, on which materials, in what conditions and with which consumables? It should then compare exposure with action and limit values and decide how exposure will be reduced as far as reasonably practicable.
Good assessment includes worker consultation. Operators often know which tools are harsh, which bits go blunt quickly, where excessive force is needed and when time pressure pushes trigger time beyond the plan. Supervisors should watch the task and time the actual tool use rather than relying only on memory or a method statement.
A strong assessment also separates baseline risk from live control. The baseline assessment identifies the normal exposure profile for the activity; live control then checks whether the day has changed because more holes were drilled, harder concrete was found, a breaker replaced a planned saw cut, a tool was substituted, a blade became blunt or the same person used several vibrating tools in one shift.
| Assessment item | What to check | Evidence |
|---|---|---|
| People exposed | Workers, apprentices, contractors and agency staff using vibrating tools. | Tool-user list and task allocation. |
| Tools and vibration data | Tool type, condition and suitable vibration information. | Tool register, supplier data and procurement records. |
| Trigger time | Actual time on the trigger per task and day. | Observation, sampling, job plans and timer data where useful. |
| Multiple-tool use | Whether one worker uses several vibrating tools in the same day. | Daily exposure calculation and task allocation board. |
| Task variability | Hard material, awkward access, cold conditions, worn consumables or programme pressure. | Supervisor notes, worker feedback and method review. |
| Work methods | Whether the task can be eliminated or redesigned. | Method review and alternative trials. |
| Health status | Symptoms or health-surveillance outcomes. | Confidential OH reports and fitness advice. |
| Controls | Exposure reduction, maintenance, training and supervision. | Action plan and close-out records. |
How should baseline HAV exposure monitoring be built?
Baseline monitoring should capture real tasks, actual trigger time, vibration data and daily exposure patterns before the management plan is fixed.
Baseline monitoring is the practical starting point for a serious HAVS programme. The aim is to understand normal and peak exposure from the work as it is really done. This means observing representative activities, timing actual tool contact, recording the tool and accessory used, noting the material being worked, and identifying whether the same worker uses more than one vibrating tool during the day.
The baseline should include ordinary work, busy days and non-routine work. A refurbishment team may have low exposure during setting out, then much higher exposure during chasing, drilling, cutting, breaking out, scabbling or snagging. A maintenance worker may use short bursts across many tools. If those tools’ exposure points are not added together, the assessment can look safer than the real day.
Baseline monitoring should be proportionate. It may involve timed observations, short sampling periods, task counts, tool logs, supervisor checks, electronic timers or a planned monitoring campaign. It should not become a daily paperwork exercise unless the work genuinely needs that level of control.
| Monitoring item | How to capture it | Why it matters |
|---|---|---|
| Activity list | List regular and non-routine vibrating-tool tasks by team, site and trade. | Shows where exposure can arise before work starts. |
| Tool identity | Record make, model, asset number, hire reference and vibration data source. | Prevents generic assessments based on unknown tools. |
| Accessory condition | Record discs, bits, chisels, blades, needles and abrasive media. | Blunt or unsuitable consumables can increase vibration and trigger time. |
| Trigger time sample | Time actual tool contact during a representative period or task cycle. | Gives a realistic input for A(8) exposure assessment. |
| Task count | Count holes drilled, cuts made, areas chased, metres cut or defects removed. | Allows repetitive work to be estimated without watching the whole shift. |
| Material and access | Note concrete hardness, steel condition, posture, cold, wet and awkward locations. | Explains why exposure changes from one site to another. |
| Multiple-tool day | Check whether one worker uses several vibrating tools during the same shift. | Ensures partial exposures are combined into one daily total. |
| Worker feedback | Ask which tools feel harsh, which tasks take longer and where symptoms occur. | Finds practical failure points that data alone may miss. |
How should tool vibration levels be used without misleading the assessment?
Tool vibration levels should be treated as representative inputs that need checking against real use, not as perfect proof of safe exposure.
Vibration magnitude is usually expressed in metres per second squared (m/s2). The HSE calculator and ready-reckoner approach depend on two inputs: the vibration magnitude and the actual trigger time. If either input is wrong, the exposure estimate is wrong. Manufacturer or supplier information can be a useful starting point, but real workplace vibration can change because of the material, accessory, tool age, maintenance condition, operator technique and grip force.
A lower-vibration tool is not automatically safer if it is too small for the job and takes three times longer. A high-power tool is not automatically worse if it finishes the task quickly with lower force. Good procurement therefore compares vibration, task effectiveness, weight, ergonomics, dust/noise control, maintenance needs and worker feedback. Where reliable data is not available, or the assessment is uncertain, competent measurement or specialist advice may be needed.
Tool vibration data should be controlled like any other safety-critical input. The tool register should show where the value came from, whether it is manufacturer-declared, supplier-provided, measured, database-derived or selected as a conservative initial value. The assessment should also state what margin or assumptions have been applied.
| Data source or issue | How to use it | Caution |
|---|---|---|
| Manufacturer-declared value | Use as an initial input where representative of the task. | May underestimate real workplace exposure if the test condition is different. |
| Supplier or hire data | Ask for likely vibration emission for the intended use. | Check the exact model, accessory and application. |
| HSE initial values or databases | Use for screening and conservative initial assessment. | Replace with better data where exposure is significant or uncertain. |
| Measured workplace value | Use where competent measurement has been carried out for the actual task. | Results vary with operator, tool condition, material and measurement method. |
| Low-vibration model | Consider during procurement and hire. | Confirm it can do the job efficiently and maintain its vibration-reduction features. |
| Tool condition | Review bearings, mounts, handles, balance and service state. | Poor maintenance can make historic vibration data unreliable. |
| Consumables | Control chisels, bits, discs, needles and blades. | Worn consumables increase force, duration and vibration. |
How can tool tags, timers and wearable systems support trigger-time monitoring?
Distinguish timing from vibration measurement
A timer or wearable may record contact time; combine it with vibration data representative of the actual tool and task. HSE warns that magnitudes measured at the wrist, fingers or back of the hand are unlikely to be representative. Competent measurements use the appropriate hand-contact position. Continuous daily monitoring is generally unnecessary; verify changed work and act on exposure evidence.
Digital systems can help estimate exposure across tools, but they must be configured, checked and interpreted carefully.
Tool tags, asset stickers, trigger-time timers, data loggers and wearable HAV monitoring systems can make HAVS management much more visible. A worker using a tagged breaker, grinder and hammer drill can have the day translated into estimated exposure points, helping supervisors see when a task plan is drifting towards the action value or limit value.
These systems are most useful where workers use several tools, contractors move between tasks, or supervisors need a repeatable way to compare planned and actual exposure. Wearable systems and watch-style devices can prompt conversations about exposure, but they should not be treated as magic compliance devices. The quality of the result depends on correct tool assignment, realistic vibration magnitude data, calibration or configuration, correct wearing, battery life, user behaviour and the way the system distinguishes powered time from true vibration exposure.
The management message should be balanced: use monitoring to understand exposure and verify controls, but do not let it replace elimination, better tools, maintenance, worker training or occupational-health surveillance. Monitoring that simply tells a manager after the shift that a limit has been exceeded has failed as a preventive control.
| Monitoring option | Good use | Limit to manage |
|---|---|---|
| Tool tags or barcode systems | Link a worker, tool and vibration value before the task starts. | Wrong tool selection or untagged hire tools corrupt the estimate. |
| Trigger-time timers | Capture actual powered time more consistently than memory. | Powered time may not always equal vibration entering the hands. |
| Wearable monitors | Help estimate daily totals across several tools and teams. | Results depend on correct wearing, settings, tool data and interpretation. |
| wearable trigger-time systems | Support live prompts, daily exposure visibility and supervisor review. | Should be used as an aid to control, not as proof that risk has been eliminated. |
| Exposure dashboards | Show high-use tasks, repeat exceedances and teams needing intervention. | Dashboard data still needs field verification and action close-out. |
| Manual logbooks | Useful where tools are few and work is simple. | Can be inaccurate if filled in late or based on whole-shift estimates. |
| Random sampling | Checks whether planned trigger times still match real work. | Sampling must include peak tasks, contractors and non-routine work. |
How can the hierarchy of controls reduce hand-arm vibration exposure and HAVS risk?
Redesign the task and choose lower-vibration methods before using trigger-time limits and surveillance to manage residual exposure.
Verify controls: Grinding welds on steel components


Read the complete visual as text
- Actual task: A fabricator removes excess weld material with a hand-held grinder; assess vibration alongside wheel, dust, noise and fire hazards.
- Evidence to check: tool/accessory condition, representative vibration, trigger time and workholding
- Stop or hold condition: abnormal vibration, defective consumable, uncontrolled exposure or reported symptoms requiring review
- Release evidence and owner: supervisor accepts a maintained tool and achievable exposure controls
Verify controls: Breaking out a concrete pad


Read the complete visual as text
- Actual task: A crew proposes hand-held breaking of identified concrete; assess vibration, silica, noise, services and debris.
- Evidence to check: concrete identity, services, tool condition, dust control and realistic vibration exposure
- Stop or hold condition: unexpected service/reinforcement, failed dust control or exposure outside the assessed plan
- Release evidence and owner: supervisor accepts the revised safe method before further breakout
A warm glove or a short briefing cannot compensate for a poorly chosen breaker. First ask whether the hole, cut or surface finish can be designed or made off site, machine-mounted, or completed by a suitable lower-vibration method. Then check tool condition, accessories, real-use vibration data and the combined daily exposure. Job rotation only works if each person’s total is reduced; spreading the same hazardous task among more workers is not an elimination strategy.
ERICPD is a control-planning mnemonic used on this page, not a regulation. HSE’s hierarchy gives priority to elimination, substitution and engineering over administrative limits and personal protection. “Discipline” here means reliable instruction, observation and action on reports, not blame.
Choose the activity
How can the ERICPD hierarchy of controls reduce risks while grinding welds on steel components?

| Control level | Control for this activity | Owner and verification | Stop / restart decision |
|---|---|---|---|
| Eliminate | Improve fabrication or buy a finished component so the manual grinding stage is unnecessary. | Process owner verifies that the revised workflow achieves the required output and the hazardous step is genuinely removed. | If the hazardous step remains, retain a task assessment and select the stronger feasible remaining controls. |
| Reduce, including substitution | Choose a suitable lower-vibration finishing method or tool after checking finish, accessory compatibility and other hazards. | Process/technical owner validates the alternative, its compatibility and any new risks before adoption. | Reject the alternative if suitability is unproved or its new hazards are unresolved. |
| Isolate | Clamp and support the component and segregate other people from sparks and fragments. | Supervisor verifies the task boundaries and that the separation or isolation protects affected people and connected work. | Hold or stop for abnormal vibration, defective consumable, uncontrolled exposure or reported symptoms requiring review. |
| Control: physical safeguards | Use a maintained compatible tool/accessory and effective dust control; avoid unnecessary force and worn consumables. | Competent equipment/process owner checks tool/accessory condition, representative vibration, trigger time and workholding. | Hold or stop for abnormal vibration, defective consumable, uncontrolled exposure or reported symptoms requiring review. |
| Control: work method and response | Plan actual trigger time from representative vibration data and the required work, alongside wheel, dust and noise controls. Task rotation only reduces individual exposure if total trigger time falls; arrange symptom reporting and required health surveillance. | Supervisor confirms the limits, response, communication and restart authority with the people doing this activity. | Stop if the agreed method, communication, competent cover or task limits cannot be maintained. |
| PPE | Use assessed eye, hearing and other protection. Anti-vibration gloves are not a substitute for exposure reduction. | Assessor confirms whether PPE is needed and checks selection, condition, compatibility and any required face-fit evidence. | Do not rely on unsuitable or defective protection, or use PPE to continue after an essential source control fails. |
| Discipline | Check tool condition and exposure plans when throughput changes; remove equipment with abnormal vibration from service. | Release only after supervisor accepts a maintained tool and achievable exposure controls. Retain the checks and unresolved restrictions at handover. | Keep the activity on hold while defects or required reinstatement evidence remain unresolved. |
How can the ISO 45001 hierarchy of controls reduce risks while grinding welds on steel components?

| Control level | Control for this activity | Owner and verification | Stop / restart decision |
|---|---|---|---|
| Elimination | Improve fabrication or buy a finished component so the manual grinding stage is unnecessary. | Process owner verifies that the revised workflow achieves the required output and the hazardous step is genuinely removed. | If the hazardous step remains, retain a task assessment and select the stronger feasible remaining controls. |
| Substitution | Choose a suitable lower-vibration finishing method or tool after checking finish, accessory compatibility and other hazards. | Process/technical owner validates the alternative, its compatibility and any new risks before adoption. | Reject the alternative if suitability is unproved or its new hazards are unresolved. |
| Engineering controls | Clamp and support the component and segregate other people from sparks and fragments. | Supervisor verifies the task boundaries and that the separation or isolation protects affected people and connected work. | Hold or stop for abnormal vibration, defective consumable, uncontrolled exposure or reported symptoms requiring review. |
| Engineering controls | Use a maintained compatible tool/accessory and effective dust control; avoid unnecessary force and worn consumables. | Competent equipment/process owner checks tool/accessory condition, representative vibration, trigger time and workholding. | Hold or stop for abnormal vibration, defective consumable, uncontrolled exposure or reported symptoms requiring review. |
| Administrative controls | Plan actual trigger time from representative vibration data and the required work, alongside wheel, dust and noise controls. Task rotation only reduces individual exposure if total trigger time falls; arrange symptom reporting and required health surveillance. | Supervisor confirms the limits, response, communication and restart authority with the people doing this activity. | Stop if the agreed method, communication, competent cover or task limits cannot be maintained. |
| PPE | Use assessed eye, hearing and other protection. Anti-vibration gloves are not a substitute for exposure reduction. | Assessor confirms whether PPE is needed and checks selection, condition, compatibility and any required face-fit evidence. | Do not rely on unsuitable or defective protection, or use PPE to continue after an essential source control fails. |
| Administrative controls | Check tool condition and exposure plans when throughput changes; remove equipment with abnormal vibration from service. | Release only after supervisor accepts a maintained tool and achievable exposure controls. Retain the checks and unresolved restrictions at handover. | Keep the activity on hold while defects or required reinstatement evidence remain unresolved. |
How can the ERICPD hierarchy of controls reduce risks while breaking out a concrete pad?

| Control level | Control for this activity | Owner and verification | Stop / restart decision |
|---|---|---|---|
| Eliminate | Change the design or use a suitable preformed section so the concrete breakout is unnecessary. | Process owner verifies that the revised workflow achieves the required output and the hazardous step is genuinely removed. | If the hazardous step remains, retain a task assessment and select the stronger feasible remaining controls. |
| Reduce, including substitution | Use an assessed remote or lower-vibration demolition method where it suits the concrete, access and structural conditions. | Process/technical owner validates the alternative, its compatibility and any new risks before adoption. | Reject the alternative if suitability is unproved or its new hazards are unresolved. |
| Isolate | Locate services and segregate the breakout area; protect people from fragments and equipment movements. | Supervisor verifies the task boundaries and that the separation or isolation protects affected people and connected work. | Hold or stop for unexpected service/reinforcement, failed dust control or exposure outside the assessed plan. |
| Control: physical safeguards | Provide suitable tool support and effective dust control with compatible maintained breaking equipment. | Competent equipment/process owner checks concrete identity, services, tool condition, dust control and realistic vibration exposure. | Hold or stop for unexpected service/reinforcement, failed dust control or exposure outside the assessed plan. |
| Control: work method and response | Confirm services and structural limits, then plan actual vibration exposure, dust control and noise for the work. Rotation only helps if individual exposure falls; stop and reassess unexpected reinforcement, services or a longer breakout. | Supervisor confirms the limits, response, communication and restart authority with the people doing this activity. | Stop if the agreed method, communication, competent cover or task limits cannot be maintained. |
| PPE | Select suitable RPE, eye/face, hearing and other residual protection; gloves do not remove vibration exposure. | Assessor confirms whether PPE is needed and checks selection, condition, compatibility and any required face-fit evidence. | Do not rely on unsuitable or defective protection, or use PPE to continue after an essential source control fails. |
| Discipline | Review actual breaking time, consumable wear and changes in the material; stop work when the assessed method no longer fits. | Release only after supervisor accepts the revised safe method before further breakout. Retain the checks and unresolved restrictions at handover. | Keep the activity on hold while defects or required reinstatement evidence remain unresolved. |
How can the ISO 45001 hierarchy of controls reduce risks while breaking out a concrete pad?

| Control level | Control for this activity | Owner and verification | Stop / restart decision |
|---|---|---|---|
| Elimination | Change the design or use a suitable preformed section so the concrete breakout is unnecessary. | Process owner verifies that the revised workflow achieves the required output and the hazardous step is genuinely removed. | If the hazardous step remains, retain a task assessment and select the stronger feasible remaining controls. |
| Substitution | Use an assessed remote or lower-vibration demolition method where it suits the concrete, access and structural conditions. | Process/technical owner validates the alternative, its compatibility and any new risks before adoption. | Reject the alternative if suitability is unproved or its new hazards are unresolved. |
| Engineering controls | Locate services and segregate the breakout area; protect people from fragments and equipment movements. | Supervisor verifies the task boundaries and that the separation or isolation protects affected people and connected work. | Hold or stop for unexpected service/reinforcement, failed dust control or exposure outside the assessed plan. |
| Engineering controls | Provide suitable tool support and effective dust control with compatible maintained breaking equipment. | Competent equipment/process owner checks concrete identity, services, tool condition, dust control and realistic vibration exposure. | Hold or stop for unexpected service/reinforcement, failed dust control or exposure outside the assessed plan. |
| Administrative controls | Confirm services and structural limits, then plan actual vibration exposure, dust control and noise for the work. Rotation only helps if individual exposure falls; stop and reassess unexpected reinforcement, services or a longer breakout. | Supervisor confirms the limits, response, communication and restart authority with the people doing this activity. | Stop if the agreed method, communication, competent cover or task limits cannot be maintained. |
| PPE | Select suitable RPE, eye/face, hearing and other residual protection; gloves do not remove vibration exposure. | Assessor confirms whether PPE is needed and checks selection, condition, compatibility and any required face-fit evidence. | Do not rely on unsuitable or defective protection, or use PPE to continue after an essential source control fails. |
| Administrative controls | Review actual breaking time, consumable wear and changes in the material; stop work when the assessed method no longer fits. | Release only after supervisor accepts the revised safe method before further breakout. Retain the checks and unresolved restrictions at handover. | Keep the activity on hold while defects or required reinstatement evidence remain unresolved. |
Where risk remains, a planned programme should name the tool, maximum assessed use for the job, maintainer, supervisor check and a route for symptoms. Exposure below an action value is not a guarantee against injury. HSE control guidance.
How should the selected controls be checked in practice?
ERICPD is used here as a planning mnemonic. The linked HSE five-level hierarchy is the official source for the order and relative reliability of controls; the two labels are not identical.
Start with removing or redesigning the hazard, test substitution and engineered separation, then verify the remaining procedure and PPE against the real task.
A construction crew plans to break out a concrete pad with a hand-held breaker. Vibration reaches the hands through the tool and can damage blood vessels, nerves and hand function after repeated exposure. The designer and supervisor test whether the pad can be removed by a different construction method before planning trigger time; a claimed low tool rating does not release the task. HSE protect workers from HAV
ERICPD is a six-stage planning aid. The HSE five-level hierarchy separates substitution, engineering, administration and PPE. ERICPD Isolate usually means engineered separation; Control can be physical or procedural; Discipline sustains controls but cannot replace them. HSE five-level control hierarchy; HSE five-level hierarchy
What should a HAVS management plan include?
A HAVS management plan should turn the assessment into named actions, exposure limits, controls, training, surveillance and verification.
A management plan is the difference between knowing HAVS exists and actually controlling it. It should describe the risk profile, who owns the programme, how tools are approved, how trigger time is estimated, how exposure is limited, how workers are trained, how occupational-health surveillance is arranged, and how evidence will be reviewed.
The plan should prioritise the highest-risk tasks first. For example, a site may decide that all breaking, scabbling, needle-gunning, cut-off saw work and repeated hammer drilling need pre-task exposure planning; that any planned work likely to exceed the action value needs supervisor approval and controls; and that work which could approach the limit value must be redesigned before it starts.
A good plan also controls change. HAVS exposure can increase when a subcontractor changes tool, a wall turns out harder than expected, a task moves outdoors into cold weather, a hired tool is substituted, or productivity pressure extends the work. The plan should tell supervisors what to do when the reality no longer matches the assessment.
| Plan element | What good looks like | Evidence |
|---|---|---|
| Risk profile | High-vibration tasks, trades, tools, contractors and sites are identified. | HAVS risk register and task risk bands. |
| Roles and ownership | Named managers own procurement, assessment, training, health surveillance and action close-out. | Responsibility matrix and review minutes. |
| Tool approval | Only approved tools and accessories are bought, hired or issued. | Tool register, procurement standard and hire checks. |
| Exposure planning | Planned trigger times and A(8) totals are set before high-risk work starts. | Exposure calculation, points plan and RAMS link. |
| Live change control | Supervisors know when to stop, redesign or reallocate work. | Stop-work criteria and daily briefing record. |
| Training and communication | Workers understand symptoms, trigger time, tool technique and reporting routes. | Training matrix, toolbox talks and worker checks. |
| Occupational health | At-risk people are placed into baseline and periodic surveillance. | Health-surveillance register and fitness advice actions. |
| Verification | Monitoring, inspections and reviews show whether the plan works. | Audit findings, sampled exposure logs and improvement tracker. |
How should HAVS health surveillance work?
Health surveillance should find early symptoms, protect individuals and trigger review of exposure controls.
Health surveillance is needed where workers are likely to be regularly exposed above the exposure action value or otherwise at risk. It should start with baseline occupational-health screening for at-risk people before or at the start of regular exposure, then continue through periodic questionnaires, referral and clinical assessment where symptoms or concerns are identified.
The health-surveillance system should protect confidentiality. Managers need fitness-for-work advice, restrictions and control actions; they do not need confidential medical details. Workers should understand that early reporting is intended to keep them healthy and in work, not to punish them or remove them from site without reason.
A questionnaire that is filed without exposure review adds little value. If symptoms are reported, the business should review recent tool use, trigger time, vibration data, maintenance, cold exposure and task planning. The key management output is whether the worker can continue the task, needs restrictions, needs referral or needs further assessment. The key safety output is whether the work method, tools, maintenance and trigger-time controls are failing.
| Stage | Purpose | Management action |
|---|---|---|
| Baseline screening | Understand starting point before regular vibration exposure. | Place at-risk workers in the surveillance programme and identify particular susceptibility. |
| Regular questionnaire | Identify early symptoms before permanent harm develops. | Refer positive responses and check recent exposure. |
| Occupational-health review | Assess symptoms, fitness and restrictions. | Act on OH advice while protecting confidentiality. |
| Clinical assessment | Confirm concern and advise whether further exposure should be restricted. | Update work allocation and control measures. |
| Exposure review | Check whether controls are effective for the person and task. | Reduce exposure, change method or remove high-risk work. |
| Trend review | Find repeated cases or work areas with issues. | Improve procurement, methods, maintenance, training and supervision. |
What records show HAVS is being managed well?
Records should show that exposure is understood, controlled, monitored and improved before workers are harmed.
A strong HAVS system has a tool register, exposure estimates, trigger-time assumptions, health-surveillance programme, maintenance records, training records and evidence that high-exposure tasks are being redesigned. Records should be simple enough for supervisors to use and robust enough for audit.
Where a worker develops symptoms, the system should show what exposure they had, what controls were in place, when health surveillance identified concern and what changed afterwards. For a construction or engineering business, the best records usually link together: approved tool list, task risk bands, trigger-time monitoring, tool maintenance, training, health-surveillance status and close-out of exposure-reduction actions.
Records should also identify weak signals. If several teams are repeatedly approaching the action value, if tool timers show the same people doing most of the vibrating work, if occupational health reports early symptoms, or if supervisors keep extending trigger-time limits, the system is telling the business to redesign the work.
| Record | What it can evidence | Review trigger |
|---|---|---|
| Vibrating tool register | Tools are known and vibration information is available. | New tool, hire change or defect. |
| Exposure assessment | Trigger times and A(8) exposure have been considered. | New task, tool, method or programme change. |
| Daily exposure log | Multiple-tool use and actual trigger time have been checked where needed. | High-risk task, unusual work pattern or monitoring alert. |
| Maintenance record | Tools remain in efficient condition. | Poor performance, increased vibration or overdue service. |
| Consumable checks | Bits, discs and blades are suitable and sharp. | Blunt consumables or operator complaints. |
| Health surveillance | Workers at risk are monitored. | Symptoms, new exposure group or OH advice. |
| Training and authorisation matrix | Workers and supervisors understand symptoms, controls and trigger-time rules. | New starter, new tool, incident or poor observation. |
| Action tracker | Exposure-reduction actions are closed. | Overdue actions, repeated symptoms or repeated high exposure. |
How should a business verify HAVS is being managed?
Verification should test whether the HAVS system is reducing real exposure, not just whether forms exist.
Verification closes the loop. A supervisor can check whether the planned method, tool, consumable and trigger-time limit are being followed today. A health and safety adviser can sample exposure calculations, tool condition, worker understanding and occupational-health actions. Senior leaders can review trends: exposure points, health-surveillance outcomes, over-trigger-time events, tool defects, procurement changes and overdue actions.
A strong verification programme uses different levels of assurance. Frontline checks should be simple and binary: correct tool, correct bit, exposure plan briefed, trigger-time limit known, symptoms reporting understood. Second-line checks should look deeper at records and behaviours. Third-line audits should test whether the whole system works across projects, contractors, tool hire, occupational health and management review.
The most important question is whether exposure is falling. If the business has more forms but still uses the same high-vibration methods, still keeps blunt tools in use and still finds symptoms late, verification should call that out plainly.
| Assurance level | What to verify | Good evidence |
|---|---|---|
| Frontline worker check | Workers understand symptoms, trigger time, stop points and how to report. | Short binary check, briefing record and worker conversation. |
| Supervisor daily check | The planned tool, method, consumable and exposure limit match the work being done. | Task card, tool check, trigger-time note and action if the plan changes. |
| HSSE inspection | Exposure assessments, tool register, maintenance and training are current and used on site. | Sampled records, observations, interviews and ranked findings. |
| Occupational-health review | Health surveillance is in place for at-risk workers and outputs trigger exposure review. | Health-surveillance register, anonymised trend review and management actions. |
| Procurement review | Hire and purchase choices reduce vibration rather than introducing unknown tools. | Approved list, supplier data, trial notes and worker feedback. |
| Management review | Trends are improving and high-exposure tasks are being designed out. | Dashboard, action tracker, investment decisions and closed improvements. |
| External or specialist audit | The system is technically credible and aligned with legal duties. | Audit plan, sampled evidence, competent findings and corrective actions. |
Which HAVS duties apply in Great Britain and Northern Ireland?
GB and NI both use 2.5 m/s² A(8) as the daily exposure action value and 5.0 m/s² A(8) as the limit, under separate 2005 vibration regulations.
The action value triggers a programme to reduce exposure; it is not a permitted target. The limit value must not be exceeded. HSE and HSENI both require assessment, control, information, training and health surveillance where risk warrants it. A real estimate must combine actual tool contact time and representative vibration magnitude across the worker’s day. The older transitional exception mentioned in some guidance ended in 2010 and gives no present-day permission.
| Decision | Great Britain | Northern Ireland |
|---|---|---|
| Vibration exposure | HSE employer duties under the Control of Vibration at Work Regulations 2005. | HSENI employer duties under the Control of Vibration at Work Regulations (NI) 2005. |
| Action and limit | 2.5 m/s² A(8) action; 5.0 m/s² A(8) limit. Reduce exposure and never exceed the limit. | The same numeric values; use HSENI’s NI assessment and action route. Source: HSE employer responsibilities Source: HSENI hand-arm vibration |
| Tool and incident decisions | Use applicable GB work-equipment and HSE RIDDOR requirements for the actual facts. | Use applicable NI work-equipment and HSENI incident-reporting routes for the actual facts. |
A diagnosed condition or symptom needs occupational-health advice and an exposure review; whether it is reportable requires the responsible person to check the relevant RIDDOR criteria and work link. A low calculated A(8) does not overrule credible symptoms or a poor tool method.
How should management verify controls for this task?
For Hand-Arm Vibration Syndrome, the management check should start with a real control decision: Designer and project manager retain changed specification. Name the person who will test it, keep evidence from the actual work, and reopen the assessment when the failure condition in the hierarchy table occurs. HSE management-system guidance.
A review should compare the planned control with what workers and supervisors can use in practice. Record the defect, owner, interim protection, verification and next review trigger so that a policy statement or certificate does not stand in for a working control.
How could BuildOut Ltd manage this in practice?

BuildOut Ltd would manage HAVS through design choices, low-vibration procurement, baseline exposure monitoring, health surveillance and verification of real site controls.
In this worked example, BuildOut Ltd carries out demolition, refurbishment, drilling, fixing, cutting, grinding and utilities work. HAVS is treated as a long-latency occupational health risk that needs daily site control and leadership attention, not as a form completed once per year. The business uses a HAVS management plan that links design review, approved tools, trigger-time monitoring, occupational-health surveillance, contractor rules, supervisor checks and management review.
At BuildOut Ltd, the supervisor first checks whether service holes can be designed in or drilled by a lower-vibration method. Before a refurbishment shift, they identify the worker, breaker and drill, obtain representative vibration data, observe trigger time and calculate the combined A(8) with the HSE method. During work, a blunt bit or longer-than-planned breaking stops the exposure plan; the supervisor changes the method rather than waiting for a wearable alert after the shift. Hand-back records the tool condition, actual use, any symptom report, revised task and owner of unresolved actions.
| Management element | How the business would manage it | Evidence to review |
|---|---|---|
| Assessing | BuildOut Ltd identifies all vibrating-tool activities at tender, pre-construction and task-planning stages. It records workers, subcontractors, tools, accessories, materials, expected trigger time, task frequency, cold exposure and whether several tools may be used by the same person in one day. | HAVS risk register, task activity map, tool-user list, RAMS review and exposure assessment. |
| Baseline monitoring | Before setting limits, supervisors observe representative work such as breaking out channels, drilling anchor holes, cutting masonry and grinding steel. They time actual trigger use, record tool model and consumable condition, then calculate likely A(8) and exposure points for normal and peak days. | Trigger-time observation sheets, daily exposure calculations, tool tag data and worker feedback. |
| Analysing | The project team challenges the work method before accepting exposure. It looks at cast-in fixings, prefabrication, service coordination, pre-cut materials, hydraulic bursting, machine-mounted breakers and lower-vibration hire tools that still complete the job efficiently. | Design review notes, alternative-method comparison, procurement decision log and cost/risk justification. |
| Implementing | Only approved tools are issued. High-risk tools are tagged with asset numbers and vibration values; consumables are controlled; maintenance is scheduled; supervisors brief daily trigger-time limits; warm welfare and dry gloves are available during cold work. | Tool register, maintenance log, consumable checks, HAVS task card and daily briefing record. |
| Digital monitoring | For higher-risk projects, BuildOut Ltd uses tool tags, timers or wearable HAV monitoring systems to estimate daily totals across multiple tools. Alerts prompt supervisors to stop, redesign or reallocate work before a worker reaches unacceptable exposure. | HAV dashboard, wearable/watch reports, exception logs and supervisor intervention records. |
| Training | Workers learn symptoms, trigger time, tool technique, reporting and stop-work rules. Supervisors learn A(8), EAV, ELV, multiple-tool exposure, health-surveillance referral and how to challenge poor methods. Procurement staff learn how to buy or hire low-vibration tools without sacrificing task suitability. | Training matrix, practical competence checks, toolbox talks and supervisor questioning records. |
| Health surveillance | At-risk workers receive baseline screening before or at the start of regular exposure, then periodic checks. Occupational-health outputs are converted into management actions such as restrictions, exposure review, task redesign or removal from high-vibration work. | Health-surveillance register, fitness advice actions and confidential OH records managed outside routine site files. |
| Checking | Frontline checks confirm the planned tool and trigger-time limit. HSSE inspections sample calculations, maintenance, worker understanding and contractor compliance. Senior reviews look at repeated high-exposure tasks and whether investment is reducing exposure. | Daily HAVS checks, audit findings, action tracker, management review minutes and closed improvement actions. |
| Learning | BuildOut Ltd trends symptoms, health-surveillance outcomes, tool defects, over-trigger-time events, subcontractor deviations and tasks repeatedly needing high vibration. Learning changes procurement standards, design reviews, training and project planning. | Trend dashboard, lessons learned, revised standards, contractor feedback and procurement changes. |
How does HAVS support NEBOSH and professional learning?
HAVS is a strong learning topic because it links hazard recognition, exposure assessment, legal values, health surveillance and long-term harm.
Learners should be able to explain what HAVS is, identify typical vibrating tools, distinguish trigger time from task duration, describe the exposure action value and exposure limit value, and choose controls that reduce exposure at source.
Scenario questions often test whether a learner can move beyond PPE. A good answer considers design, procurement, alternative work methods, maintenance, consumables, exposure planning, health surveillance, training, supervision and records. Strong answers also explain the link between activity monitoring and occupational health: if a worker reports tingling, the employer should not only refer them into health surveillance but should check recent exposure, tool condition and whether the task can be redesigned.
For NEBOSH-style learning, HAVS is useful because it makes the hierarchy of control very concrete. Anti-vibration gloves and job rotation are weak answers if they appear before elimination, lower-vibration equipment, suitable tools, maintenance, sharp consumables and exposure planning.
| Prompt | What a strong answer includes | Common weak answer |
|---|---|---|
| A worker uses a breaker all day. | Actual trigger time, tool magnitude, alternative method and health surveillance. | Just give anti-vibration gloves. |
| Several workers report tingling. | Stop and review exposure, OH referral and task redesign. | Tell them to report if it gets worse. |
| A contractor brings own tools. | Contractor competence, tool data, maintenance and site exposure control. | Assume contractor manages it alone. |
| Tool data is supplier-declared. | Use as a starting point and verify real-use exposure. | Treat catalogue value as perfect. |
| Work is outdoors in winter. | Cold can worsen symptoms and reduce circulation. | Ignore welfare because vibration is the main hazard. |
| One person uses three tools in a day. | Add all partial exposures into the daily A(8) total and check controls. | Assess each tool separately and ignore the combined day. |
| A wearable shows high exposure after the shift. | Investigate why the plan failed and change the work before recurrence. | File the report as monitoring evidence only. |
What competence is needed at each level?
Tool users need practical task instruction; supervisors, buyers, assessors and occupational-health staff need different evidence for their decisions.
A generic course certificate is not proof that someone can choose a tool, estimate actual trigger time or act on an abnormal day. Users should demonstrate pre-use checks, efficient technique, symptom reporting and the hold point when the planned exposure no longer fits. Supervisors must combine several tools for one person and know that a post-shift warning is too late to prevent that day’s exposure. Refresh learning when the method, tool, data, symptoms or observed practice changes.
| Role and learning | Demonstration | Assessor and retained evidence | Reassess when |
|---|---|---|---|
| New and nearby workers: symptom and reporting awareness | Name tingling, numbness or blanching and who receives a concern. | Supervisor checks understanding; induction record. | New work area or symptom pattern emerges. |
| Tool user: selection, technique and daily exposure | Show actual tool, sharp accessory, trigger-time check and defect stop. | Competent supervisor observes task; authorisation and briefing record. | Tool, material, accessory or work duration changes. |
| Maintainer and specialist assessor: tool condition and representative data | Verify maintenance, vibration data source and uncertainty under real use. | Engineering or vibration specialist records checks and scope. | Defect, overhaul, new model or data conflict occurs. |
| Supervisor and contractor coordinator: combined A(8) and release | Calculate or check a multi-tool day, challenge overtime and hold unsafe work. | Manager samples plans and stop decisions; task and exposure records. | Observed trigger time or contractor method differs. |
| Manager and purchaser: design and procurement | Compare alternative methods, suitability, vibration and secondary risks. | Competent adviser reviews specification; decision and risk register remain. | Procurement, design or trend evidence changes. |
| Occupational health and auditor: surveillance and assurance | Trace symptoms to exposure-control review while maintaining confidentiality. | Qualified OH gives fitness advice; auditor records sampled findings. | Symptom, repeated case or failing control is identified. |
Information, training and health surveillance are statutory components where applicable, but neither replaces exposure reduction at source. The worker’s clinical detail stays with qualified health professionals; supervisors need only the restrictions and control actions they must implement.
What warning signs show HAVS controls are weak?
Warning signs include uncontrolled trigger time, unknown tool vibration data, symptoms, poor maintenance, weak health surveillance and over-reliance on monitoring devices.
HAVS failure often shows up before anyone is formally diagnosed. Workers may talk about tingling as if it is normal, supervisors may rotate people without calculating exposure, or tool use may quietly expand because the job is harder than planned. These are management signals, not just worker behaviour issues.
The most serious warning sign is a system that collects data but does not act on it. A wearable report, a tool tag dashboard, a health-surveillance questionnaire or a supervisor observation only has value if it triggers exposure reduction, task redesign, referral or better procurement.
| Warning sign | How harm can develop | Action |
|---|---|---|
| Workers cannot explain trigger time | Exposure is not being controlled in practice and people may confuse task duration with actual tool use. | Brief and measure actual tool use. |
| Daily totals ignore multiple tools | A worker can exceed the action value even if each individual tool looks acceptable. | Add all partial exposures and re-plan the task. |
| Old tools are used until failure | Vibration, grip force and task duration may increase as components wear. | Improve maintenance, quarantine and replacement. |
| Blunt bits, chisels or worn discs | Workers grip harder, push harder and work longer, increasing exposure. | Control consumable quality and replacement. |
| Symptoms are treated as normal | Early nerve or circulation changes may become permanent. | Refer through health surveillance and reduce exposure. |
| Contractors bring unknown tools | Exposure data, suitability and maintenance are uncontrolled. | Set site tool standards and pre-checks. |
| Tool-tag data is not reviewed | The business creates records without preventing repeated high exposure. | Review dashboards, investigate alerts and close actions. |
| Health-surveillance outputs do not change work | Workers with early signs may continue in harmful exposure. | Link OH advice to task restrictions and exposure review. |
| Anti-vibration gloves are the main control | The hierarchy has failed and vibration remains at source. | Redesign the job and reduce vibration at source. |
What do the acronyms and key terms mean?
These terms keep the health effect, vibration measurement and legal action distinct.
| Term | Full form | Meaning here |
|---|---|---|
| HAVS | Hand-arm vibration syndrome | Work-related vascular, nerve and hand-function injury. |
| HAV | Hand-arm vibration | Vibration reaching the hands and arms during work. |
| VWF | Vibration white finger | Vascular component that can blanch fingers, often in cold. |
| A(8) | Eight-hour energy-equivalent daily exposure | Combined vibration exposure across the working day. |
| EAV / ELV | Exposure action value / exposure limit value | 2.5 and 5.0 m/s² A(8), respectively, for HAV in GB and NI. |
| m/s² | Metres per second squared | Unit for vibration magnitude and daily exposure. |
| OH | Occupational health | Confidential work-health assessment and fitness advice. |
| ERICPD | Eliminate, Reduce, Isolate, Control, Personal Protective Equipment, Discipline | Practical hierarchy; not itself a statute. |
| Trigger time | Not an acronym | Time vibration actually reaches the hands, not total task duration. |
Which BuildOut documents support this topic?
Download individual editable BuildOut documents for this topic. Procedures and plans contain completed arrangements; forms, checklists, assessments, RAMS and permits are blank masters. Registers include separate worked examples.
| Document | Purpose and content | Editable download |
|---|---|---|
| Vibration exposure assessment and control procedure BOUK-PRO-VIB · Completed worked example · v1.0 | Select low-vibration methods, estimate realistic trigger times, maintain tools and refer symptoms. | Download DOCX Read preview |
| Hand-arm vibration task/exposure assessment BOUK-RA-VIB-01 · Blank editable master · v1.0 | Use reliable task data and realistic trigger times to reduce exposure. | Download DOCX Read preview |
| Whole-body vibration and plant-route assessment BOUK-RA-VIB-02 · Blank editable master · v1.0 | Evaluate vehicle, ground, seat, speed and duration influences. | Download DOCX Read preview |
| Vibration exposure-control and tool-use record BOUK-FRM-VIB-01 · Blank editable master · v1.0 | Verify planned controls and investigate unexpected task duration. | Download DOCX Read preview |
| Vibration symptom and health-surveillance referral BOUK-FRM-VIB-02 · Blank editable master · v1.0 | Escalate symptoms and arrange competent surveillance where risk indicates. | Download DOCX Read preview |
| Vibration-tool selection and maintenance check BOUK-CHK-VIB-01 · Blank editable master · v1.0 | Check suitable low-vibration equipment, consumables and maintenance. | Download DOCX Read preview |
Review and adapt the documents for your organisation, activities and jurisdiction before approval and issue. Open the SHAREms management-system hierarchy to find each document under its parent policy.
Unlock another resource
You have used this month’s two free downloads. Publish a post in your own words to unlock one more resource, or choose SHARE Individual for 10 downloads per month.
You decide whether to share. If you do, use the relevant platform disclosure tools and do not make claims you do not genuinely hold.