SHARE Knowledge Hub
Repetitive Strain Injury (RSI) and Upper Limb Disorders
Repetitive strain injury is a broad public term for upper-limb symptoms, while workplace assessment should identify the actual disorder or risk factors without attempting diagnosis. Repetition, force, awkward or fixed posture, vibration and insufficient recovery can combine to load muscles, tendons, nerves and joints. Observe the task as performed, redesign the source of exposure and respond early to symptoms so work does not keep aggravating harm.
Understanding Repetitive Strain Injury (RSI) and Upper Limb Disorders
Repetitive strain injury is a broad public term for upper-limb symptoms, while workplace assessment should identify the actual disorder or risk factors without attempting diagnosis. Repetition, force, awkward or fixed posture, vibration and insufficient recovery can combine to load muscles, tendons, nerves and joints. Observe the task as performed, redesign the source of exposure and respond early to symptoms so work does not keep aggravating harm.
Why this matters at work
The evidence set should include surveillance rationale, exposure groups, attendance, competence, anonymised trends, fitness outcomes, referrals, control changes and review. Unsafe shortcut: using unsupervised symptom questionnaires without competent programme design or appropriate follow-up of positive findings, treating normal results as proof exposure is controlled or allowing managers to interpret medical findings. Escalate when symptoms are reported, surveillance identifies concern, exposure controls are weak or a worker remains in harmful work while advice is pending.
The evidence set should include event account, injury or symptoms, task state, tool and control condition, immediate action, investigation, learning and corrective action. Unsafe shortcut: recording the case only as personal injury or unsafe act without testing why the work exceeded capability or controls failed. Escalate when serious harm is possible, evidence may be lost, similar events recur or work continues before interim control is established.
How organisations manage this in practice
The evidence set should include scope, assessor competence, task description, exposure evidence, affected groups, risk reasoning, action owner, interim control, residual risk and review triggers. Unsafe shortcut: filing a generic assessment, a completed tool score or a worker self-check without resolving significant uncertainty or controlling identified risk. Escalate when credible harm is serious, evidence is incomplete, symptoms exist, multiple factors combine or the assessor cannot justify why current controls are enough.
The evidence set should include exception rationale, risk review, start and expiry, affected workers, restrictions, communication, checks and permanent-control progress. Unsafe shortcut: renewing rotation, overtime limits, manual assistance or personal restrictions indefinitely because engineering action is delayed. Escalate when the interim control is breached, symptoms or incidents occur, expiry passes or no credible route to durable control exists.
The evidence set should include worker application or consent, workplace assessment, recommended support, employer contribution, equipment ownership, training and review. Unsafe shortcut: waiting for funding before controlling an identified risk or presenting the scheme as the only route to equipment. Escalate when support is delayed or declined, recommendations conflict with task safety or no suitable interim arrangement exists.
Trial a change to the whole packaging cycle
RSI is not a single tissue diagnosis. Observe force, repetition, reach, posture, duration and recovery in the real task before selecting a redesign.

Observe the cycle
Identify pinch, wrist position, reach and pace without inferring a lesion from pain location.
Trial the redesign
Consider suitable presentation, a supporting fixture, adjustable height and a less forceful closure with the workers.
Check new hazards
Review guarding, pinch points, vibration and the whole cycle; rotation only helps if the demands actually differ.
Verify and respond
The task owner checks exposure change and worker feedback, and uses early symptom and clinical routes separately. ART and DSE assessments serve different purposes.
Read the complete task-specific control examples
ERICPD is a planning cross-map: Discipline verifies and sustains every control. ESEAP compares effectiveness. A label does not authorise the task; retain the owner, evidence and stop or change decision.
Repetitive Strain Injury (RSI) and Upper Limb Disorders · ERICPD
- Eliminate
- Remove the repeated hand-twist step by changing the closure or packaging design if product integrity trials pass.
- Reduce
- Choose a lower-force closure or powered tool with a measured reduction in grip and repetition; compare vibration and new pinch hazards.
- Isolate
- Install a height-adjustable fixture and jig that holds the pack so wrists stay nearer neutral; provide separate DSE input devices and layout for screen work.
- Control
- Set realistic line pace, task variation using different muscle groups, recovery periods and early symptom reporting; do not rely on rotation between equally repetitive jobs.
- PPE
- Gloves may protect against a separate cut or chemical hazard but can increase grip force; no generic brace or glove is a substitute for task redesign.
- Discipline
- Maintain tools/jigs, follow up symptoms confidentially, compare exposure observations and review production targets when controls erode.
Repetitive Strain Injury (RSI) and Upper Limb Disorders · ESEAP
- Elimination
- Remove the repeated hand-twist step by changing the closure or packaging design if product integrity trials pass.
- Substitution
- Choose a lower-force closure or powered tool with a measured reduction in grip and repetition; compare vibration and new pinch hazards.
- Engineering controls
- Install a height-adjustable fixture and jig that holds the pack so wrists stay nearer neutral; provide separate DSE input devices and layout for screen work.
- Administrative controls
- Set realistic line pace, task variation using different muscle groups, recovery periods and early symptom reporting; do not rely on rotation between equally repetitive jobs.
- PPE
- Gloves may protect against a separate cut or chemical hazard but can increase grip force; no generic brace or glove is a substitute for task redesign.
What is RSI and how does it relate to upper limb disorders?
RSI is a broad label; upper limb disorder is the more useful workplace term for symptoms and conditions affecting upper limbs and neck.
Upper-limb loading is a combination of factors


Read the complete visual as text
- REPETITION: Same movement repeated with little variation. Recognise it in: Keyboard/data entry, assembly, packing or cutting.
- FORCE: Grip, pinch, push, pull or tool pressure loads tissues. Recognise it in: Squeezing triggers, using pliers or forcing parts.
- AWKWARD POSTURE: Joints work away from neutral positions. Recognise it in: Raised shoulders, bent wrist or overhead work.
- STATIC LOAD: Muscles hold a position for long periods. Recognise it in: Mouse use, microscope work or arms held out.
- DURATION: Exposure continues without recovery. Recognise it in: Long production runs or extended DSE sessions.
- VIBRATION: Hand tools add vascular and nerve stress. Recognise it in: Sanders, grinders and drills.
- PSYCHOSOCIAL FACTORS: High demands or low control increase reporting and risk. Recognise it in: Paced line with little ability to pause.
Best-practice guide: Repetitive Strain Injury (RSI) and Upper Limb Disorders
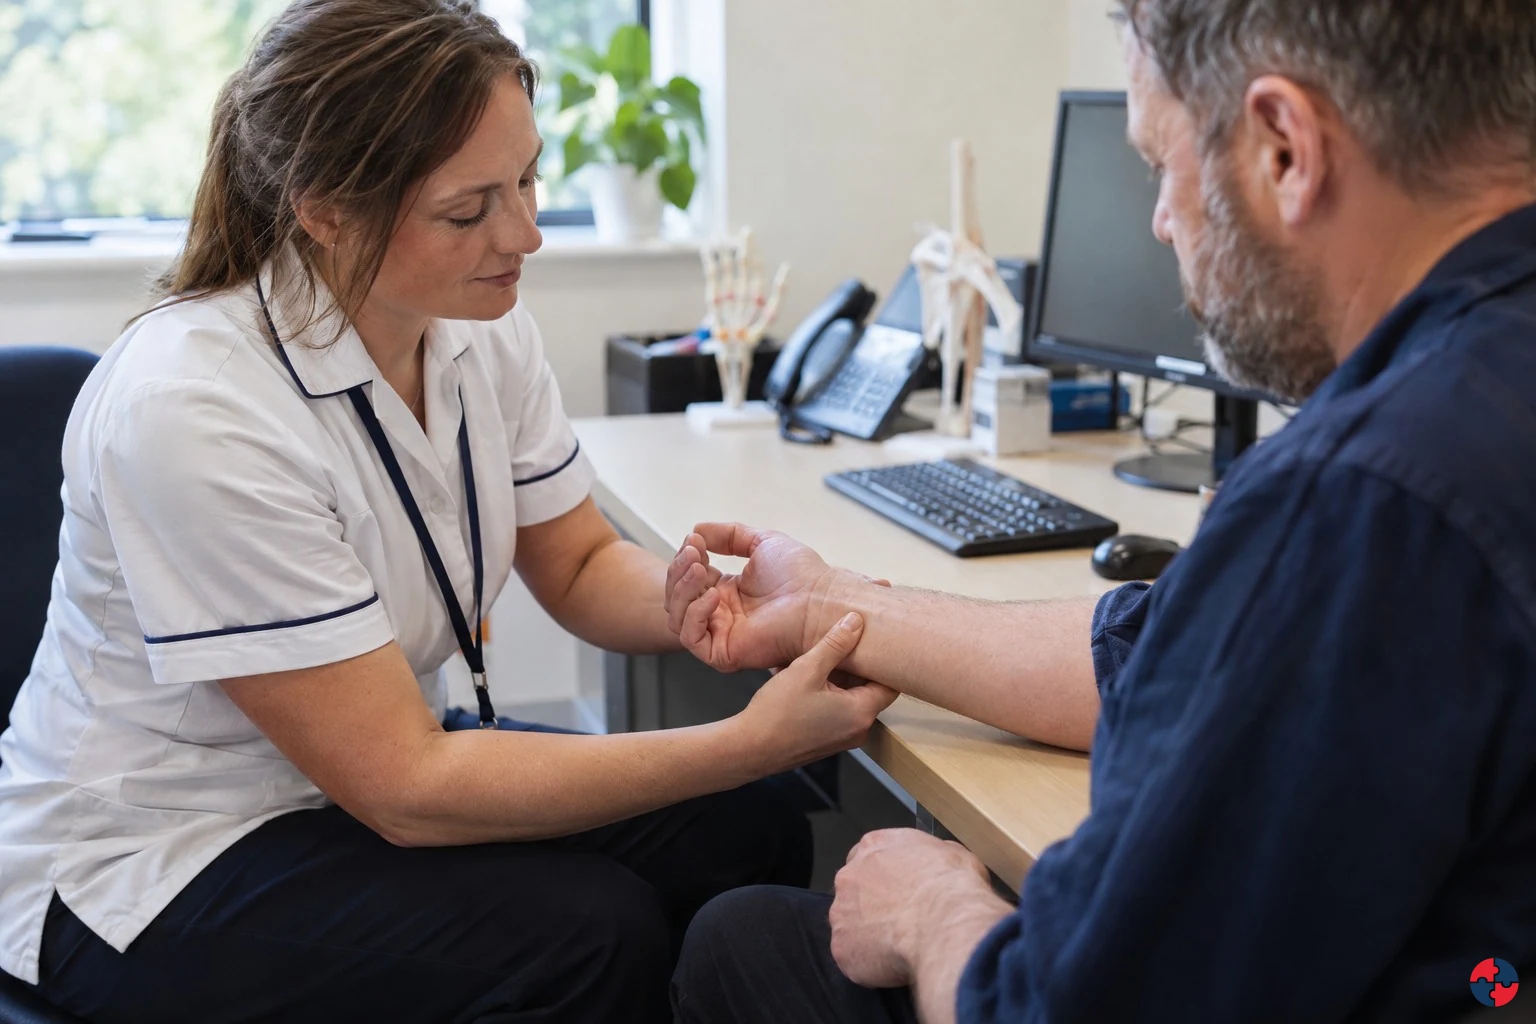
What is RSI and how does it relate to upper limb disorders?
RSI is a broad label; upper limb disorder is the more useful workplace term for symptoms and conditions affecting upper limbs and neck. Repetitive strain injury is a broad public term for upper-limb symptoms, while workplace assessment should identify the actual disorder or risk factors without attempting diagnosis.
Turn repetitive strain injury (rsi) and upper limb disorders knowledge into a decision
Repetitive strain injury is a broad public term for upper-limb symptoms, while workplace assessment should identify the actual disorder or risk factors without attempting diagnosis. Repetition, force, awkward or fixed posture, vibration and insufficient recovery can combine to load muscles, tendons, nerves and joints. Keep the observation, ART record where used, action owner, worker feedback, symptom report and reassessment.
A packing task with wrist symptoms
Check the changed task with workers during normal and peak output; breaks supplement redesign rather than excuse continuing high exposure. Reassess the changed task and symptom trend; return to the original rate only if controls remain effective.
Where do RSI controls commonly fail?
They fail when the organisation focuses on training and stretching instead of work design.
Choose controls for the actual task
Eliminate: Remove the repeated hand-twist step by changing the closure or packaging design if product integrity trials pass. Reduce: Choose a lower-force closure or powered tool with a measured reduction in grip and repetition; compare vibration and new pinch hazards. Isolate: Install a height-adjustable fixture and jig that holds the pack so wrists stay nearer neutral; provide separate DSE input devices and layout for screen work. Control: Set realistic line pace, task variation using different muscle groups, recovery periods and early symptom reporting; do not rely on rotation between equally repetitive jobs. PPE: Gloves may protect against a separate cut or chemical hazard but can increase grip force; no generic brace or glove is a substitute for task redesign. Read the full control table for qualifications, ownership and verification. Use the actual task and applicable jurisdiction; existing technical approval remains unchanged.
Use the full repetitive strain injury (rsi) and upper limb disorders lesson
Use the full topic for the decision points, practical examples, detailed control tables and source scope. HSE guidance applies to Great Britain; use HSENI for the Northern Ireland route and the source’s stated jurisdiction. A simplified guide does not change the page’s technical-review or approval status.

Read all six steps as text
1. What is RSI and how does it relate to upper limb disorders?
RSI is a broad label; upper limb disorder is the more useful workplace term for symptoms and conditions affecting upper limbs and neck.
- Avoid / redesign: Remove the repeated hand-twist step by changing the closure or packaging design if product integrity trials pass.
- Control the task: Install a height-adjustable fixture and jig that holds the pack so wrists stay nearer neutral; provide separate DSE input devices and layout for screen work.
- Verify before release: Process owner trials quality, cycle time and force demand.
RSI is a broad label; upper limb disorder is the more useful workplace term for symptoms and conditions affecting upper limbs and neck. Repetitive strain injury is a broad public term for upper-limb symptoms, while workplace assessment should identify the actual disorder or risk factors without attempting diagnosis.
Apply it: Which part of this plan would you check at the workface before authorising the task?
2. Turn repetitive strain injury (rsi) and upper limb disorders knowledge into a decision
Use the evidence to improve the actual work arrangement.
- Change at source: Remove the repeated hand-twist step by changing the closure or packaging design if product integrity trials pass.
- Make it observable: Process owner trials quality, cycle time and force demand.
- Keep useful evidence: Keep the observation, ART record where used, action owner, worker feedback, symptom report and reassessment.
Repetitive strain injury is a broad public term for upper-limb symptoms, while workplace assessment should identify the actual disorder or risk factors without attempting diagnosis. Repetition, force, awkward or fixed posture, vibration and insufficient recovery can combine to load muscles, tendons, nerves and joints. Keep the observation, ART record where used, action owner, worker feedback, symptom report and reassessment.
Apply it: What evidence would show that the change improves this task, rather than only completing a record?
3. A packing task with wrist symptoms
Example: a practical application of the existing topic lesson.
- Setting: A worker seals small products for most of a shift using a pinch grip and bent wrist while dispatch targets accelerate the pace.
- Act: Trial a fixture and lower bench height, reduce pinch force, vary genuinely different tasks and adjust production pace.
- Hold / review: If tingling, weakness or pain persists or worsens, reduce or stop the affected task and seek occupational health or medical advice as appropriate.
Check the changed task with workers during normal and peak output; breaks supplement redesign rather than excuse continuing high exposure. Reassess the changed task and symptom trend; return to the original rate only if controls remain effective.
Apply it: At which point would you hold this example, and what evidence would allow it to proceed?
4. Where do RSI controls commonly fail?
Connect the task, the route to the person and the control that can fail.
- Source / exposure: They fail when the organisation focuses on training and stretching instead of work design.
- Possible consequence: Awareness training is useful, but it does not remove excessive repetition, force, awkward posture or pace.
- Control failure: If the workstation, tool or production target creates the risk, the control must change the task.
They fail when the organisation focuses on training and stretching instead of work design.
Apply it: Who could be exposed, including other trades, cleaners, maintainers and people nearby?
5. Choose controls for the actual task
Control summary. Read the complete task-specific controls and checks in the linked topic.
- Elimination: Remove the repeated hand-twist step by changing the closure or packaging design if product integrity trials pass.
- Substitution: Choose a lower-force closure or powered tool with a measured reduction in grip and repetition; compare vibration and new pinch hazards.
- Engineering controls: Install a height-adjustable fixture and jig that holds the pack so wrists stay nearer neutral; provide separate DSE input devices and layout for screen work.
- Administrative controls: Set realistic line pace, task variation using different muscle groups, recovery periods and early symptom reporting; do not rely on rotation between equally repetitive jobs.
- PPE: Gloves may protect against a separate cut or chemical hazard but can increase grip force; no generic brace or glove is a substitute for task redesign.
Eliminate: Remove the repeated hand-twist step by changing the closure or packaging design if product integrity trials pass. Reduce: Choose a lower-force closure or powered tool with a measured reduction in grip and repetition; compare vibration and new pinch hazards. Isolate: Install a height-adjustable fixture and jig that holds the pack so wrists stay nearer neutral; provide separate DSE input devices and layout for screen work. Control: Set realistic line pace, task variation using different muscle groups, recovery periods and early symptom reporting; do not rely on rotation between equally repetitive jobs. PPE: Gloves may protect against a separate cut or chemical hazard but can increase grip force; no generic brace or glove is a substitute for task redesign. Read the full control table for qualifications, ownership and verification. Use the actual task and applicable jurisdiction; existing technical approval remains unchanged.
Apply it: Which stronger option can be used here, and who will verify it before accepting the remaining risk?
6. Use the full repetitive strain injury (rsi) and upper limb disorders lesson
Follow the official sources below and retain the task-specific evidence.
- Official guidance: HSE upper-limb guidance
- Official guidance: HSE ART
- Task decision: The task owner checks exposure change and worker feedback, and uses early symptom and clinical routes separately. ART and DSE assessments serve different purposes.
Use the full topic for the decision points, practical examples, detailed control tables and source scope. HSE guidance applies to Great Britain; use HSENI for the Northern Ireland route and the source’s stated jurisdiction. A simplified guide does not change the page’s technical-review or approval status.
Apply it: Which official source and full-topic section will you use to resolve the next decision?
RSI is often used in everyday language, but it can hide the real risk factors. The issue is rarely repetition alone. HSE highlights prolonged repetitive work, awkward posture, excessive force, long duration without suitable rest, hand-held tools, poor environment, poor work organisation and individual vulnerability as interacting factors.
The practical message is that RSI/ULD prevention should start with job design. If work requires high repetition, force, awkward reach, static posture or poor recovery, training people to stretch will not be enough. The task, workstation, tool, pace, staffing and recovery pattern need review.
Choose an assessment method for the task: HSE ART is for repetitive upper-limb tasks such as assembly, while HSE DSE and HSENI DSE cover qualifying screen work. ART is not intended for DSE assessment. HSE upper-limb guidance supports early reporting, work redesign and review of combined factors.
| Risk factor | How it contributes | Example |
|---|---|---|
| Repetition | Same movement repeated with little variation. | Keyboard/data entry, assembly, packing or cutting. |
| Force | Grip, pinch, push, pull or tool pressure loads tissues. | Squeezing triggers, using pliers or forcing parts. |
| Awkward posture | Joints work away from neutral positions. | Raised shoulders, bent wrist or overhead work. |
| Static load | Muscles hold a position for long periods. | Mouse use, microscope work or arms held out. |
| Duration | Exposure continues without recovery. | Long production runs or extended DSE sessions. |
| Vibration | Hand tools add vascular and nerve stress. | Sanders, grinders and drills. |
| Psychosocial factors | High demands or low control increase reporting and risk. | Paced line with little ability to pause. |
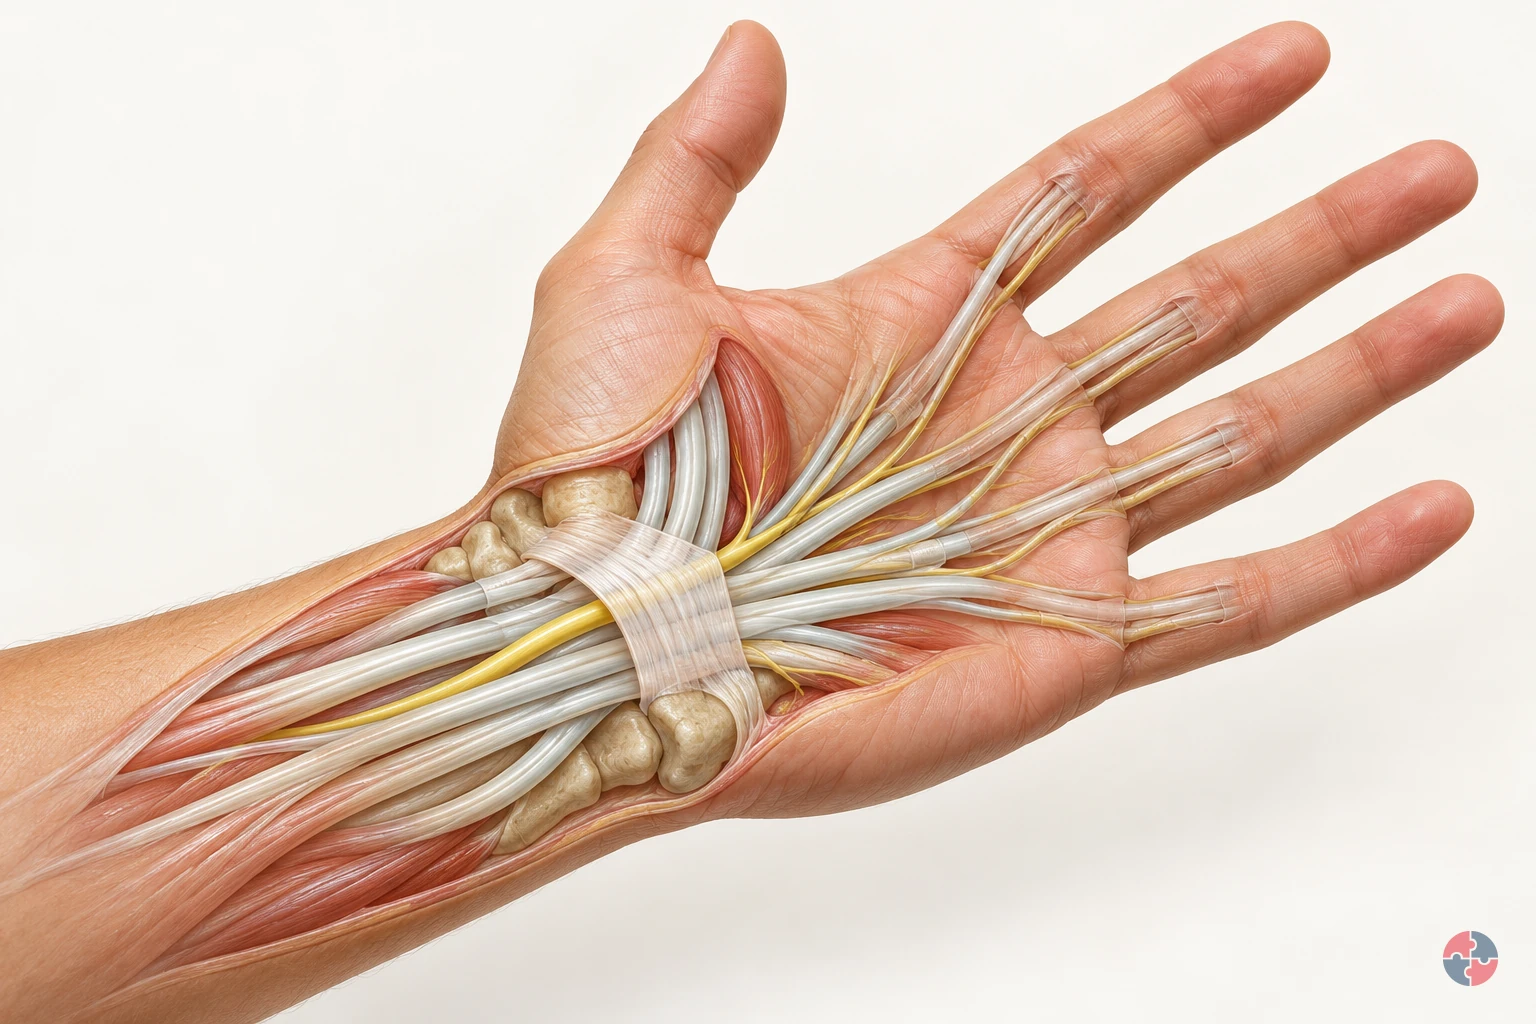
How does a working hand move, and what changes in nerve and tendon problems?
Interactive anatomy · Tendons, nerves and cushioning tissues · Updated 2026-10-23
Read all anatomy and process explanations without the viewer
General anatomy and example mechanisms, not diagnosis, treatment choice or fitness-for-work assessment. These are examples of mechanisms. Similar symptoms can have different causes. Self-provocation or nerve-tapping tests Exercise or stretching prescriptions Automatic symptom classification or a generic RSI lesion Treatment, return-to-work clearance or a task-based diagnosis Unreviewed shoulder, medial-elbow or trigger-finger damage overlays The prepatellar-bursitis route requires the dedicated labelled front-of-knee inset. A wrist/shoulder substitute is not suitable. Prompt-help text remains outside the model and scenarios.
Forearm flexor muscles
These muscles contract and pull through tendons to bend the fingers and thumb. The forearm flexor muscles generate the pull transmitted through tendons into the fingers and thumb. As the illustrated grip closes, follow the muscle region towards those slender connections. Their action bends the finger joints; the tendon transfers the pull rather than generating it. The visible shape change makes this relationship clearer and does not measure muscle effort. Gloucestershire Hospitals NHS Foundation Trust: Flexor Tendon Injuries
Flexor tendons
These tendons carry muscle force into the hand. Flexor tendons connect forearm muscles with bones in the hand. Their glide lets a muscle’s pull bend the finger joints while guided paths keep the tendons near the skeleton. Nine flexor tendons pass through the carpal tunnel. Compare their mechanical role with the nearby median nerve, which carries signals rather than pulling on bone. Gloucestershire Hospitals NHS Foundation Trust: Flexor Tendon Injuries · Whittington Health NHS Trust: Carpal Tunnel Syndrome
Tendon sheath
The sheath surrounds the tendon and supports smooth glide. A tendon sheath surrounds and supports a tendon as it glides. Along the fingers, pulley structures help keep the tendon close to the bones so its pull acts along a guided route. Watch the tendon move relative to its surroundings. A sheath is part of that supporting passage, not another muscle producing the same pull. Gateshead Health NHS Foundation Trust: Trigger Finger/Thumb Release Surgery
Carpal bones
Eight small carpal bones make up the wrist. Their curved arrangement forms the bony side of the carpal tunnel. The transverse carpal ligament closes the tunnel across the palm side. King’s College Hospital NHS Foundation Trust: Carpal tunnel syndrome — patient information · Kent Community Health NHS Foundation Trust: Carpal tunnel syndrome guide for patients
Transverse carpal ligament
This strong ligament spans the palm side of the wrist. It forms the roof above the median nerve and flexor tendons. Separating layers in the model helps reveal these relationships. King’s College Hospital NHS Foundation Trust: Carpal tunnel syndrome — patient information · Whittington Health NHS Trust: Carpal Tunnel Syndrome
Median nerve
The median nerve carries signals for feeling and some thumb movement. The median nerve carries sensory information from the thumb, index and middle fingers and part of the ring finger, and helps control some thumb muscles. Follow its branches beyond the shared wrist passage. The cyan travel cue represents communication; it is not a visible electrical flash, a nerve-speed measurement or a map for diagnosing altered sensation. NHS: Carpal tunnel syndrome · Kent Community Health NHS Foundation Trust: Carpal tunnel syndrome guide for patients · Whittington Health NHS Trust: Carpal Tunnel Syndrome
Thumb tendon: APL
Abductor pollicis longus helps move the thumb away from the hand. APL passes along the thumb side of the wrist through the first dorsal compartment. Follow it towards the base of the thumb. Ashford and St Peter’s Hospitals NHS Foundation Trust: De Quervains · Wrightington, Wigan and Leigh Teaching Hospitals NHS Foundation Trust: De Quervain’s Syndrome
Thumb tendon: EPB
Extensor pollicis brevis helps straighten the thumb. EPB travels beside APL through the first dorsal compartment on the thumb side of the wrist. Ashford and St Peter’s Hospitals NHS Foundation Trust: De Quervains · Wrightington, Wigan and Leigh Teaching Hospitals NHS Foundation Trust: De Quervain’s Syndrome
First dorsal compartment
A small passage on the thumb side of the wrist guides APL and EPB. The tendons normally glide through their sheath here. This is the location of the De Quervain’s example; the carpal tunnel lies on the palm side. Ashford and St Peter’s Hospitals NHS Foundation Trust: De Quervains · Wrightington, Wigan and Leigh Teaching Hospitals NHS Foundation Trust: De Quervain’s Syndrome
Outer elbow tendon attachment
Forearm tendons attach to bone near the outside of the elbow. Forearm extensor tendons attach near the bony point on the outside of the elbow, the lateral epicondyle. These muscles extend and help steady the wrist during gripping. Link the closer attachment view with the tool task to see why an elbow structure matters during hand use. Pain here does not establish a torn or detached tendon. NHS: Tennis elbow · Berkshire Healthcare NHS Foundation Trust: Advice and resources: Lateral elbow tendinopathy · Newcastle Hospitals NHS Foundation Trust: Tennis elbow
Prepatellar bursa
A fluid-containing sac helps reduce friction at the front of the kneecap. The prepatellar bursa lies between the kneecap and the overlying soft tissues, outside the knee joint. Its fluid-containing structure helps cushioning and smooth glide over bone. Compare the closer view with the worker’s knee contact in the floor task. The normal view locates the sac; it does not diagnose inflammation or measure pressure during kneeling. NHS: Bursitis · Leeds Community Healthcare NHS Trust: About pre-patella bursitis
Open the complete process transcript
The process, step by step
Watch muscles pull and tendons glide
The forearm muscles provide much of the pull that closes the fingers around an object. When these muscles contract, their tendons transmit force into the hand and pull on the finger bones, bending the joints. The tendons glide along guided paths rather than pulling away from the fingers like loose cords. Follow the muscle-to-tendon connection as the illustrated grip closes, then follow the return movement as the hand opens. The model enlarges this motion so that you can connect the movement at the fingers with the working structures farther up the forearm. Gloucestershire Hospitals NHS Foundation Trust: Flexor Tendon Injuries · Gateshead Health NHS Foundation Trust: Trigger Finger/Thumb Release Surgery
What to watch: Look from the forearm muscle bellies towards the slender flexor tendons, then follow their paths into the fingers around the handle.
Why it matters: Tendons transfer a muscle’s mechanical pull to bone, allowing joints to move. Guided tendon paths help direct that pull through the hand; the nerve has a different role in signalling.
Explore this step: Pause during the grip and trace one tendon from its forearm muscle towards the finger.
Watch tendon glide through the wrist
The carpal tunnel is a passage at the wrist, with a bony boundary formed by the carpal bones and a strong ligament spanning the palm side. Nine flexor tendons and the median nerve pass through this shared space. The tendons transmit the pull that helps bend the fingers and thumb; the nerve carries signals. Follow the tendon movement beneath the ligament roof and compare it with the nerve’s position. The cutaway separates the layers for learning, but these structures normally remain close together within a connected wrist. King’s College Hospital NHS Foundation Trust: Carpal tunnel syndrome — patient information · Kent Community Health NHS Foundation Trust: Carpal tunnel syndrome guide for patients · Whittington Health NHS Trust: Carpal Tunnel Syndrome
What to watch: Find the carpal bones and ligament roof, then compare the flexor tendons with the median nerve passing through the same wrist passage.
Why it matters: The tunnel brings several structures through a compact part of the wrist. Understanding their different functions explains why tendon glide and nerve signalling must be explored separately even though they occupy nearby space.
Explore this step: Use the labels to identify the tunnel boundary, a tendon and the nerve without changing to an injury example.
Follow the nerve signal
The median nerve links part of the hand with the nervous system. It carries sensory information from the thumb, index finger, middle finger and part of the ring finger, and helps control some muscles at the base of the thumb. Follow the cyan travelling cue along the nerve and into its branches. This colour illustrates signalling; a real nerve does not visibly light up. Compare that pathway with the tendons beside it: tendons transfer mechanical pull, whereas the nerve carries information. The simplified branches are a teaching map, not a test of a person’s sensation. Kent Community Health NHS Foundation Trust: Carpal tunnel syndrome guide for patients · Whittington Health NHS Trust: Carpal Tunnel Syndrome
What to watch: Follow the cyan cue along the median nerve through the wrist into the palm, keeping the adjacent tendons in view.
Why it matters: Sensation helps the nervous system receive information from the hand, while motor signals contribute to thumb control. Distinguishing information from mechanical pull makes the coordinated hand function easier to understand.
Explore this step: Compare the nerve cue with tendon glide and explain which one represents information and which represents force transfer.
Follow the thumb tendons
Two tendons run along the thumb side of the wrist through the first dorsal compartment. They connect forearm muscles to the thumb and glide as the thumb changes position. Abductor pollicis longus, labelled APL, helps move the thumb away from the hand. Extensor pollicis brevis, labelled EPB, helps straighten it. Follow the two labelled paths rather than assuming they pass through the palm-side carpal tunnel. The model brings their movement and location into view so that the separate actions and their shared guiding passage can be understood together. Ashford and St Peter’s Hospitals NHS Foundation Trust: De Quervains · Wrightington, Wigan and Leigh Teaching Hospitals NHS Foundation Trust: De Quervain’s Syndrome
What to watch: Find APL and EPB beside the thumb side of the wrist, then follow both labelled paths through the first dorsal compartment.
Why it matters: Different tendon actions contribute to positioning the thumb for hand use. Their shared passage guides glide, but the two tendons retain different attachments and functions; they are not interchangeable parts.
Explore this step: Select each tendon in turn and connect its name with the thumb movement described in the explanation.
Follow the elbow during a tool task
A tool task involves more than the muscles that visibly close the fingers. Forearm extensor muscles also help hold the wrist steady while the hand grips. Follow these muscles back towards their tendon attachment near the bony point on the outside of the elbow, called the lateral epicondyle. Watch the technician’s illustrated grip and tool turn, then use the closer elbow view to connect the activity with this attachment. A moving tool does not demonstrate a damaged tendon: the normal task and the separate tissue example explain different things. NHS: Tennis elbow · Newcastle Hospitals NHS Foundation Trust: Tennis elbow
What to watch: Watch the hand grip the screwdriver, then follow the working forearm towards the tendon attachment on the outside of the elbow.
Why it matters: Wrist stability helps the hand grip and use an object, so a tendon attachment near the elbow can be involved in a hand task. Movement alone does not show injury or quantify the demand.
Explore this step: Switch between Work activity and Elbow cutaway and describe how the two views relate to the same task.
Locate the bursa in front of the kneecap
The prepatellar bursa is a small fluid-containing sac in front of the kneecap. It helps the overlying soft tissues move across the bone with less friction. First locate the front of the knee in the floor-laying task, then follow the linked closer view to the thin sac outside the knee joint. This shows where contact during kneeling relates to the anatomy; the bursa is not a cushion inside the joint. The normal location lesson remains separate from the example of bursal irritation, and the short model sequence does not predict when symptoms would occur. Leeds Community Healthcare NHS Trust: About pre-patella bursitis · NHS Musculoskeletal Matters Dorset: Prepatellar bursitis
What to watch: Locate the kneeling worker’s front-of-knee contact, then find the thin bursa between the kneecap and the overlying soft tissues in the close view.
Why it matters: Glide between soft tissue and bone is a different function from movement inside the knee joint. Locating the bursa makes the relevant contact area clear without inferring tissue damage from posture alone.
Explore this step: Compare Floor-laying task with Knee cutaway and identify which side of the kneecap contains the bursa.
Read the practice situations and all answer explanations
Sources and how the model is made
The opening images are AI-generated anatomical illustrations. The interactive 3D models and labelled SVG diagrams use original procedural artwork. These teaching images are not medical scans or diagnostic tools. Source references support the learner explanations and do not grant artwork rights.
- Health and Safety Executive: Upper limb disorders — Multiple work factors, task redesign, force/repetition/posture/duration, worker involvement and early reporting. Risk scores are not diagnosis.
- NHS: Carpal tunnel syndrome — Median-nerve pressure, potential sensory and functional effects, varied contributors and clinical assessment. No treatment or self-test generated.
- King’s College Hospital NHS Foundation Trust: Carpal tunnel syndrome — patient information — Bony tunnel boundary and transverse carpal-ligament roof. Text only, no third-party credited artwork copied. Printed review date September 2026 requires recheck at clinical sign-off; corroborates NHS anatomy.
- Ashford and St Peter’s Hospitals NHS Foundation Trust: De Quervains — APL and EPB actions and thumb-side first dorsal compartment. Indexed primary-page text rechecked, updated 28 April 2026; corroborated by directly retrieved UL8. No treatment recommendations or artwork copied.
- NHS: Tennis elbow — Outer-elbow location, tendon attachment and possible repeated gripping/twisting context. More precise tendinopathy wording corroborated by UL12/UL14; no blanket inflammation claim.
- NHS: Bursitis — Fluid-sac cushioning, inflammation and pressure-reduction context. Printed next-review date 30 October 2026 should be rechecked at sign-off.
- NHS: Tendonitis — General tendon role and urgent professional advice for severe pain or suspected rupture. Printed next-review date June 2026 is overdue: recheck before clinical approval. No treatment/exercise regimen reused.
- Wrightington, Wigan and Leigh Teaching Hospitals NHS Foundation Trust: De Quervain’s Syndrome — Directly retrieved January 2026 leaflet, expiry January 2028: APL/EPB, thumb-side first dorsal compartment and constrained sheath glide. Anatomy/mechanism only; no exercises or artwork copied.
- Gloucestershire Hospitals NHS Foundation Trust: Flexor Tendon Injuries — Directly retrieved: flexor tendons connect forearm muscles to finger bones and transmit their pull. Used for normal function only; no injury prognosis, treatment instructions or artwork reused.
- Gateshead Health NHS Foundation Trust: Trigger Finger/Thumb Release Surgery — Directly retrieved normal tendon/sheath distinction and guiding finger pulleys only. Printed review date September 2026 remains overdue; no trigger-finger overlay, surgical advice or exercise regimen reused.
- Ashford and St Peter’s Hospitals NHS Foundation Trust: Carpal Tunnel — Median-nerve sensory/motor role and flexor tendons within the tunnel. Indexed primary text verified, updated 28 April 2026; direct retrieval failed. Recheck live source at clinical sign-off.
- Berkshire Healthcare NHS Foundation Trust: Advice and resources: Lateral elbow tendinopathy — Painful forearm tendon attachment near the outside of the elbow and possible repetitive work demands. No treatment regimen, recovery prediction or artwork copied.
- Leeds Community Healthcare NHS Trust: About pre-patella bursitis — Dedicated bursa in front of kneecap, cushioning/glide, kneeling/direct injury/infection and urgent GP assessment for fever or feeling unwell. No treatment selection.
- NHS MyHealth Devon: Golfers & Tennis Elbow — Forearm tendon attachments and tendinopathy wording: not equated with simple inflammation. No rehabilitation or prognosis claims reused.
- NHS Musculoskeletal Matters Dorset: Prepatellar bursitis — Front-of-knee friction-reducing sac; prolonged kneeling, direct injury and infection as distinct possible causes. No medicine or cooling regimen reused.
- Kent Community Health NHS Foundation Trust: Carpal tunnel syndrome guide for patients — Directly retrieved, last edited 9 July 2025: eight carpal bones, ligament boundary, median-nerve sensory/motor role and tendon passage. Anatomy facts paraphrased only; no clinical regimen or artwork copied.
- Whittington Health NHS Trust: Carpal Tunnel Syndrome — Directly retrieved, updated 7 August 2025: nine tendons and median nerve in the carpal tunnel, nerve function and cautious attribution of work contribution. Normal anatomy corroborated by Sherwood Forest Hospitals NHS leaflet PIL202409-06-CTS; that leaflet has a September 2026 review date. No treatment recommendations or artwork reused.
- Newcastle Hospitals NHS Foundation Trust: Tennis elbow — Directly retrieved, last updated 3 November 2025: forearm tendons attach at the lateral epicondyle; these muscles extend the wrist and take part in gripping. Used for extensor anatomy and task explanation only; no treatment regimen, work-clearance advice or artwork copied.
- Health and Safety Executive: Lower limb disorders — Directly retrieved, updated 27 March 2025: repeated kneeling and knee bursitis; review working methods, mechanical aids, task variation, breaks, seating where possible, and suitable knee pads or matting. Used for prevention principles only; no numerical kneeling threshold, diagnosis or guarantee of protection.
How can the hierarchy of controls reduce repetition, force and awkward upper-limb work?
Assess repetition, force, posture, duration, recovery, vibration, environment and individual needs. For qualifying screen, keyboard or mouse work in Northern Ireland, apply the Health and Safety (Display Screen Equipment) Regulations (Northern Ireland) 1992 and assess the workstation and work routine; the ART tool for repetitive tasks does not replace that DSE assessment.
A good assessment starts with observation of work as done, not just a job description. Watch the hands, wrists, elbows, shoulders and neck. Look at cycle time, peak force, grip type, reach, wrist angle, shoulder elevation, tool vibration, work height, lighting, temperature, pace, breaks and whether workers can vary the task.
HSE points to tools such as the ART tool for repetitive upper-limb tasks and DSE assessment for screen work. These tools support judgement but do not replace a suitable and sufficient risk assessment, especially where individual factors, symptoms or task variation matter.
| Assessment factor | What to look for | Control direction |
|---|---|---|
| Cycle and repetition | Short cycles and repeated same action. | Automate, vary task, redesign pace or rotate properly. |
| Force | Grip, pinch, trigger pressure or tool resistance. | Reduce force, improve tool design or use powered assistance. |
| Posture | Bent wrist, raised arm, neck twist or reach. | Adjust height, layout, jig, reach and workstation. |
| Duration and recovery | Long exposure with few breaks. | Short frequent recovery and task variation. |
| Tool fit | Tool too large, heavy, vibrating or badly maintained. | Select suitable tool and maintain it. |
| Environment | Cold, poor lighting, vibration or cramped space. | Improve conditions and access. |
| Symptoms | Pain, tingling, numbness, weakness or swelling. | Early reporting, task review and OH/medical advice if needed. |
How do both control hierarchies change this work decision?
A packing line requires thousands of forceful wrist twists per shift and a separate screen workstation has prolonged mouse use. Assess the two exposure routes by task. ERICPD (Eliminate, Reduce including substitution, Isolate, Control, Personal Protective Equipment, Discipline) and the HSE five levels lead from task removal through redesign and engineered support to residual work rules; PPE means personal protective equipment and is not a primary tendon-load control. HSE topic guidance and HSE control hierarchy support the control order; the scenario needs local feasibility and effectiveness checks. HSE hierarchy of control
On a narrow screen, scroll this table sideways to see the owner, check and stop decision.
How can the ERICPD hierarchy of controls reduce repetition, force and awkward upper-limb work?

| ERICPD prompt | Five-level match | Exact task control and feasibility | Owner, verification and stop point |
|---|---|---|---|
| Eliminate | Elimination | Remove the repeated hand-twist step by changing the closure or packaging design if product integrity trials pass. HSE topic guidance | Process owner trials quality, cycle time and force demand. Stop the old task if symptoms cluster while redesign is assessed. |
| Reduce | Substitution | Choose a lower-force closure or powered tool with a measured reduction in grip and repetition; compare vibration and new pinch hazards. HSE topic guidance | Engineer trials tools with workers and records force/cycle observations. Reject a substitute that adds another upper-limb exposure. |
| Isolate | Engineering | Install a height-adjustable fixture and jig that holds the pack so wrists stay nearer neutral; provide separate DSE input devices and layout for screen work. HSE topic guidance | Ergonomist/engineer observes actual reach and posture after commissioning. Stop use of a loose jig or workstation that worsens symptoms. |
| Control | Administrative | Set realistic line pace, task variation using different muscle groups, recovery periods and early symptom reporting; do not rely on rotation between equally repetitive jobs. HSE topic guidance | Supervisor observes work and checks ART/DSE reassessment after change. Escalate persistent pain or lost recovery time. |
| PPE | PPE only for separate hazard | Gloves may protect against a separate cut or chemical hazard but can increase grip force; no generic brace or glove is a substitute for task redesign. HSE topic guidance | Competent assessor checks glove fit and force effect. Stop a glove choice that worsens grip or dexterity. |
| Discipline | Administrative assurance | Maintain tools/jigs, follow up symptoms confidentially, compare exposure observations and review production targets when controls erode. HSE topic guidance | Manager closes defects and checks worker feedback; reopen the assessment after new product or pace changes. |
How can the ISO 45001 hierarchy of controls reduce repetition, force and awkward upper-limb work?

| ERICPD prompt | Five-level match | Exact task control and feasibility | Owner, verification and stop point |
|---|---|---|---|
| Eliminate | Elimination | Remove the repeated hand-twist step by changing the closure or packaging design if product integrity trials pass. HSE topic guidance | Process owner trials quality, cycle time and force demand. Stop the old task if symptoms cluster while redesign is assessed. |
| Reduce | Substitution | Choose a lower-force closure or powered tool with a measured reduction in grip and repetition; compare vibration and new pinch hazards. HSE topic guidance | Engineer trials tools with workers and records force/cycle observations. Reject a substitute that adds another upper-limb exposure. |
| Isolate | Engineering | Install a height-adjustable fixture and jig that holds the pack so wrists stay nearer neutral; provide separate DSE input devices and layout for screen work. HSE topic guidance | Ergonomist/engineer observes actual reach and posture after commissioning. Stop use of a loose jig or workstation that worsens symptoms. |
| Control | Administrative | Set realistic line pace, task variation using different muscle groups, recovery periods and early symptom reporting; do not rely on rotation between equally repetitive jobs. HSE topic guidance | Supervisor observes work and checks ART/DSE reassessment after change. Escalate persistent pain or lost recovery time. |
| PPE | PPE only for separate hazard | Gloves may protect against a separate cut or chemical hazard but can increase grip force; no generic brace or glove is a substitute for task redesign. HSE topic guidance | Competent assessor checks glove fit and force effect. Stop a glove choice that worsens grip or dexterity. |
| Discipline | Administrative assurance | Maintain tools/jigs, follow up symptoms confidentially, compare exposure observations and review production targets when controls erode. HSE topic guidance | Manager closes defects and checks worker feedback; reopen the assessment after new product or pace changes. |
How can a repetitive task create RSI risk?
A worked example shows why task redesign matters more than telling people to stretch.
Packaging task: fixture, height, pace and symptom response


Read the complete visual as text
- 1. SITUATION: A worker seals small products for most of a shift using a pinch grip and bent wrist while dispatch targets accelerate the pace.
- 2. PEOPLE AND EVIDENCE: Supervisor observes the real cycle, force, posture, duration and recovery; the assessor considers HSE ART for this repetitive upper-limb task and records the worker’s symptoms without diagnosis.
- 3. CHANGE THE WORK: Trial a fixture and lower bench height, reduce pinch force, vary genuinely different tasks and adjust production pace.
- 4. CHECK IN REAL WORK: Check the changed task with workers during normal and peak output; breaks supplement redesign rather than excuse continuing high exposure.
- 5. HOLD OR REFER: If tingling, weakness or pain persists or worsens, reduce or stop the affected task and seek occupational health or medical advice as appropriate.
- 6. VERIFY AND REVIEW: Reassess the changed task and symptom trend; return to the original rate only if controls remain effective.
- 7. RETAIN THE DECISION: Keep the observation, ART record where used, action owner, worker feedback, symptom report and reassessment.
A packaging worker seals small products for most of a shift. The cycle is short, the product is held in a pinch grip, the wrist bends sideways, the bench is slightly too high and the target rate increases near dispatch deadlines. The worker reports wrist aching and tingling, but the first response is a reminder to take breaks.
A better review observes the task, uses ART-style risk factors, tests a lower work height, changes the fixture, reduces pinch force, varies tasks, adjusts pace and checks whether symptoms improve. Persistent or worsening symptoms should prompt GP assessment while work factors are reviewed immediately; occupational health can advise on functional restrictions and adaptations.
| Risk factor | Observed issue | Improved control |
|---|---|---|
| Repetition | Same wrist action hundreds of times. | Task variation and automation option review. |
| Force | Pinch grip used to hold small item. | Fixture or larger grip surface. |
| Posture | Bent wrist and raised shoulder. | Bench height and layout change. |
| Duration | Long run before breaks. | Short frequent pauses and genuine rotation. |
| Pace | Dispatch deadline increases speed. | Production planning and realistic staffing. |
| Symptoms | Worker reports tingling. | Early review, temporary task change and OH signposting. |
A packing task with wrist symptoms
Task, material and setting: A worker seals small products for most of a shift using a pinch grip and bent wrist while dispatch targets accelerate the pace.
People and prerequisites: Supervisor observes the real cycle, force, posture, duration and recovery; the assessor considers HSE ART for this repetitive upper-limb task and records the worker’s symptoms without diagnosis.
Before: Trial a fixture and lower bench height, reduce pinch force, vary genuinely different tasks and adjust production pace.
During: Check the changed task with workers during normal and peak output; breaks supplement redesign rather than excuse continuing high exposure.
Hold or stop: If tingling, weakness or pain persists or worsens, reduce or stop the affected task and seek occupational health or medical advice as appropriate.
Completion and hand back: Reassess the changed task and symptom trend; return to the original rate only if controls remain effective.
Evidence: Keep the observation, ART record where used, action owner, worker feedback, symptom report and reassessment.
A desk analyst with mouse and shoulder pain
Task, material and setting: An analyst uses a laptop and mouse for prolonged data work and reports shoulder pain after a new reporting deadline.
People and prerequisites: A trained DSE assessor reviews screen, chair, input devices, posture, task duration and workload; ART is not used as the DSE keyboard-and-mouse assessment.
Before: Correct the workstation, provide suitable input equipment, vary tasks and review the deadline and staffing.
During: Ask whether adjustments work during actual long reporting sessions, not just at the initial setup.
Hold or stop: If symptoms worsen or affect function, change the task exposure and signpost to occupational health or a clinician; do not assign a diagnosis.
Completion and hand back: Review the DSE assessment after the changes and after any material change in work or symptoms.
Evidence: Retain the DSE assessment, equipment action, workload decision, report and review outcome.
How does RSI risk look in different sectors?
RSI risk appears differently across desk work, production, construction, care, retail and workshops.
Sector examples help learners avoid treating RSI as an office-only issue. A keyboard worker, meat processor, dental nurse, plasterer, vehicle panel technician and warehouse picker can all develop upper-limb symptoms, but the risk profile and controls differ.
The assessment should be task-specific. The same person may have low risk on one task and high risk on another because of pace, force, tool fit, work height or recovery time.
At a packing line, count reaches and grips during the busiest sustained period rather than judging a single easy cycle. Ask whether product presentation, fixture height or mechanised feed can remove the repeated force before setting rotation or breaks. At a desk, inspect screen, input devices and work routine separately; a desk adjustment does not solve high-volume repetitive processing on its own. HSE ART supports repetitive-task assessment, while HSE DSE guidance covers screen work.
| Sector/task | Typical risk pattern | Control focus |
|---|---|---|
| DSE/data entry | Keyboard, mouse, static posture, high visual demand. | DSE setup, input device, task variation and breaks. |
| Manufacturing assembly | Short cycle, pinch grip, force and pace. | Jigs, automation, work height and rotation. |
| Construction finishing | Overhead plastering, sanding, tying or tool use. | Work planning, access height, tool selection and exposure time. |
| Food production | Cutting, trimming, packing and cold conditions. | Knife/tool design, pace, rest and temperature. |
| Healthcare/care | Repetitive clinical tasks, computer notes and manual handling. | Workflow design, equipment and staffing. |
| Vehicle repair | Sanding, polishing, drilling and awkward panel positions. | Tool maintenance, vibration control, stands and rotation. |
| Retail/warehouse | Scanning, picking, box cutting and repetitive handling. | Layout, load presentation, tools and pace control. |
How should supervisors intervene before RSI becomes absence?
Supervisors should treat early symptoms as a trigger to review the task, not as proof that the worker cannot cope.
The supervisor is often the first person who can stop RSI risk becoming chronic. They see the pace, repetition, force, tool problems, awkward reaches and skipped breaks before a formal assessment catches up. A good supervisor response is calm, practical and evidence-led: reduce exposure, observe the task, ask what work factors make symptoms worse and escalate technical changes where needed.
The important distinction is between temporary support and permanent control. Modified duties can help someone recover, but if the original task still requires excessive force, awkward posture or poor recovery, other workers may be next.
| Early signal | Likely work factors to check | Supervisor intervention |
|---|---|---|
| Tingling after keyboard and mouse work | Reach, wrist angle, input device, workload and breaks. | Review DSE, adjust equipment, vary tasks and set a review date. |
| Shoulder ache during overhead work | Arm elevation, access height, tool weight and duration. | Improve platform height, rotate task, use lighter tool or change method. |
| Forearm pain on assembly line | Cycle time, grip force, fixture, pace and recovery. | Pause task, observe at real pace, trial jig/tool changes and escalate production design. |
| Hand pain when cutting or trimming | Blade sharpness, handle size, cold, force and repetition. | Change tool, sharpen/maintain blades, warm environment and rotate demand. |
| Symptoms after sanding/polishing | Tool vibration, grip force, panel position and long duration. | Review HAVS link, tool condition, work stands, trigger time and rotation. |
| Multiple reports from one task | Systemic task design issue, not individual weakness. | Stop relying on individual adjustments and reassess the task for all workers. |
How do force, posture, repetition, duration and recovery combine?
RSI risk usually comes from combinations of factors, so assessment should look at the whole exposure pattern.
A task with high repetition may be low risk if force is tiny, posture is neutral and recovery is good. The same repetition becomes a problem when grip force increases, the wrist is bent, the shoulder is raised, the shift is long, the tool vibrates or production pace removes recovery.
This is why HSE-style assessment tools are useful: they make the assessor look at risk factors separately and then judge the combined exposure. The best controls change several factors at once, such as improving work height, reducing force, changing the tool and shortening exposure duration.
| Task | Risk-factor combination | Higher-value control |
|---|---|---|
| Cable tying/rebar tying | Repetition plus wrist deviation plus grip force plus cold conditions. | Mechanical tying tools, task rotation, work positioning and recovery periods. |
| Microscope or laboratory pipetting | Static neck/shoulder posture plus pinch force plus precision repetition. | Adjustable workstation, electronic pipette, task variation and breaks. |
| Checkout/scanning | Repetition plus reach plus twisting plus pace. | Scanner layout, two-sided reach reduction, rotation and staffing. |
| Food trimming | Force plus cold plus repetition plus blade condition. | Suitable knife, sharpening, glove dexterity, temperature management and pacing. |
| Vehicle panel sanding | Duration plus tool grip plus awkward panel posture plus vibration. | Panel stands, low-vibration tools, trigger-time control and planned recovery. |
| Laptop-only remote work | Static posture plus poor input device plus long duration. | Separate keyboard/mouse, screen height, chair support and meeting/break discipline. |
When should RSI symptoms trigger action?
Early symptoms should trigger task review before discomfort becomes chronic or disabling.
HSE encourages workers to report upper-limb symptoms early. Symptoms such as aches, tenderness, weakness, tingling, numbness, cramp, burning, swelling, stiffness or reduced movement should not be normalised as part of the job.
The management response should review work factors first: repetition, force, posture, duration, recovery, tools, environment and workload. Medical diagnosis is not the manager's role, but task adjustment and signposting can prevent worsening.
| Trigger | Immediate action | Follow-up |
|---|---|---|
| Worker reports pain or tingling | Review task and reduce exposure. | Check improvement and signpost to GP/OH if needed. |
| Multiple reports from same task | Stop assuming individual issue. | Reassess task design and controls. |
| High ART or DSE risk | Prioritise higher-order controls. | Pilot changes and monitor. |
| Symptoms worsen during work | Consider temporary modified duties. | Seek competent medical/OH advice. |
| Vibration tools involved | Review HAVS and tool exposure too. | Link to vibration assessment and surveillance. |
| Pace prevents breaks | Review staffing and production design. | Escalate workload issue. |
Where do RSI controls commonly fail?
They fail when the organisation focuses on training and stretching instead of work design.
Where RSI controls fail: change the exposure


Read the complete visual as text
- TRAINING-ONLY CONTROL: Failure: People are told how to sit or stretch. Supervisor/assessor response: Redesign task, workstation, tool and pace.
- POOR ROTATION: Failure: Different task name but same body part demand. Supervisor/assessor response: Rotate to genuinely different movements and loads.
- LATE REPORTING: Failure: Pain is normalised until absence occurs. Supervisor/assessor response: Encourage early symptom reporting.
- TOOL MISMATCH: Failure: Tool too heavy, poorly maintained or wrong grip. Supervisor/assessor response: Select and maintain suitable tools.
- PRODUCTION PRESSURE: Failure: Targets remove breaks and increase force. Supervisor/assessor response: Review staffing, pace and recovery.
- DSE BLIND SPOT: Failure: Laptop work continues without assessment. Supervisor/assessor response: Assess DSE and provide equipment/training.
- NO CONTROL VERIFICATION: Failure: Changes made but not checked. Supervisor/assessor response: Monitor symptoms, observations and worker feedback.
Awareness training is useful, but it does not remove excessive repetition, force, awkward posture or pace. If the workstation, tool or production target creates the risk, the control must change the task.
Another failure is poor rotation. Moving someone between two jobs that use the same hand, wrist and shoulder patterns does not give recovery. Good rotation changes the exposure profile.
| Failure or weak practice | How it develops | What good looks like |
|---|---|---|
| Training-only control | People are told how to sit or stretch. | Redesign task, workstation, tool and pace. |
| Poor rotation | Different task name but same body part demand. | Rotate to genuinely different movements and loads. |
| Late reporting | Pain is normalised until absence occurs. | Encourage early symptom reporting. |
| Tool mismatch | Tool too heavy, poorly maintained or wrong grip. | Select and maintain suitable tools. |
| Production pressure | Targets remove breaks and increase force. | Review staffing, pace and recovery. |
| DSE blind spot | Laptop work continues without assessment. | Assess DSE and provide equipment/training. |
| No control verification | Changes made but not checked. | Monitor symptoms, observations and worker feedback. |
What evidence should RSI management hold?
Evidence should show task assessment, worker involvement, controls, symptom reporting and review.
A good RSI evidence pack proves that the employer identified significant tasks, involved workers, assessed risk factors, improved design and checked whether controls worked. It should not be limited to a signed training sheet.
Individual health information should be handled confidentially. Managers need enough functional information to adjust work, while medical detail belongs with qualified health professionals.
| Evidence item | What it should show | Assurance question |
|---|---|---|
| Task risk assessment | Repetition, force, posture, duration, recovery and environment assessed. | Was work observed? |
| ART and DSE assessment records | Detailed assessment used where relevant. | For repetitive tasks, were ART scores and actions followed? For DSE, were workstation findings acted on? |
| Worker consultation | Worker experience and suggestions captured. | Were workers involved? |
| Control changes | Task, tool, workstation, pace or rotation improved. | Did changes reduce exposure? |
| Symptom reporting | Early reports captured and acted on. | Are symptoms trending? |
| Modified duties | Temporary changes and review dates recorded. | Is privacy protected? |
| Review evidence | Pilot changes monitored and adjusted. | Are controls still working? |
Representative ART observation and trial record
Illustrative packing-task record: observe ordinary and peak cycles, record time spent on each, pauses and actual rotation, and consult more than one worker when several perform the task. Identify the arm assessed; assess both if uncertain. Keep the task score separate from the duration-adjusted exposure score. One easy cycle or a lower count without duration is not evidence of lower total exposure.
Before/after trial: record the fixture and work height, grip force, wrist posture, repetition and time on each activity; retain worker feedback from realistic production. The assessor records what changed and the supervisor reopens the trial if force, symptoms or missed pauses persist. Do not invent an ART score from this narrative or treat its screening bands as safe exposure limits. Persistent or worsening symptoms should prompt GP assessment while work factors are reviewed immediately; occupational health can advise on functional restrictions. Reducing the aggravating task is different from blanket immobilisation or indefinite absence.
HSE ART; HSE ART frequently asked questions; HSE occupational-disease guidance; NHS RSI advice.
How should RSI controls be assured?
Assurance should test whether task controls actually reduce repetition, force, posture and duration risks.
Assurance should include work observation and worker feedback. A manager should watch the task at normal pace, at busy periods and after any production or layout change. The issue may only appear when speed, fatigue or demand increases.
Leading indicators include high-risk task reviews, DSE action closure, tool maintenance, rotation quality and symptom reporting. Lagging indicators include absence, injury reports and OH referrals.
| Assurance check | What good looks like | Escalate if |
|---|---|---|
| Task observation | Real pace, posture and force are observed. | Assessment is desk-based only. |
| Rotation quality | Rotation changes body demand and gives recovery. | Rotation repeats the same risk factors. |
| Tool condition | Tools are suitable and maintained. | Force or vibration increases due to wear. |
| DSE actions | Actions are closed and comfort reviewed. | Laptop-only work continues. |
| Symptom trend | Early reports are acted on. | Reports repeat or worsen. |
| Change review | New product, target, tool or layout triggers reassessment. | Old assessment used after change. |
The task owner reduces exposure at source: eliminate unnecessary repetition, redesign force and posture, then use genuine task variation and recovery, with training and PPE only as supporting measures. The ergonomic or DSE assessor checks method choice; the supervisor checks the trial during peak work. If symptoms or risk factors persist, reduce the affected task, seek OH advice and reassess rather than accepting a low score or attendance record.
Which Great Britain and Northern Ireland duties apply?
For relevant Northern Ireland screen work, the Health and Safety (Display Screen Equipment) Regulations (Northern Ireland) 1992 require the DSE assessment route; a general upper-limb task assessment or ART score is not a substitute. Ordinary pain, tingling or weakness should be reported internally and prompt early task review; that report alone is not a RIDDOR disease notification. Some specified doctor-diagnosed upper-limb diseases linked to particular work are reportable, under different Great Britain and Northern Ireland RIDDOR instruments. Check the diagnosis and work condition before the responsible person reports.
Use the jurisdiction where the work takes place. A rest right, risk-assessment duty, regulator guide and voluntary standard have different status; check the actual task, person and any sector-specific provision before deciding what must happen.
| Issue | Primary route | Decision for this topic | Evidence to keep |
|---|---|---|---|
| Great Britain: General assessment and ULD control | Management of Health and Safety at Work Regulations 1999; HSE upper-limb guidance | Assess work as performed, consult workers and redesign higher-risk tasks before relying on breaks or training. | Task observation, risk factors, trialled change and symptom follow-up. |
| Northern Ireland: General assessment and ULD control | Management of Health and Safety at Work Regulations (Northern Ireland) 2000; HSENI ULD guidance | Use NI duties and regulator guidance to assess cumulative loading and respond early. | NI task assessment, worker account and control check. |
| Great Britain: Display screen equipment | Health and Safety (Display Screen Equipment) Regulations 1992; HSE DSE guidance | Use the DSE route for qualifying keyboard, mouse, laptop and screen work; ART is not a substitute for this assessment. | Workstation, work routine, breaks or activity changes and symptom response. |
| Northern Ireland: Display screen equipment | Health and Safety (Display Screen Equipment) Regulations (Northern Ireland) 1992; HSENI DSE guidance | Apply the NI DSE instrument to relevant workstations, including home or hybrid use when within scope. | NI workstation assessment and review after change or discomfort. |
| Great Britain and Northern Ireland: Repetitive-task assessment method | HSE Assessment of Repetitive Tasks tool; HSENI ULD guidance | ART helps prioritise repetitive upper-limb tasks, but it omits some individual and task factors; select other methods for DSE, heavy handling or vibration as needed. | Observed task cycle, worker input, method choice and post-change verification. |
| Great Britain: Reportable diagnosed disease | HSE occupational-disease guidance | A confirmed diagnosis and specified work link are needed. Carpal tunnel syndrome from typing alone is not reportable; vibration-tool and physically demanding repetitive-task conditions differ. | For employees, a written medical diagnosis; for a self-employed GB reporter, a doctor’s verbal diagnosis can suffice. In either case check the specified disease, relevant current work exposure and responsible-person decision. Check NI separately. |
| Northern Ireland: Reportable diagnosed disease | HSENI reporting route; HSENI report a disease | Use NI RIDDOR 1997 and HSENI guidance, not GB thresholds. A written registered-medical-practitioner diagnosis and linked work are needed for specified disease reporting. | NI diagnosis, work-link assessment and report decision. |
How should the work be managed and checked?
Use an accountable plan, practical controls, worker input and checks that show whether the controls work in real tasks.
HSE’s Plan, Do, Check, Act approach connects the risk decision to implementation, monitoring and improvement. For this topic, the duty holder should name a control owner, define the evidence that the control is effective, and change the work if that evidence fails. A management-system label or certificate is not proof that an individual exposure or task is safe. HSE managing health and safety
| Official guidance | Practical decision | Boundary |
|---|---|---|
| HSE Plan, Do, Check, Act | Assign the risk owner, implement the chosen control and review field evidence after change or failure. | This guidance does not replace the applicable GB or NI law, task assessment or named specialist decision. |
What training and competence are needed?
Competence must match the decision: recognising symptoms is different from assessing repetitive work, redesigning a task or giving clinical advice. A checklist score alone does not authorise continued exposure.
Choose instruction and supervised practice for the actual decision. Record what was demonstrated, who assessed it, the scope of authority and what change or failure will trigger reassessment; do not invent a universal certificate expiry.
A worker should demonstrate how to report early symptoms and identify a task that aggravates them. The supervisor should observe the real cycle, request a change to force, reach, duration or recovery, and verify the change with the worker. A competent assessor should state the limits of the screening tool and seek specialist or clinical advice where needed; a manager should not diagnose a disorder from an ART score. Reassess after a new product, pace or workstation.
| Role and learning | Demonstration and assessor | Record and reassessment trigger |
|---|---|---|
| Workers: recognise early discomfort and explain the actual cycle, force and workarounds. | Supervisor checks a practical report and safe route for changing or pausing the task. | Briefing and report response; revisit after new task or symptoms. |
| Supervisors: observe work, reduce exposure and arrange early modified duties. | Ergonomic or safety lead challenges a scenario with interacting risk factors and a worker report. | Task change and follow-up; reassess after recurrence or production change. |
| Ergonomic and DSE assessors: choose a method suited to the task and consult workers. | Competent assessor reviews an ART or DSE assessment against observed work and its limits. | Method basis, findings and quality review; reassess after tool, workstation or process change. |
| Engineers, purchasers and designers: reduce force, repetition and awkward reach at source. | Task owner verifies a trial with affected workers and checks no new risk was introduced. | Design specification, trial results and hand-back; reassess after defect or substitution. |
| Managers, occupational health and auditors: resource redesign while respecting clinical boundaries. | Relevant specialist checks referral and restriction decisions; auditor samples exposure after controls. | Restricted health advice, work decisions and effectiveness evidence; reassess after persistent symptoms. |
How could BuildOut Ltd manage this in practice?

BuildOut would manage RSI risk by designing construction and office tasks to reduce repetition, force, awkward posture and poor recovery.
A construction contractor has site trades, office planners, estimators, plant administrators and vehicle-repair style tool work. BuildOut would include repetitive work in planning rather than waiting for symptoms.
| Management element | How the business would manage it | Evidence to review |
|---|---|---|
| Identify | Map repetitive finishing, tying, cutting, DSE and tool tasks. | MSD risk register. |
| Assess | Use task observation and ART/DSE where relevant. | Assessment records. |
| Redesign | Improve tools, access, height, pace and rotation. | Control action plan. |
| Report | Encourage early symptoms and modified duties. | Symptom reporting route. |
| Review | Monitor reports, absence and task changes. | MSD dashboard. |
What do the acronyms and key terms mean?
Use a term to describe the actual work and decision; an abbreviation alone does not establish a legal duty or clinical diagnosis.
| Term | Full wording or expansion | Meaning for this topic |
|---|---|---|
| RSI | Repetitive strain injury | Broad public label; it does not identify a particular diagnosis or task mechanism. |
| ULD | Upper-limb disorder | Symptoms or conditions affecting neck, shoulder, arm, wrist or hand. |
| WRULD | Work-related upper-limb disorder | An upper-limb problem caused or aggravated by work; causation needs competent assessment. |
| MSD | Musculoskeletal disorder | A wider category of muscle, joint, tendon, nerve and related problems. |
| ART | Assessment of Repetitive Tasks | HSE method for repetitive upper-limb tasks; not a universal or DSE assessment. |
| DSE | Display screen equipment | Screens and associated workstations have their own GB or NI assessment route. |
| Force | Muscular effort or contact load in a task | Grip, push, tool or impact forces can compound repetition and posture. |
| Recovery | Time and task variation that allow loaded tissue to rest | A break cannot by itself correct excessive force or poor tool design. |
| HSE hierarchy | Elimination, substitution, engineering controls, administrative controls, then PPE | A source-first order for choosing workplace controls; keep higher-order measures ahead of instructions or PPE. |
| PPE | Personal protective equipment | Residual protection where a task-specific hazard warrants it; not a fatigue or psychosocial control. |
| ERICPD | Eliminate, Reduce, Isolate, Control, Personal Protective Equipment, Discipline | Compare source removal and substitution with engineered separation before work rules or PPE; Discipline means checking that stronger controls keep working. |
Unlock another resource
You have used this month’s two free downloads. Publish a post in your own words to unlock one more resource, or choose SHARE Individual for 10 downloads per month.
You decide whether to share. If you do, use the relevant platform disclosure tools and do not make claims you do not genuinely hold.