SHARE Knowledge Hub
Ergonomics and human factors at work
Ergonomics fits tasks, equipment, information and environments to people; human factors also examines the organisation that shapes real work. Force, repetition, posture, workload, confusing controls and time pressure can contribute to ill health or error. Observe the task with workers, redesign the work before relying on reminders, and verify that changes still work under normal and abnormal conditions.
Understanding Ergonomics and human factors at work
Ergonomics and human factors is the disciplined design and management of work so that people, tasks, equipment, information, environment and organisation fit together safely. It is not a programme for correcting individual behaviour after poor design. HSE describes human factors as reducing error and influencing behaviour to manage health and safety risks, and its ergonomics guidance covers physical, psychological and social features of work. A worker may be physically capable, trained and conscientious yet still be set up to make an error or develop ill health if the task, control, procedure, workload, shift pattern, interface, workplace or supervision is poorly designed.
Why this matters at work
Task analysis describes the goal, steps, information, decisions, tools, conditions and transitions in work. Begin with tasks whose failure could cause serious harm or recurrent exposure. Walk through the work with experienced and newer users, including maintenance or contractor staff where relevant. Break the task into meaningful steps without creating so much detail that critical decisions disappear. At each safety critical step identify what must be recognised, remembered, selected, confirmed or communicated, and what would happen if it were omitted, performed incorrectly or done too early.
Physical ergonomics addresses how a person interacts with loads, tools, machinery, storage, seating, standing work, access, controls and workspace. Hazard patterns include excessive force, repetitive movement, awkward reach, static posture, vibration, contact stress, poor grip, insufficient leg room, poor visibility, constrained access, slips/trips and unsuitable work height. The harm mechanisms are cumulative tissue loading, sudden overload, fatigue, loss of balance and compromised control. Potential outcomes include back pain, upper-limb disorders, hand/arm injury, neck/shoulder pain, strain/sprain, falls and errors that expose people to other hazards.
How organisations manage this in practice
A dependable ergonomics and human-factors programme needs ownership, not a collection of isolated assessments. Set a senior sponsor accountable for resources and integration, and assign competent leads for work design, DSE/manual handling, occupational health, engineering, operations, procurement, HR and safety as appropriate to the organisation. Agree how a concern moves from worker report or data signal to assessment, interim protection, design decision, implementation, user verification and management review. The route should be simple enough for a supervisor to use and robust enough for a major-hazard or multi-site change.
Determine what the operator must detect, understand and do, within what time and under which conditions. Examine control location, labels, compatibility, feedback, display units, visibility, alarm priorities, interruptions and the consequences of error. Test assumptions with actual users wearing relevant PPE and working in realistic lighting and noise. A label or procedure is weak if the underlying interface makes the wrong action easy and the right action difficult. Consider redesigning layout, differentiating functions, preventing accidental activation and providing meaningful feedback or engineered protection. Assess alarm flooding and workload rather than adding another signal by default. Trial the proposal safely, checking normal, abnormal and recovery situations and accessible use. Document the design basis, user feedback, verification and remaining limits. Update procedures and training after the interface is suitable, and check that field equipment matches the approved design. Do not treat a successful demonstration by the designer as proof that all users can make the correct decision during an upset or time pressure.
The trial record identifies representative users and shifts, equipment and software versions, scenario, expected result, observed result, deviations and evidence. Record whether the test occurred on a prototype or the installed equipment. For any unmet criterion, specify a correction, restriction or rejection with an owner. Check that changes to one interface do not undermine another protection or conceal an unavailable function. Contractor and maintenance knowledge belongs in the review. Competence and training should reflect the final arrangement and the available time to carry out the task.
Choose the physical, cognitive or organisational starting point
On the packing line, the operator reaches around a confusing label display to meet the target. The supervisor and workers observe both reach and label errors; the designer trials a closer fixture and clearer display, procurement checks maintainability and the operations manager adjusts pace and cover where needed.
- Physical loading — Observe reach, force, posture, movement and recovery.
- Information and decisions — Check displays, labels, alarms, memory demands and errors.
- Pace, staffing and work design — Identify who can change targets, layout and procurement.
Test with varied users at peak demand and during clearing or maintenance as well as normal running. Revisit worker feedback, discomfort and error observations after the change; reject a layout that improves reach but obscures a warning. Training attendance or a tidier bench cannot demonstrate that the full work system is controlled.
Content amended 19 October 2026 by the SHARE Knowledge Hub editorial team. This records an editorial content change; the existing technical-review and approval status still applies.
Trial the whole packing task with varied users
Reach, force, visibility, interruption and pace interact. A layout improvement should be judged in actual use, including whether it creates a different demand or error route.

Observe real work
Include varied users, task cycles, demand peaks and interruptions rather than one posed posture.
Trial a change
Assess layout, support, information and workflow together; assign any equipment or organisational actions.
Evaluate the result
Review discomfort, mistakes, throughput and unintended effects with workers and reopen an ineffective trial.
No universal joint angle, load limit or ideal body size is implied by the drawing.
Where should ergonomic design start?
Start with a real task and the people who do it: observe the job, equipment, environment and organisational pressures together. Remove avoidable demand, then test a practical redesign with users before issuing training or reminders.
A packing line has repetitive reaches across a wide conveyor and frequent label errors. The designer brings materials within easy reach, improves label presentation and lets operators test the layout at normal pace. The supervisor checks both discomfort and error rates after hand-back.
What are the key facts about ergonomics and human factors?
The key facts are that poor design creates strain and error, while good design makes safe work easier and more reliable.
What are the key facts about ergonomics and human factors? — part 1 of 3


Read the complete visual as text
- The key facts are that poor design creates strain…: The key facts are that poor design creates strain and error, while good design makes safe work easier and more reliable.
- Fit the work to the person: The starting point is task, equipment, environment and organisation design, not asking people to tolerate poor conditions.
- Look at the whole system: Risk is shaped by posture, force, repetition, reach, workload, time pressure, lighting, space, staffing and culture.
What are the key facts about ergonomics and human factors? — part 2 of 3


Read the complete visual as text
- Human error is usually a symptom: Errors, slips, lapses, mistakes and violations often reveal weak design, unclear procedures or conflicting priorities.
- Worker involvement matters: People doing the work often know which tasks cause pain, waste effort or encourage shortcuts.
What are the key facts about ergonomics and human factors? — part 3 of 3


Read the complete visual as text
- Assessment tools help: HSE MAC, RAPP, ART and DSE tools give structure, but they do not replace observation and judgement.
- Review after change: New equipment, altered staffing, work pace, home working, contractorisation or process change can create new ergonomic risks.
Fit the work to the person
The starting point is task, equipment, environment and organisation design, not asking people to tolerate poor conditions.
Look at the whole system
Risk is shaped by posture, force, repetition, reach, workload, time pressure, lighting, space, staffing and culture.
Human error is usually a symptom
Errors, slips, lapses, mistakes and violations often reveal weak design, unclear procedures or conflicting priorities.
Worker involvement matters
People doing the work often know which tasks cause pain, waste effort or encourage shortcuts.
Assessment tools help
HSE MAC, RAPP, ART and DSE tools give structure, but they do not replace observation and judgement.
Review after change
New equipment, altered staffing, work pace, home working, contractorisation or process change can create new ergonomic risks.
What do ergonomics and human factors mean in plain English?
They mean designing work around real human capability instead of expecting people to compensate for weak design.
Ergonomics is often described as fitting the job to the person. In practice, that means considering body size, strength, reach, vision, hearing, dexterity, fatigue, mental workload, skill, experience and health. A task that is safe for one person for ten minutes may become harmful if repeated for a whole shift, performed above shoulder height, rushed, done in cold conditions or carried out with the wrong tool. See HSE introduction to human factors.
Human factors widens the lens. It asks why people make decisions, miss signals, bypass controls, misunderstand instructions or create workarounds. The answer is rarely just carelessness. People operate inside a system shaped by production pressure, staffing levels, supervision, maintenance, interface design, alarm quality, training, procedures and leadership priorities.
A good page on this topic must therefore cover physical ergonomics, cognitive ergonomics and organisational human factors together. Separating them too sharply hides the way harm really develops: an awkward task may also be rushed, poorly supervised, badly maintained and accepted as normal because everyone has adapted to it.
| Area | What it examines | Examples |
|---|---|---|
| Physical ergonomics | How the body interacts with work. | Lifting, reaching, posture, grip, force, repetition, vibration, seating and standing. |
| Cognitive ergonomics | How people take in information and make decisions. | Displays, alarms, instructions, workload, attention, memory, interface design and situation awareness. |
| Organisational human factors | How the organisation shapes behaviour. | Leadership, culture, staffing, fatigue, contractorisation, supervision, communication and learning. |
| Environmental design | How workplace conditions influence work. | Lighting, noise, temperature, ventilation, space, floor condition and layout. |
| Individual factors | How capability varies between people and over time. | Age, health, disability, experience, fitness, pregnancy, recovery after injury and temporary restrictions. |
How should the work system be assessed?
The work system should be assessed by observing real tasks and checking the job, person, equipment, environment and organisation together.
A useful ergonomic review starts at the point where work is actually done. Watch the task, speak to workers, look at the tools and layout, review pace and recovery time, and compare the procedure with real practice. Paper risk assessments are weak if they do not describe awkward reaches, cramped access, manual fallback, fatigue peaks or the shortcuts people use to get the job done. See HSE introduction to human factors.
The assessment should also look upstream. Procurement may buy equipment that is too heavy, too high, too complex or difficult to maintain. Planning may schedule too many high-force or repetitive tasks together. Supervision may focus on output but not task quality. Maintenance may leave broken aids in service. These are management system issues, not worker behaviour problems.
| Element | Questions to ask | Useful evidence |
|---|---|---|
| Job | What force, repetition, posture, pace, accuracy and recovery does the task demand? | Task observation, worker feedback and process map. |
| Individual | Who performs the task and what variation in size, strength, experience or health must be allowed for? | Workforce profile, return-to-work notes and adjustment records. |
| Equipment | Are tools, controls, displays, seats, handles and aids suitable and maintained? | Inspection records, procurement specification and maintenance reports. |
| Environment | Are lighting, noise, temperature, floor condition, space and access suitable? | Workplace inspection, monitoring and photographs. |
| Organisation | Do staffing, breaks, supervision, procedures and production targets support safe work? | Rosters, procedures, KPIs, audit findings and incident trends. |
What physical ergonomic risks commonly cause harm?
Physical ergonomic risks include excessive force, awkward posture, repetition, static loading, vibration, contact stress and insufficient recovery.
Musculoskeletal disorders can develop from a sudden overload, such as a heavy lift or slip while carrying a load, but many develop gradually. The body is exposed to repeated small demands until tendons, nerves, muscles or joints become irritated, inflamed or painful. Early symptoms can include aching, tingling, numbness, swelling, reduced grip, stiffness, tiredness or reluctance to do a task.
Physical risks are rarely isolated. A worker using a vibrating grinder may also be gripping hard, working overhead, wearing gloves that reduce dexterity, rushing to finish a job, standing on an uneven surface and using a tool that has not been maintained. Good control looks at the combination, not just one factor.
| Risk factor | How it causes harm | Typical controls |
|---|---|---|
| Force | High effort strains muscles, tendons and joints. | Mechanical aids, lighter loads, better handles, team handling and process redesign. |
| Repetition | Repeated movement limits recovery and can inflame soft tissues. | Automation, task variation, rotation, micro-pauses and pace control. |
| Awkward posture | Twisting, bending, reaching or overhead work increases tissue loading. | Adjustable height, better access, redesign and tools that keep neutral posture. |
| Static loading | Holding one posture reduces blood flow and increases fatigue. | Movement, task changes, sit-stand options and recovery breaks. |
| Vibration | Hand-arm vibration can damage nerves, blood vessels and joints. | Low-vibration tools, maintenance, exposure control and health surveillance. |
| Contact stress | Hard edges or pressure points irritate tissues and restrict circulation. | Padding, tool redesign, gloves and workstation changes. |
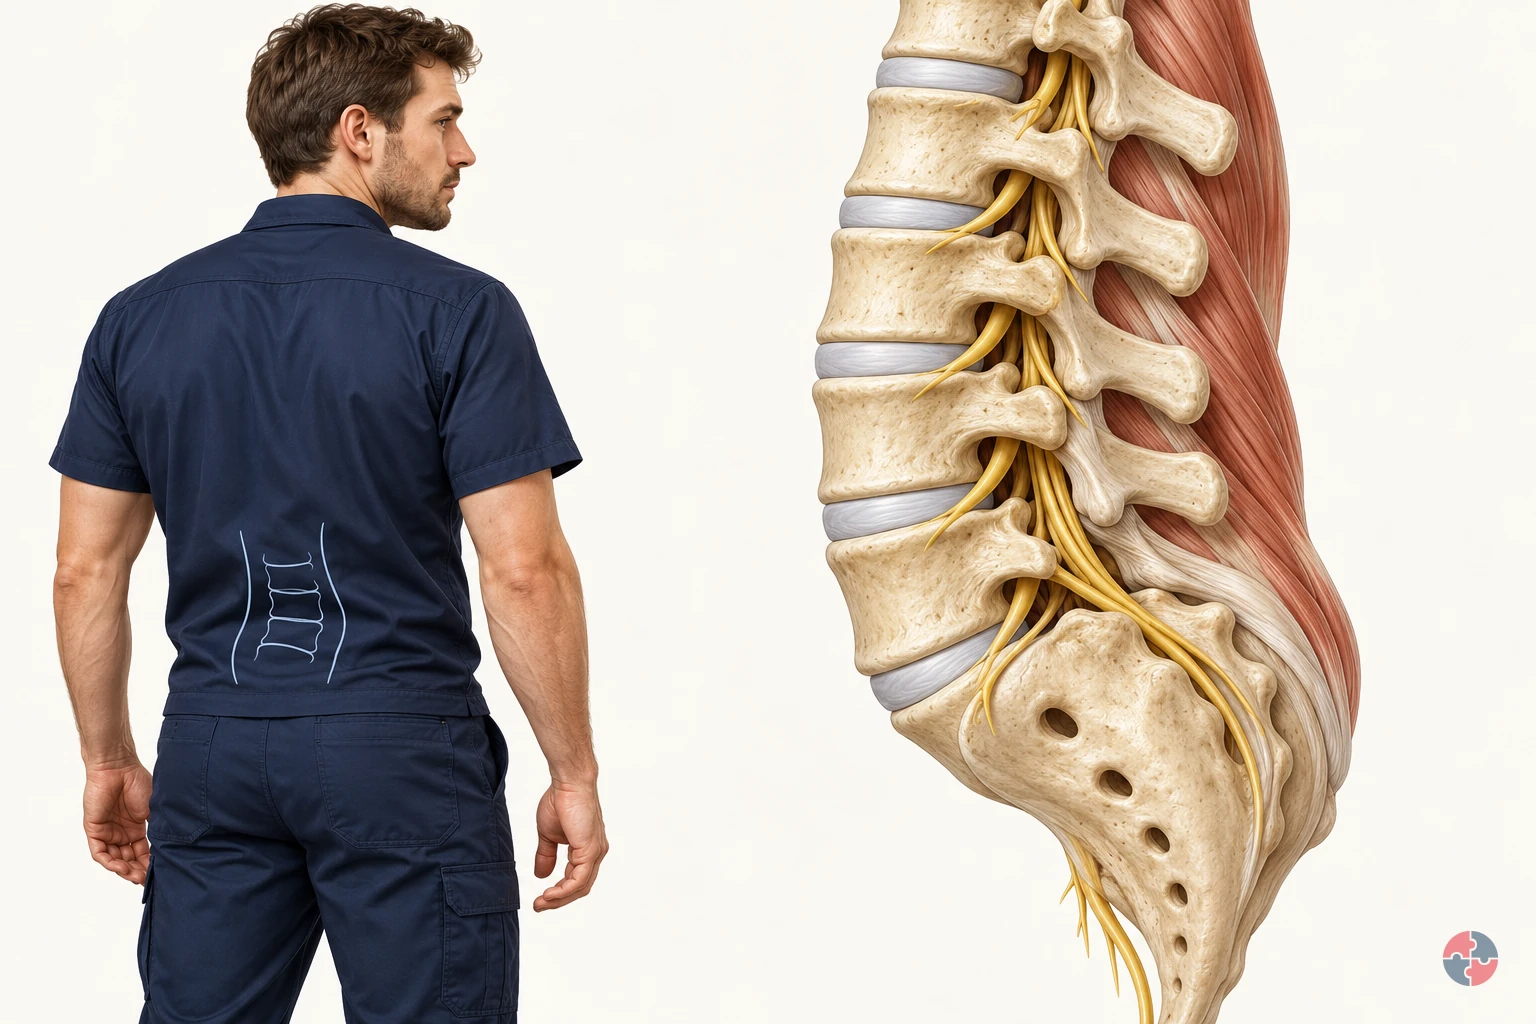
How does the back support movement, and how can work design reduce manual handling risk?
Interactive anatomy · Back and manual handling · Updated 2026-10-23
Read all anatomy and process explanations without the viewer
Simplified education, not a scan interpretation, diagnosis, safe-weight calculator, posture score or personalised exercise prescription. No webcam, posture capture or personal symptom input. Task demand comparisons never alter disc morphology or calculate spinal compression, tissue tolerance or injury probability.
Vertebral body
A vertebra is one of the bones of the spine. The vertebral body is the substantial front portion of a spinal bone. Neighbouring bodies are linked through discs, while other bony parts help enclose the nerve space behind them. Follow the bone-and-disc pattern to see how a spinal segment combines support with movement rather than behaving as a pile of separate blocks. University Hospitals Birmingham NHS Foundation Trust: Lumbar decompressive surgery: structure of the spine · DynamicHealth · NHS: Lower back pain
Intervertebral disc
A disc lies between neighbouring vertebral bodies. A disc is flexible tissue joining neighbouring vertebral bodies. A tougher outer region surrounds a softer centre, and the connected structure helps accommodate loading and movement. In the healthy model it stays part of the segment. The closer cutaway explains its regions; it is not a pressure gauge or a prediction of what a lift will do. University Hospitals Birmingham NHS Foundation Trust: Lumbar decompressive surgery: structure of the spine · DynamicHealth · NHS: Lower back pain
Outer disc region
The tougher outer region surrounds the softer centre. This labelled cross-section simplifies the disc’s tissue organisation. A ring outline is a teaching aid, not a measure of tissue strength. University Hospitals Birmingham NHS Foundation Trust: Lumbar decompressive surgery: structure of the spine
Inner disc region
The softer centre works with the outer disc tissue. Both regions contribute during loading. The diagram does not behave as a water balloon or show a pressure gauge. University Hospitals Birmingham NHS Foundation Trust: Lumbar decompressive surgery: structure of the spine
Facet joint
Small paired joints link neighbouring vertebrae. They contribute to stability and help guide movement at the back of the spine. Partner surfaces remain together during the normal movement example. The Dudley Group NHS Foundation Trust: Facet joint injections and medial branch block
Ligament
A ligament connects bones. Spinal ligaments help guide and restrain movement. They are a different tissue connection from a tendon. NHS: Sprains and strains · University Hospitals Birmingham NHS Foundation Trust: Lumbar decompressive surgery: structure of the spine
Supporting muscle
Back and trunk muscles help produce and control movement. Muscle fibres generate force and change length as they produce or control movement. Their pull is transmitted through tendon attachments to bone. Back, trunk and hip muscles contribute together during everyday bending and reaching. The highlighted muscle simplifies one part of that system, allowing you to follow a connection rather than calculate the effort of every muscle. DynamicHealth · NHS: Lower back pain · NHS: Tendonitis · York and Scarborough Teaching Hospitals NHS Foundation Trust: Treating a soft tissue injury: normal soft-tissue roles
Tendon attachment
A tendon transmits a muscle’s pull to bone. A tendon provides the connection through which muscle pull reaches bone. Trace it from the muscle into the attachment, then compare it with a ligament, which connects bones. The two connections contribute different functions. Keeping the attachment visible helps explain how a muscle can move or steady a joint without the tendon becoming a separate loose cord. NHS: Tendonitis · DynamicHealth · NHS: Lower back pain
Nerve root
Nerve roots leave the canal through side openings. A nerve root passes out beside the spinal bones towards the areas it supplies. Pressure or nearby inflammation can irritate it, sometimes producing symptoms in the buttock, leg or foot. The highlighted pathway explains this possible relationship, but symptoms vary. A coloured region cannot identify the cause of somebody’s pain or establish that a particular disc is responsible. University Hospitals Birmingham NHS Foundation Trust: Lumbar decompressive surgery: structure of the spine · NHS: Slipped disc · NHS: Sciatica · Norfolk & Waveney Community Musculoskeletal Services · NHS: Sciatica: understanding nerve irritation and protective muscle activity · Bradford Teaching Hospitals NHS Foundation Trust: Pain management: nerve root pain
Lower spinal canal
The lower lumbar canal contains a bundle of nerve roots. Below the end of the spinal cord these roots continue as the cauda equina. A solid spinal cord should not extend through this lower-lumbar illustration. University Hospitals Birmingham NHS Foundation Trust: Lumbar decompressive surgery: structure of the spine
Open the complete process transcript
The process, step by step
1 · Share support
Each vertebra works with the discs and other tissues around it to support the trunk while allowing movement. The disc between two vertebral bodies is flexible tissue, with a tougher outer region surrounding a softer centre. It helps the connected segment accommodate loading; it is not a loose pad that normally slides out when someone bends. Follow the repeating bone-and-disc arrangement, then look behind it towards the joints and nerve space. This relationship explains how support, movement and protection can coexist in the same part of the back. University Hospitals Birmingham NHS Foundation Trust: Lumbar decompressive surgery: structure of the spine · DynamicHealth · NHS: Lower back pain
What to watch: Follow two neighbouring vertebral bodies, the disc between them and the protected nerve space behind the bones in the lumbar view.
Why it matters: Support is shared across connected tissues rather than supplied by a single bone or disc. This arrangement allows the back to bear everyday demands while retaining the flexibility needed to change position.
Explore this step: Pause the model and locate the disc between two bones before selecting the next step.
2 · Allow movement
Movement of the back is spread across connected spinal segments and the rest of the body. The paired facet joints at the back of neighbouring vertebrae help guide movement, while ligaments connect bones and contribute to stability. In this step, the small illustrative movement helps you locate these relationships; it does not show a strain or a ligament being torn. Ordinary bending is part of normal function. Notice how a joint and a ligament perform different jobs, and avoid interpreting one demonstrated position as a universal safe or unsafe posture. University Hospitals Birmingham NHS Foundation Trust: Lumbar decompressive surgery: structure of the spine · The Dudley Group NHS Foundation Trust: Facet joint injections and medial branch block · Cambridge University Hospitals NHS Foundation Trust: Myth busting about posture, core stability and lifting
What to watch: Look behind the vertebral bodies for the paired facet joints, then follow the ligament between its bony attachment points.
Why it matters: Joints permit and guide movement; ligaments contribute restraint and stability. Together with the other spinal tissues, they allow controlled movement without making the back a rigid column or ordinary bending an injury.
Explore this step: Compare the joint and ligament labels and describe the different connection each one makes.
3 · Produce and control force
Muscle fibres produce force and can shorten or lengthen as they move or control the body. Their pull reaches bone through tendon attachments. Follow that continuous connection from the larger muscle region into the narrower tendon and its attachment, rather than treating muscle, tendon and bone as separate objects. Back, trunk and hip muscles contribute together during bending, turning and reaching. The model simplifies one part of this system so that the connection is easier to follow. Its movement is an explanation of function, not a measurement of an individual muscle’s effort or strength. DynamicHealth · NHS: Lower back pain · NHS: Tendonitis · York and Scarborough Teaching Hospitals NHS Foundation Trust: Treating a soft tissue injury: normal soft-tissue roles
What to watch: Follow the supporting muscle into its tendon and then to the bone, using the close view to keep the attachment visible.
Why it matters: This continuous attachment allows a muscle’s pull to move or steady the skeleton. Controlling a movement can involve muscle work as well as starting it; the visible motion does not account for every contributing muscle.
Explore this step: Trace the connection in both directions, then explain how a tendon differs from a ligament.
4 · Review the task
Normal back function takes place within a whole task, not an isolated spinal joint. Use the task view to compare a nearer reach with a more distant one. The load, how often it is handled, the working height, available space and the person’s capability all matter when assessing unavoidable handling. Repeated work is a separate factor from the reach shown in one still position. This comparison directs attention to work design; it does not calculate spinal force, identify a tissue injury or establish a safe load for everyone. HSE: Back pain at work · HSE: Assess manual handling you cannot avoid
What to watch: Compare the position of the person and the load in the closer and farther reach, including the surrounding working space.
Why it matters: The same body may face different demands when the task layout changes. Looking at reach alongside load, frequency, space and capability helps explain why an anatomy view alone cannot establish whether handling is suitable.
Explore this step: Compare both arrangements and name one task factor the model cannot measure for your workplace.
5 · Compare an example
Use the healthy segment as a reference before exploring an independent tissue example. A muscle strain concerns muscle tissue, a sprain concerns a ligament, and a disc example concerns a different structure again. These are separate explanations, not consecutive stages that every back passes through during a lift. Back pain can have several contributors, and the location or intensity of pain does not identify a damaged tissue by itself. Keep the normal view available so you can compare the selected structure without assuming that a pictured mechanism diagnoses a person or predicts what a task will do. NHS: Sprains and strains · NHS: Slipped disc · NHS: Back pain
What to watch: Locate the muscle, ligament, disc and nearby nerve root in the healthy reference before opening any separate tissue example.
Why it matters: Separating the tissues prevents a misleading story in which normal movement automatically becomes a specific injury. A model can explain a possible mechanism while leaving an individual’s symptoms and cause to proper assessment.
Explore this step: Choose one tissue example, identify the structure involved, and return to the healthy reference for comparison.
Worked handling examples
Bending to lower a load
A worker lowers a held box towards a low receiving surface. The low destination and repeated handling make the arrangement worth reviewing.
Check the receiving height, reach, grip, load and number of moves, including whether a handling aid can remove the repeated low placement.
Inspect the low destination The box starts in the worker’s hands, with a low receiving point ahead. Notice the standing space, the handhold and the distance to the destination. HSE: Assess manual handling you cannot avoid
Bend and lower the box The worker bends forwards and lowers the box. Watch the trunk and hips move together while supporting muscles control the descent. Muscle fibres change length and transmit pull through their tendon attachments. HSE: Back pain at work · NHS: Tendonitis · Cambridge University Hospitals NHS Foundation Trust: Myth busting about posture, core stability and lifting · York and Scarborough Teaching Hospitals NHS Foundation Trust: Treating a soft tissue injury: normal soft-tissue roles
Inspect the supporting muscles Follow the muscle fibres into their tendon attachments. Fibres change length while producing or controlling movement; the tendons transmit their pull to bone. Use Spine and attachments to locate these connections around the lumbar segment. NHS: Sprains and strains · NHS: Tendonitis · Cambridge University Hospitals NHS Foundation Trust: Myth busting about posture, core stability and lifting · York and Scarborough Teaching Hospitals NHS Foundation Trust: Treating a soft tissue injury: normal soft-tissue roles
Raise the receiving point and reduce handling Compare a receiving point closer to a practical working height. Before relying on a handling instruction, consider a suitable lift table, a different delivery arrangement or removing the handling step. HSE: Manual handling at work · HSE: Manual handling: reduce the risk of injury
Compare raised placement Provide a suitable raised receiving surface within easy access, and check whether a handling aid or process change can remove the repeated low placement. Confirm that the revised arrangement works with the team. HSE: Manual handling at work · HSE: Assess manual handling you cannot avoid · HSE: Manual handling: reduce the risk of injury
Ordinary bending is part of normal movement. This composite task does not identify a pain source, assign a safe posture or predict injury.
Turning while holding a load
A worker transfers a box to a surface at the side. The original layout invites a turn through the trunk while the feet remain facing the first surface.
Review transfer direction, foot space, the load and the pace of work so people have room to reposition while controlling the box.
Spot the sideways destination The destination is offset from the starting position. Before moving, check that the turning route is clear and the load will not hide obstacles. HSE: Assess manual handling you cannot avoid · HSE: Manual handling: good handling technique
Watch the loaded turn Compare the feet, pelvis and shoulders as the worker turns with the box. Supporting muscles change their pull to control the turn, while ligaments guide and restrain movement between neighbouring bones. HSE: Back pain at work · University Hospitals Birmingham NHS Foundation Trust: Lumbar decompressive surgery: structure of the spine · HSE: Manual handling: good handling technique · York and Scarborough Teaching Hospitals NHS Foundation Trust: Treating a soft tissue injury: normal soft-tissue roles
Inspect the ligament connection Open Ligament close-up to identify the bone-to-bone connection. Use Spine and joints to see how neighbouring structures support and guide normal movement. NHS: Sprains and strains · University Hospitals Birmingham NHS Foundation Trust: Lumbar decompressive surgery: structure of the spine
Make room to turn with the load Compare a clearer transfer arrangement that lets the worker reposition the feet towards the destination. Review the layout first; a turning instruction cannot create missing floor space. HSE: Manual handling: good handling technique · HSE: Manual handling: reduce the risk of injury
Compare repositioned turn Clear the turning area and bring the receiving position into a better alignment. Where a turn remains, provide space to move the feet with the load; consider a suitable transfer aid for repeated moves. HSE: Manual handling: good handling technique · HSE: Manual handling: reduce the risk of injury
This is a selected work example and a separate possible sprain illustration. The model cannot decide whether a particular turn is harmful or diagnose symptoms.
Reaching to place a load
A worker places a box towards the back of a shelf. The shelf depth keeps the load away from the body during the final part of the placement.
Check shelf depth, placement height, access from the other side, grip and repetition instead of assessing the box by weight alone.
Identify the placement point The destination is set behind the accessible shelf edge. Notice the space in front of the shelf and the reach needed while the box is still supported by the hands. HSE: Assess manual handling you cannot avoid
Watch the load move away The box moves farther from the body as the worker reaches. Watch the trunk and arms extend while the supporting muscles control the load. The longer reach changes the task demand; the model does not calculate tissue force. HSE: Back pain at work · HSE: Assess manual handling you cannot avoid · HSE: Manual handling: good handling technique
Inspect muscle fibres and the spine Inspect the muscle fibres as they change length and pull through their tendon attachments. Use Spine and attachments to see how these tissues connect around the lumbar segment. NHS: Sprains and strains · NHS: Tendonitis · NHS: Sciatica · York and Scarborough Teaching Hospitals NHS Foundation Trust: Treating a soft tissue injury: normal soft-tissue roles
Bring the receiving point within reach Compare a receiving point closer to the shelf edge. Consider changing the shelf or access, using a suitable aid, and setting the load down before making small position adjustments. HSE: Manual handling: good handling technique · HSE: Manual handling: reduce the risk of injury
Compare closer placement Move the receiving point nearer or redesign access so a long unsupported placement is unnecessary. Check suitable aids for the actual load and consider putting it down before the final position adjustment. HSE: Manual handling: good handling technique · HSE: Manual handling: reduce the risk of injury
Reach and load position are task factors, not a diagnosis. The colour and fibre motion identify a teaching region, rather than a measured injury from this placement.
Read the practice situations and all answer explanations
Sources and how the model is made
The opening images are AI-generated anatomical illustrations. The interactive 3D models and labelled SVG diagrams use original procedural artwork. These teaching images are not medical scans or diagnostic tools. Source references support the learner explanations and do not grant artwork rights.
- HSE: Manual handling at work — Avoid hazardous handling where practicable, assess unavoidable tasks and reduce risk; there is no universal weight limit.
- HSE: Back pain at work — Work design, repetition/reach, handling aids, consultation and early reporting.
- NHS: Sprains and strains — Muscle strain versus ligament sprain, local pain/tenderness and possible involuntary painful muscle tightening (spasm); no treatment programme copied.
- NHS: Slipped disc — Outward disc protrusion, possible nerve involvement and absence of symptoms in some people; the animation is not a diagnosis.
- NHS: Back pain — Often uncertain cause, possible muscle spasm, routine versus urgent assessment and emergency warning signs.
- University Hospitals Birmingham NHS Foundation Trust: Lumbar decompressive surgery: structure of the spine — Basic vertebral/disc/ligament anatomy, nerve roots and cauda equina only. Source illustrations and surgery instructions are not copied.
- DynamicHealth · NHS: Lower back pain — Lumbar support, discs, ligaments, tendon attachments and varied movement context.
- The Dudley Group NHS Foundation Trust: Facet joint injections and medial branch block — Only the normal role of paired facet joints in stability and guiding movement; no injection advice.
- NHS: Tendonitis — Tendons connect muscle to bone; no medication or treatment prescription reused.
- HSE: Manual handling: training — Training supports work design and does not ensure safe handling on its own.
- HSE: Assess manual handling you cannot avoid — Assessment of task, load, frequency, working environment and individual capability.
- Cambridge University Hospitals NHS Foundation Trust: Myth busting about posture, core stability and lifting — Avoid fear-based posture claims and a single ideal posture; no personalised exercise advice.
- NHS: Sciatica — Nerve irritation/compression, possible symptoms in the buttock and one leg or foot, variable symptom onset, when to obtain advice and emergency warning signs. No treatment programme or diagnostic distribution is copied.
- Norfolk & Waveney Community Musculoskeletal Services · NHS: Sciatica: understanding nerve irritation and protective muscle activity — Pressure and local inflammation as possible routes to nerve irritation; protective muscle activity and possible cramp; connected discs do not slip out as loose objects. No copied artwork, exercise or treatment programme.
- Bradford Teaching Hospitals NHS Foundation Trust: Pain management: nerve root pain — Disc bulges may irritate or compress nerve roots, with symptoms in supplied leg/foot regions. Only explanatory anatomy and symptom context, not clinical management or a diagnostic nerve map.
- HSE: Manual handling: good handling technique — Practical planning, load position, foot movement during turning, and setting down before final adjustment. Technique supports task redesign and suitable aids; no universal posture or safe load is inferred.
- HSE: Manual handling: reduce the risk of injury — Task-specific mechanical help and changes to load, height, layout, space and work routine for unavoidable handling. Original worked examples are not HSE-tested tasks.
- York and Scarborough Teaching Hospitals NHS Foundation Trust: Treating a soft tissue injury: normal soft-tissue roles — Basic anatomy only: muscle fibres contract and lengthen to produce or control movement, tendons connect muscle to bone, and ligaments connect bones. Paediatric treatment advice, recovery times and artwork are not reused.
- Bexley Musculoskeletal Service · NHS: Acute low back pain — Low-back pain may also be felt in the buttocks and thighs; pain intensity or location does not establish a specific tissue injury. No treatment programme, exercise, fixed recovery estimate or diagnostic rule is reused.
Power-zone explorer: what the colours mean
Choose Explore the 3D power zone in the handling examples. Move the load using the height, reach, side-position and mass controls. The floor target connects the feet to the load position; the translucent volume shows a close-in handling zone for this illustrative worker. Red highlights and matching text identify areas with added demand as the arrangement changes.
The display is a task-design illustration. It does not calculate tissue forces, identify damaged structures, predict pain or injury, or recommend a safe lifting weight. Actual handling needs assessment of the task, individual, load, environment and other factors, including repetition and recovery. Consider avoiding the handling or using suitable aids before relying on lifting technique.
HSE: good handling technique · HSE: control measures for lifting tasks
How does cognitive ergonomics affect safety and performance?
Cognitive ergonomics affects how people notice information, understand it, decide what to do and act without overload or confusion.
People have limited attention and memory. Poor displays, cluttered screens, confusing alarms, ambiguous procedures and high workload make it more likely that a person will miss a signal or make the wrong decision. This matters in offices, production lines, vehicles, control rooms, maintenance, healthcare, chemical handling and emergency response.
Good cognitive design makes the right action obvious. Controls are labelled clearly, critical information is prominent, alarms are prioritised, instructions match the task sequence, and people are not expected to remember complex steps under pressure. Training helps, but it cannot compensate for an interface or procedure that is badly designed.
| Issue | How it appears | Better design |
|---|---|---|
| Information overload | Too many screens, alerts or instructions compete for attention. | Prioritise critical information and remove clutter. |
| Poor alarm design | Frequent nuisance alarms make people ignore alarms. | Rationalise alarms and define response actions. |
| Unclear procedures | Steps do not match real work or use ambiguous wording. | Use task-based procedures, validation and worker review. |
| Weak labels and displays | People confuse controls, readings or chemical containers. | Use clear labels, layout grouping and fail-safe design. |
| High time pressure | People shortcut checks or miss warning signs. | Plan realistic staffing, sequencing and recovery time. |
| Memory dependence | Critical steps rely on recall alone. | Use checklists, prompts, interlocks and independent verification. |
How do organisational factors influence ergonomics?
Organisational factors influence whether good ergonomic controls are planned, funded, used, maintained and improved.
Many ergonomic failures sit above the workstation. If procurement buys the cheapest tool without worker trial, if maintenance delays repairs to handling aids, if production targets reward speed over safe method, or if managers ignore early symptoms, the organisation is shaping risk.
Leadership matters because it decides what is normal. A strong organisation treats pain reports, awkward access, tool workarounds, fatigue and repeated mistakes as intelligence about the system. A weak organisation treats them as complaints or personal failings until injury, absence or enforcement forces action.
| Factor | Risk if weak | Good practice |
|---|---|---|
| Procurement | Unsuitable tools, chairs, vehicles, trolleys or software become embedded. | Trial with users and specify ergonomic requirements. |
| Planning | High-risk tasks cluster without recovery. | Plan workload, task rotation and staffing realistically. |
| Supervision | Unsafe adaptations become accepted. | Observe real work and challenge normalised workarounds. |
| Maintenance | Broken aids force manual handling or awkward work. | Prioritise aids, adjusters, wheels, brakes, controls and lighting faults. |
| Consultation | Workers stop reporting discomfort. | Use early reporting, feedback loops and visible close-out. |
| Learning | Incidents are blamed on people and repeated. | Investigate system causes and share learning. |
How should display screen equipment be managed?
DSE should be managed through user identification, workstation assessment, risk reduction, information, training, breaks and eye-test arrangements.
Display screen equipment includes desktop computers, laptops, tablets, smartphones and display workstations used for work. Poor setup can contribute to neck, shoulder, back, arm, wrist and hand discomfort, as well as fatigue and eye strain. The risk is higher where people use DSE daily for continuous periods, have poor seating or lighting, work at laptops without accessories, hot-desk without adjustment or work from home without suitable setup. See HSE DSE workstation assessment.
A DSE assessment should be practical. It should look at screen height and distance, keyboard and mouse position, chair adjustment, foot support, desk space, lighting, glare, software usability, work routine and breaks. The point is not to file a checklist; it is to remove the source of discomfort and make the user confident in adjusting the workstation.
| Control | What good looks like | Evidence |
|---|---|---|
| User identification | Regular DSE users are identified, including hybrid and home workers. | DSE register or HR/workforce record. |
| Assessment | Workstations are assessed and actions closed. | HSE-style checklist and action log. |
| Set-up support | Users know how to adjust chair, screen, keyboard, mouse and lighting. | Briefing, assessor support and guidance. |
| Breaks or activity change | Work is arranged so intense DSE use is interrupted. | Work planning and manager instruction. |
| Eye tests | Eligible users know how to request an eye and eyesight test. | Policy, request route and records. |
| Laptop use | Regular laptop use has accessories such as separate keyboard, mouse and riser. | Equipment issue and workstation review. |
How should manual handling and repetitive work be controlled?
Manual handling should be avoided where reasonably practicable, assessed where unavoidable and reduced through design before relying on training.
Manual handling and repetitive work controls — part 1 of 2


Read the complete visual as text
- Heavy lifting: What to look for: High load, poor grip, long reach or twisting. Higher-value controls: Avoid, split loads, mechanical aids and better storage height.
- Pushing and pulling: What to look for: Poor wheels, slopes, thresholds or high starting force. Higher-value controls: Powered aids, good wheels, route repair and load limits.
- Team handling: What to look for: Poor coordination, uneven load and unclear leader. Higher-value controls: Mechanical aid, team briefing and nominated lead.
Manual handling and repetitive work controls — part 2 of 2


Read the complete visual as text
- Repetitive upper limb work: What to look for: Fast cycle, force, pinch grip or awkward wrists. Higher-value controls: Automation, jigging, tool redesign, rotation and breaks.
- Overhead work: What to look for: Shoulder loading and neck extension. Higher-value controls: Bring work down, use platforms, extension tools or prefabrication.
- Kneeling or squatting: What to look for: Knee loading and awkward access. Higher-value controls: Redesign access, use benches, supports, pads and rotation.
Manual handling includes lifting, lowering, carrying, pushing, pulling and supporting a load by hand or bodily force. The load may be a box, tool, drum, person, animal or component. Repetitive work can involve small loads but still harm the body because the same tissues are loaded again and again with too little recovery.
The legal hierarchy is important. Training people to lift better is not enough if the load should have been eliminated, moved by mechanical aid, stored at a better height, packaged differently or delivered closer to the point of use. The assessment should consider the task, the load, the working environment and individual capability.
| Risk | What to look for | Higher-value controls |
|---|---|---|
| Heavy lifting | High load, poor grip, long reach or twisting. | Avoid, split loads, mechanical aids and better storage height. |
| Pushing and pulling | Poor wheels, slopes, thresholds or high starting force. | Powered aids, good wheels, route repair and load limits. |
| Team handling | Poor coordination, uneven load and unclear leader. | Mechanical aid, team briefing and nominated lead. |
| Repetitive upper limb work | Fast cycle, force, pinch grip or awkward wrists. | Automation, jigging, tool redesign, rotation and breaks. |
| Overhead work | Shoulder loading and neck extension. | Bring work down, use platforms, extension tools or prefabrication. |
| Kneeling or squatting | Knee loading and awkward access. | Redesign access, use benches, supports, pads and rotation. |
What does good workstation and workplace design look like?
Good design allows people to work in neutral postures with clear visibility, suitable reach, enough space and safe movement.
Redesign the display and workload, not just attention
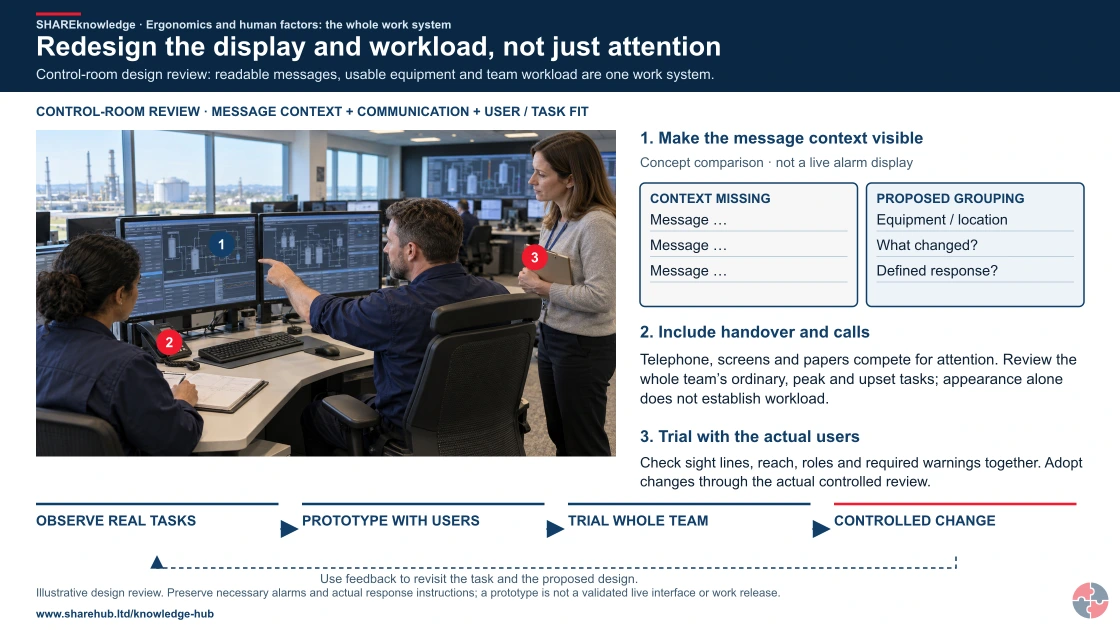
Full written explanation
A new detailed realistic UK control-room design-review scene shows two operators and a designer, physically connected monitor supports, keyboard and mouse, a telephone, handover papers and chair backs. Numbered native annotations connect screen information, competing communications and user/task fit. An editable comparison of same-looking messages lacking context with a proposed grouping of equipment, change and defined response retains the analytical information-design relationship in the original teaching. It contains no live process values, alarm settings, priority codes or operating commands. A complete linked observe, prototype, trial and controlled-change review loop includes normal and upset work and the whole team. Neither the photographic-looking scene nor the prototype validates an alarm system, staffing level, posture, workload or operating arrangement; necessary warnings and the actual controlled change process remain authoritative.
Control-room design review: readable messages, usable equipment and team workload are one work system.
- Understand the work. Observe what operators need to notice, understand and decide, including interruptions and abnormal demand.
- Prototype with users. Review grouping, wording and visibility with operators and designers. Preserve necessary warnings and context.
- Test the whole situation. Use controlled trials for normal and upset work, handover and maintenance. Check staffing, pace and new error routes.
- Review before adoption. Use the actual change process, worker feedback and task evidence. Revisit the design when errors or conditions change.
When the evidence does not fit: Do not hide necessary alarms or blame attention as the automatic root cause. A clearer-looking prototype is not a validated live interface or proof that workload is controlled.
Who acts: Operators, designer, human-factors/task adviser and the manager who owns work organisation and controlled change.
Changed workplace
Packing work: Reach, label visibility, support and pace interact.
Process control room: Information, alarms, team demand and decisions interact.
Evidence check: Qualitative design teaching only. No universal angle, reach, staffing level, alarm limit or operating instruction is supplied.
Physical, cognitive and organisational factors must be reviewed together
Primary references: HSE: ergonomics and user-centred design · HSE: whole-task and team workload · HSE: human-computer interfaces · HSE: alarm-management principles
Open the complete HD image (new tab)Download image
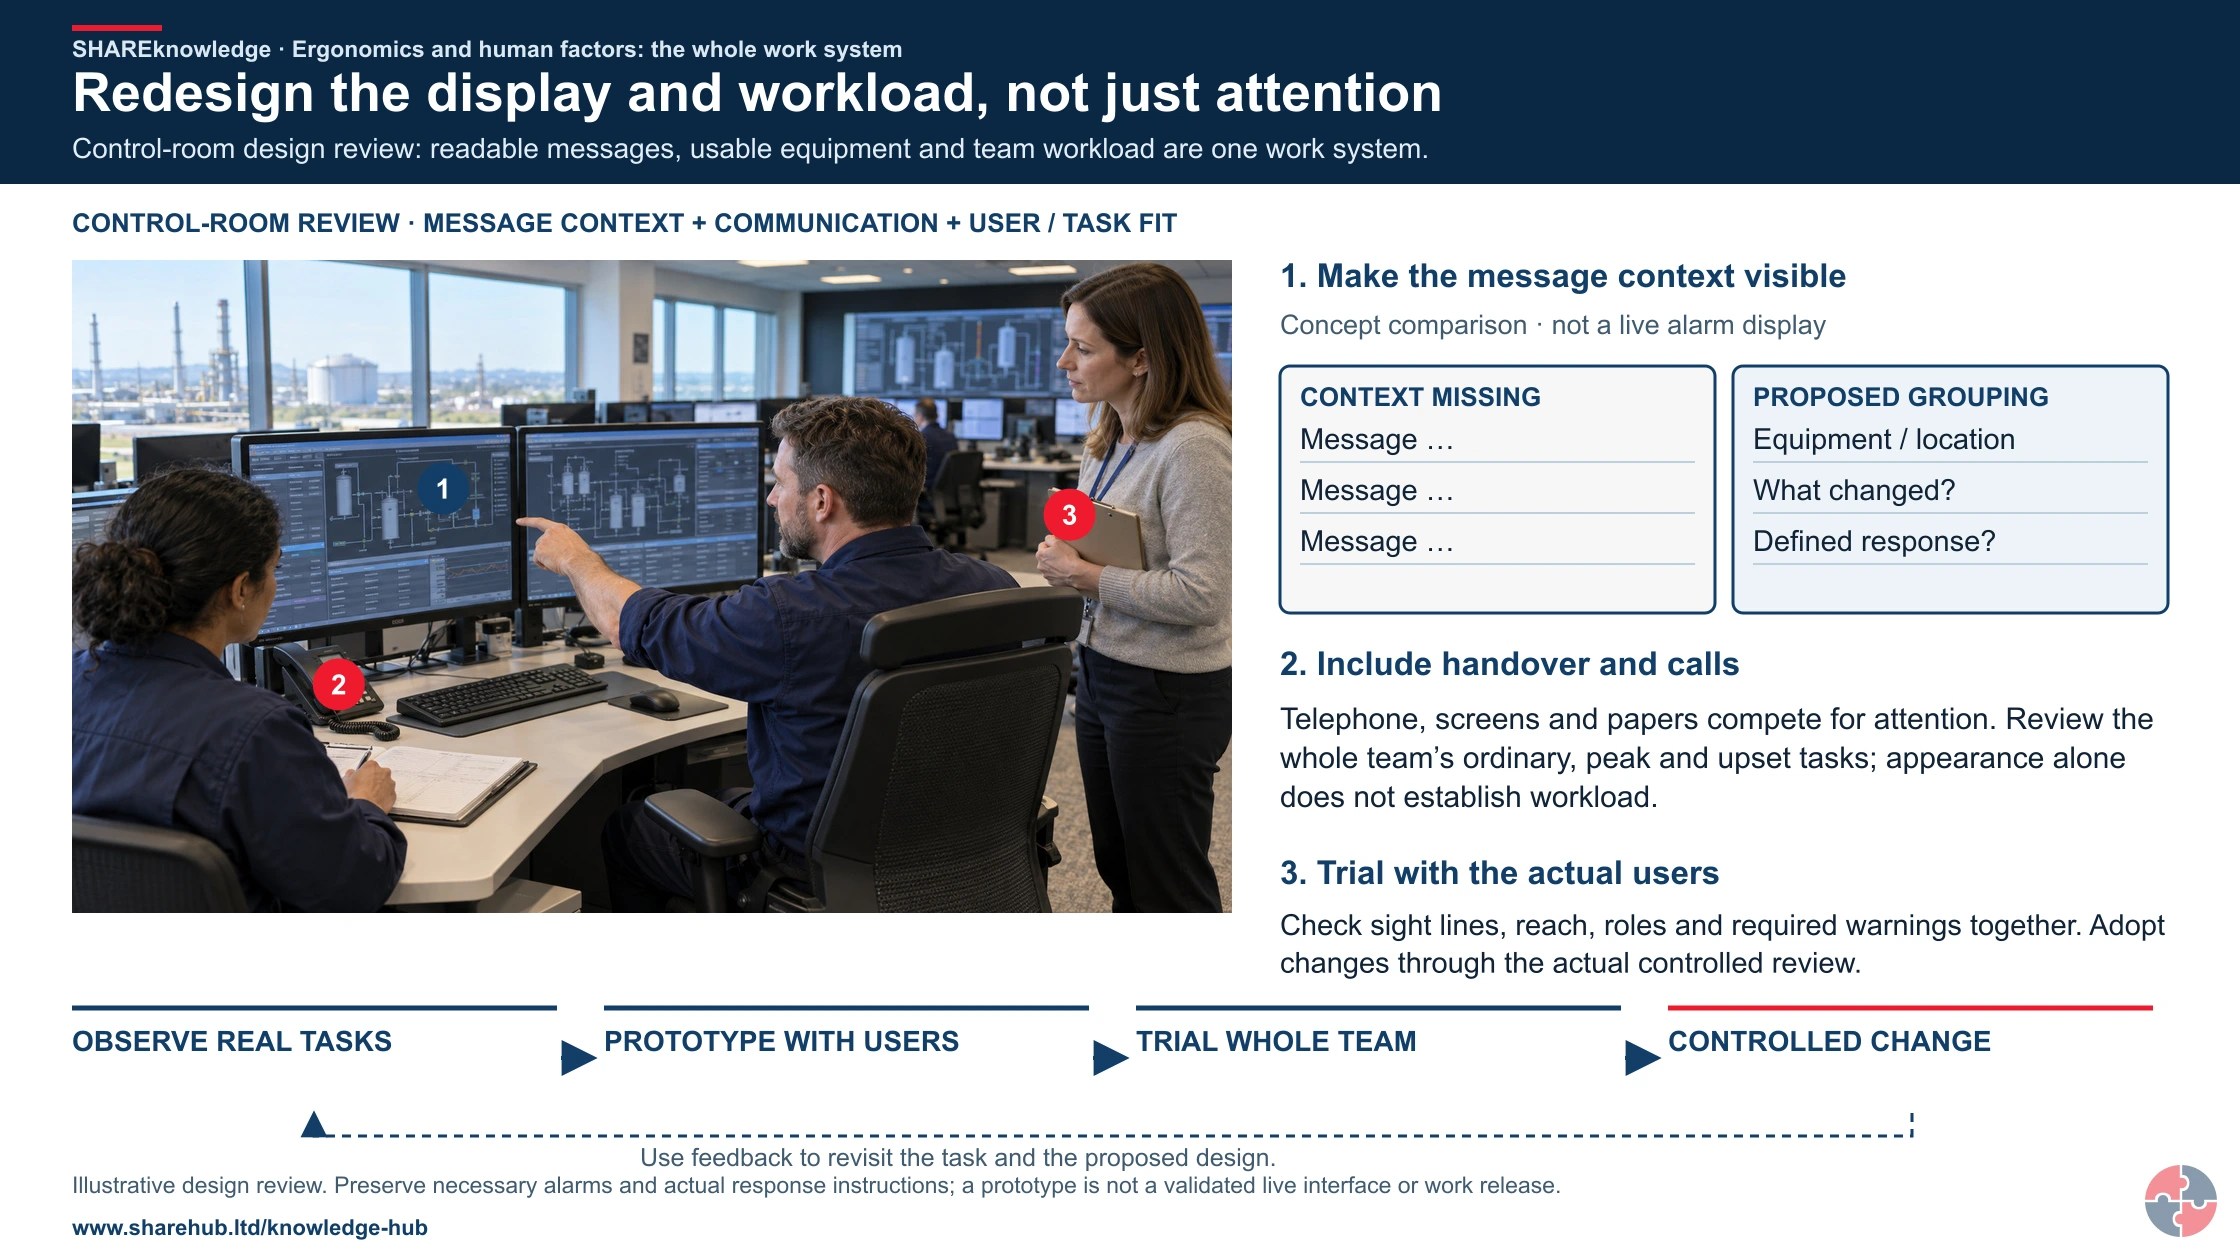
Physical, cognitive and organisational factors must be reviewed together
Primary references: HSE: ergonomics and user-centred design · HSE: whole-task and team workload · HSE: human-computer interfaces · HSE: alarm-management principles
A well-designed workstation places frequent items within easy reach, keeps the task close to the body, avoids sustained twisting, gives enough knee and foot space, provides suitable seating or standing support and allows adjustment. The best design is usually flexible because the workforce is not one size.
Workplace layout matters as much as the workstation. Narrow aisles, poor storage, blocked routes, uneven floors, poor lighting, badly placed displays and cluttered areas can create lifting, reaching, slips, trips, fire escape and emergency access issues.
| Principle | Practical meaning | Example |
|---|---|---|
| Neutral posture | Keep joints away from extremes for sustained work. | Screen around eye level, elbows relaxed and wrists straight. |
| Reach zones | Frequently used items should sit close to the body. | Tools and parts stored between shoulder and hip height where possible. |
| Adjustability | Users can fit the workstation to their body and task. | Adjustable chair, monitor, bench or platform. |
| Visibility | People can see displays, labels and hazards without straining. | Task lighting and readable displays. |
| Space | Enough room for task, movement, tools and safe access. | Clear working envelope and storage discipline. |
| Maintainability | Equipment can be cleaned, adjusted and repaired without awkward access. | Accessible fixings, inspection points and isolation points. |
How should tools, equipment and procurement support ergonomics?
Tools and equipment should be specified, tested, maintained and reviewed for the people and tasks that will use them.
A poor tool can create force, vibration, contact stress, awkward wrist posture, poor visibility and errors. A good tool reduces effort, supports a natural grip, allows clear feedback, fits gloved and ungloved users, limits vibration and can be used without overreaching.
Procurement should involve end users before purchase. The cheapest chair, trolley, scanner, hand tool or software system can become expensive if it creates injuries, low productivity, workarounds or poor compliance. Contractor-supplied equipment should meet the same expectations.
| Decision point | Questions to ask | Evidence |
|---|---|---|
| Specification | What force, reach, grip, display and user range must it support? | Procurement standard and ergonomic criteria. |
| Trial | Have real users tested it during real tasks? | Trial feedback and selection record. |
| Compatibility | Does it work with PPE, space, cleaning and maintenance needs? | Task trial and supervisor sign-off. |
| Maintenance | Will wear increase force, vibration, misalignment or errors? | Inspection and maintenance schedule. |
| Training | Do users know how to adjust, use and report defects? | Training record and toolbox talk. |
| Review | Has discomfort, defect or workaround data changed since introduction? | Worker feedback and audit findings. |
How does the workplace environment affect ergonomics?
Lighting, noise, temperature, air quality, space and floor condition can all change how safely and comfortably work is done.
Environmental problems often create secondary ergonomic risks. Poor lighting makes people lean forward or twist to see. Cold conditions reduce dexterity and increase grip force. Heat and poor ventilation increase fatigue. Noise makes communication harder and can hide warning signals. Poor floors increase pushing and pulling forces and trip risks.
Environmental design should be assessed with the task. A level of lighting that is acceptable for general movement may not be good enough for inspection work. A comfortable office temperature may be unsuitable for someone wearing protective clothing or doing physical work. Ergonomics is therefore part of workplace design, not just workstation design.
| Factor | Effect on work | Control |
|---|---|---|
| Lighting | Eye strain, poor posture and errors. | Suitable general and task lighting, glare control and maintenance. |
| Noise | Distraction, stress and missed communication. | Engineering controls, layout, communication aids and hearing protection where needed. |
| Temperature | Fatigue, reduced dexterity or discomfort. | Heating, cooling, breaks, clothing and local controls. |
| Ventilation and air quality | Headaches, fatigue or respiratory irritation. | Ventilation, source control, maintenance and monitoring where needed. |
| Space | Twisting, overreaching, congestion and poor access. | Layout review, storage discipline and access planning. |
| Floors and routes | Higher pushing forces, slips, trips and falls. | Repair, cleaning, route planning and suitable wheels. |
How should human error be understood?
Human error should be treated as information about the system, not as the automatic root cause of an event.
Human factors thinking separates different kinds of failure. Slips and lapses are attention or memory failures, such as pressing the wrong button or forgetting a step. Mistakes involve choosing the wrong plan because the person misunderstood the situation or procedure. Violations are departures from rules, which may be routine, situational or exceptional. See HSE introduction to human factors.
The practical question is what made the failure more likely. Was the display confusing? Was the worker tired? Was the procedure too long? Were alarms frequent and low value? Was the job understaffed? Was the target unrealistic? Did the culture reward speed more than safe control? These questions lead to better controls than simply telling people to take more care.
| Type | Plain meaning | Useful prevention |
|---|---|---|
| Slip | Right intention, wrong action. | Better layout, forcing functions, labels and confirmation. |
| Lapse | Memory failure or missed step. | Checklists, prompts, independent checks and simpler tasks. |
| Mistake | Wrong decision because the person misread the situation. | Training, decision aids, clearer information and supervision. |
| Routine violation | Shortcut has become normal practice. | Remove incentives for shortcuts and fix impractical procedures. |
| Situational violation | Rules cannot be followed in the conditions provided. | Provide resources, time, tools and realistic planning. |
| Exceptional violation | Rare departure under unusual pressure. | Emergency planning, leadership expectations and escalation routes. |
Which HSE assessment tools are useful?
Useful HSE tools include MAC for lifting and carrying, RAPP for pushing and pulling, ART for repetitive upper limb work and DSE checklists for workstation assessment.
Assessment tools bring discipline to judgement. They help teams look at load, posture, frequency, grip, environment, distance, recovery and other risk factors in a consistent way. They also create a baseline for comparison, action planning and review. See HSE musculoskeletal assessment toolkit.
The tool should match the task. A DSE checklist will not assess repetitive packing, and MAC will not assess prolonged mouse use. Use the right tool, observe real work, involve workers and treat the result as the start of improvement rather than the end of the assessment.
| Tool | Best used for | What it helps identify |
|---|---|---|
| MAC | Lifting, carrying and team handling. | Load, posture, frequency, grip, floor, carry distance and team coordination risks. |
| RAPP | Pushing and pulling loads. | Starting force, sustained force, route, wheels, posture and floor condition risks. |
| ART | Repetitive upper limb tasks. | Frequency, force, posture, breaks, task duration and additional factors. |
| DSE checklist | Display screen workstations. | Screen, chair, keyboard, mouse, desk, lighting, glare, software and work routine issues. |
| Worker symptom map (practical method) | Early symptom reporting and trend spotting. | Pain clusters, task links and priorities for investigation. |
| Task observation (practical method) | Any ergonomic or human factors issue. | Work-as-done, workarounds, conflicting demands and practical controls. |
How can the hierarchy of controls reduce force and awkward reach during repeated carton handling?
Use HSE’s hierarchy to eliminate or substitute a hazard where practicable, then apply engineering and administrative controls before relying on PPE. Check each chosen control against the actual task and stop when it fails.
Ergonomics should not begin with posters and manual handling training. The best controls remove the harmful task, reduce the physical or mental demand, isolate people from the hazard, engineer the workplace or equipment, and only then rely on procedures, PPE and supervision.
How can the ERICPD hierarchy of controls reduce force and awkward reach during repeated carton handling?

| Control level | Control for this activity | Owner and verification | Stop / restart decision |
|---|---|---|---|
| Eliminate | Arrange delivery at bench height and point of use so floor retrieval and a second manual lift are unnecessary. | Task owner verifies that the proposed change removes the named hazardous step, including foreseeable cleaning, maintenance and work transferred elsewhere. | If the hazardous step remains, keep it within the task assessment and select the stronger feasible remaining controls. |
| Reduce, including substitution | Replace heavy cartons with suitable smaller packs; check stability and total repetition before accepting the new pack size. | Competent task/process owner validates suitability, compatibility and new hazards against the actual operating requirements before the alternative is adopted. | Reject an alternative if its performance is unproved or its new hazards are unresolved. |
| Isolate | Keep the unloading station away from vehicle movements and protect the clear route between pallet and bench. | Supervisor checks the actual boundary, affected people and connected work; verify separation or isolation before allowing access. | Hold or stop for unstable load, failed aid, blocked route or pain during handling. |
| Control: physical safeguards | Provide a suitable pallet positioner or lifting aid and adjustable receiving surface; verify capacity and access with the real cartons. | Competent equipment/process owner checks load weight, working height, aid capacity and a full replenishment cycle. | Hold or stop for unstable load, failed aid, blocked route or pain during handling. |
| Control: work method and response | Agree replenishment quantities, handling limits and assistance before peak demand; do not use training to justify an excessive lift. | Supervisor confirms the work limits, competent cover, communication and stop/restart authority with the people doing this activity. | Hold work when the agreed limits, competent cover or effective communication cannot be maintained. |
| PPE | Use grip and foot protection where contact hazards require it. A back belt does not control the load on the spine. | Assessor confirms whether personal protection is needed and checks suitability, condition, compatibility and any required fit evidence. | Do not use unsuitable protection or rely on PPE to continue after an essential source control fails. |
| Discipline | Inspect the aid and route each shift; review actual deliveries with workers when carton sizes or throughput change. | Release only after supervisor accepts the aid trial and revised delivery method. Retain verification and unresolved restrictions at handover. | Keep the task on hold until required reinstatement evidence and unresolved defects are accepted by the responsible owner. |
How can the ISO 45001 hierarchy of controls reduce force and awkward reach during repeated carton handling?

| Control level | Control for this activity | Owner and verification | Stop / restart decision |
|---|---|---|---|
| Elimination | Arrange delivery at bench height and point of use so floor retrieval and a second manual lift are unnecessary. | Task owner verifies that the proposed change removes the named hazardous step, including foreseeable cleaning, maintenance and work transferred elsewhere. | If the hazardous step remains, keep it within the task assessment and select the stronger feasible remaining controls. |
| Substitution | Replace heavy cartons with suitable smaller packs; check stability and total repetition before accepting the new pack size. | Competent task/process owner validates suitability, compatibility and new hazards against the actual operating requirements before the alternative is adopted. | Reject an alternative if its performance is unproved or its new hazards are unresolved. |
| Engineering controls | Keep the unloading station away from vehicle movements and protect the clear route between pallet and bench. | Supervisor checks the actual boundary, affected people and connected work; verify separation or isolation before allowing access. | Hold or stop for unstable load, failed aid, blocked route or pain during handling. |
| Engineering controls | Provide a suitable pallet positioner or lifting aid and adjustable receiving surface; verify capacity and access with the real cartons. | Competent equipment/process owner checks load weight, working height, aid capacity and a full replenishment cycle. | Hold or stop for unstable load, failed aid, blocked route or pain during handling. |
| Administrative controls | Agree replenishment quantities, handling limits and assistance before peak demand; do not use training to justify an excessive lift. | Supervisor confirms the work limits, competent cover, communication and stop/restart authority with the people doing this activity. | Hold work when the agreed limits, competent cover or effective communication cannot be maintained. |
| PPE | Use grip and foot protection where contact hazards require it. A back belt does not control the load on the spine. | Assessor confirms whether personal protection is needed and checks suitability, condition, compatibility and any required fit evidence. | Do not use unsuitable protection or rely on PPE to continue after an essential source control fails. |
| Administrative controls | Inspect the aid and route each shift; review actual deliveries with workers when carton sizes or throughput change. | Release only after supervisor accepts the aid trial and revised delivery method. Retain verification and unresolved restrictions at handover. | Keep the task on hold until required reinstatement evidence and unresolved defects are accepted by the responsible owner. |
Illustrative packing-line task: repeated far reaches, awkward labels and a fast target cause discomfort and labelling mistakes. Observe work at normal rate and check the changed layout with different users.
Which legal duties apply to ergonomics and human factors?
Select the duty by site nation and activity. Great Britain instruments do not automatically apply in Northern Ireland.
| Where | Instrument | Practical boundary |
|---|---|---|
| Great Britain | Health and Safety at Work etc. Act 1974 | GB general work-safety duties |
| Northern Ireland | Health and Safety at Work (Northern Ireland) Order 1978 | NI general work-safety duties |
| Great Britain | Management of Health and Safety at Work Regulations 1999 | GB risk assessment and prevention arrangements |
| Northern Ireland | Management of Health and Safety at Work Regulations (Northern Ireland) 2000 | NI risk assessment and prevention arrangements |
| Great Britain | Manual Handling Operations Regulations 1992 | Avoid hazardous manual handling where practicable; assess and reduce remaining risk. |
| Northern Ireland | Manual Handling Operations Regulations (Northern Ireland) 1992 | NI manual-handling avoidance, assessment and risk reduction. |
| Great Britain | Health and Safety (Display Screen Equipment) Regulations 1992 | GB workstation assessment and risk reduction for in-scope DSE users. |
| Northern Ireland | Health and Safety (Display Screen Equipment) Regulations (Northern Ireland) 1992 | NI workstation assessment and risk reduction for in-scope DSE users. |
| Great Britain | Equality Act 2010 | GB disability and reasonable-adjustment duties where legal test is met |
| Northern Ireland | Disability Discrimination Act 1995 (NI application) | NI disability employment duties as amended |
Check the actual work and the current amended instrument; a diagnosis or a statistics table does not by itself establish a reporting or disability-law outcome.
How should ergonomics appear in a risk register?
The register should identify task-specific ergonomic hazards, who may be harmed, controls, early indicators and evidence of review.
Review reach, information and pace together
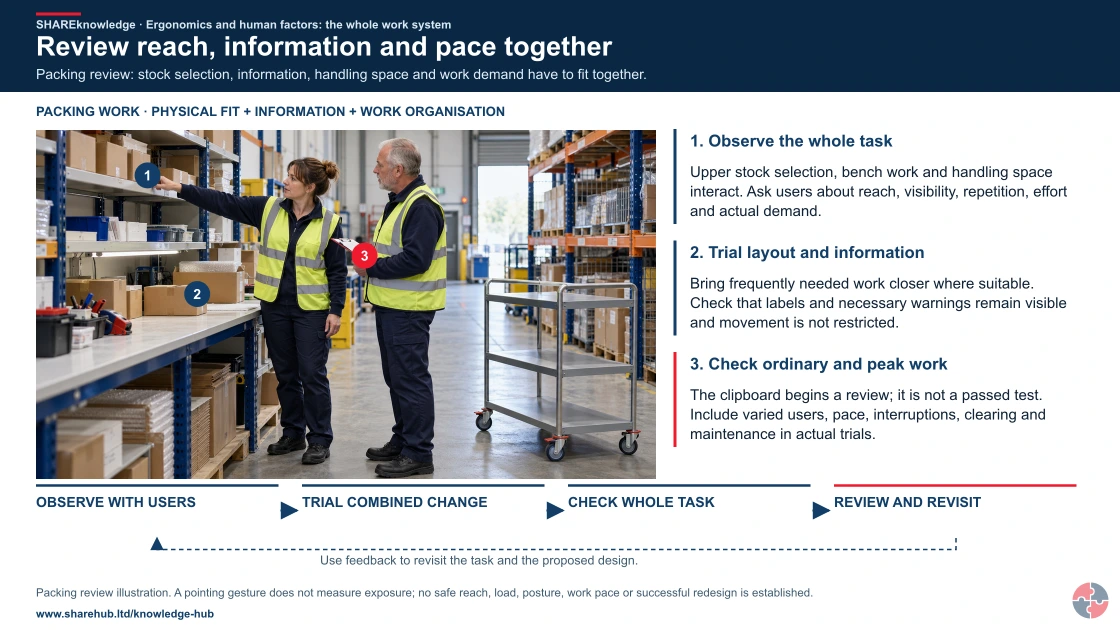
Full written explanation
A detailed realistic warehouse packing scene is retained unchanged. An operator points to upper-shelf cartons while a colleague reviews the task with a clipboard; the packing bench, materials and wheeled trolley remain visible. Native numbered labels identify the observed selection/reach, the packing work surface and the user review, linking them to physical, information and pace questions. A complete observe, combined trial and varied-user review loop explains that a shorter reach can still create a visibility problem, and that changes are revisited after actual trial evidence. The gesture is not an exposure measurement and the image establishes no safe angle, reach, load, pace, diagnosis or completed improvement. Existing normal-function back/anatomy content remains unchanged.
Packing review: stock selection, information, handling space and work demand have to fit together.
- Observe the whole packing task. Review stock selection, work surface, reach, visibility, handling and actual demand with the people who do the work.
- Trial the combined change. Review layout, labels and workflow together. A proposed closer position must not hide necessary information or restrict movement.
- Review with varied users. Test ordinary and peak-demand tasks, cleaning and maintenance; revisit comfort, errors, usability and ineffective changes.
Change the pathway
- A pose is not an exposure measure. The still cannot establish force, pace or a safe reach limit.
- A trolley is not proof of control. Equipment in the picture has no demonstrated task benefit.
- Attendance is not effectiveness. An inert sheet or training record cannot prove that work demand fell.
Evidence check: Qualitative design teaching only. No universal angle, reach, staffing level, alarm limit or operating instruction is supplied.
Physical, cognitive and organisational factors must be reviewed together
Primary references: HSE: ergonomics and user-centred design · HSE: whole-task and team workload · HSE: human-computer interfaces · HSE: alarm-management principles
Open the complete HD image (new tab)Download image
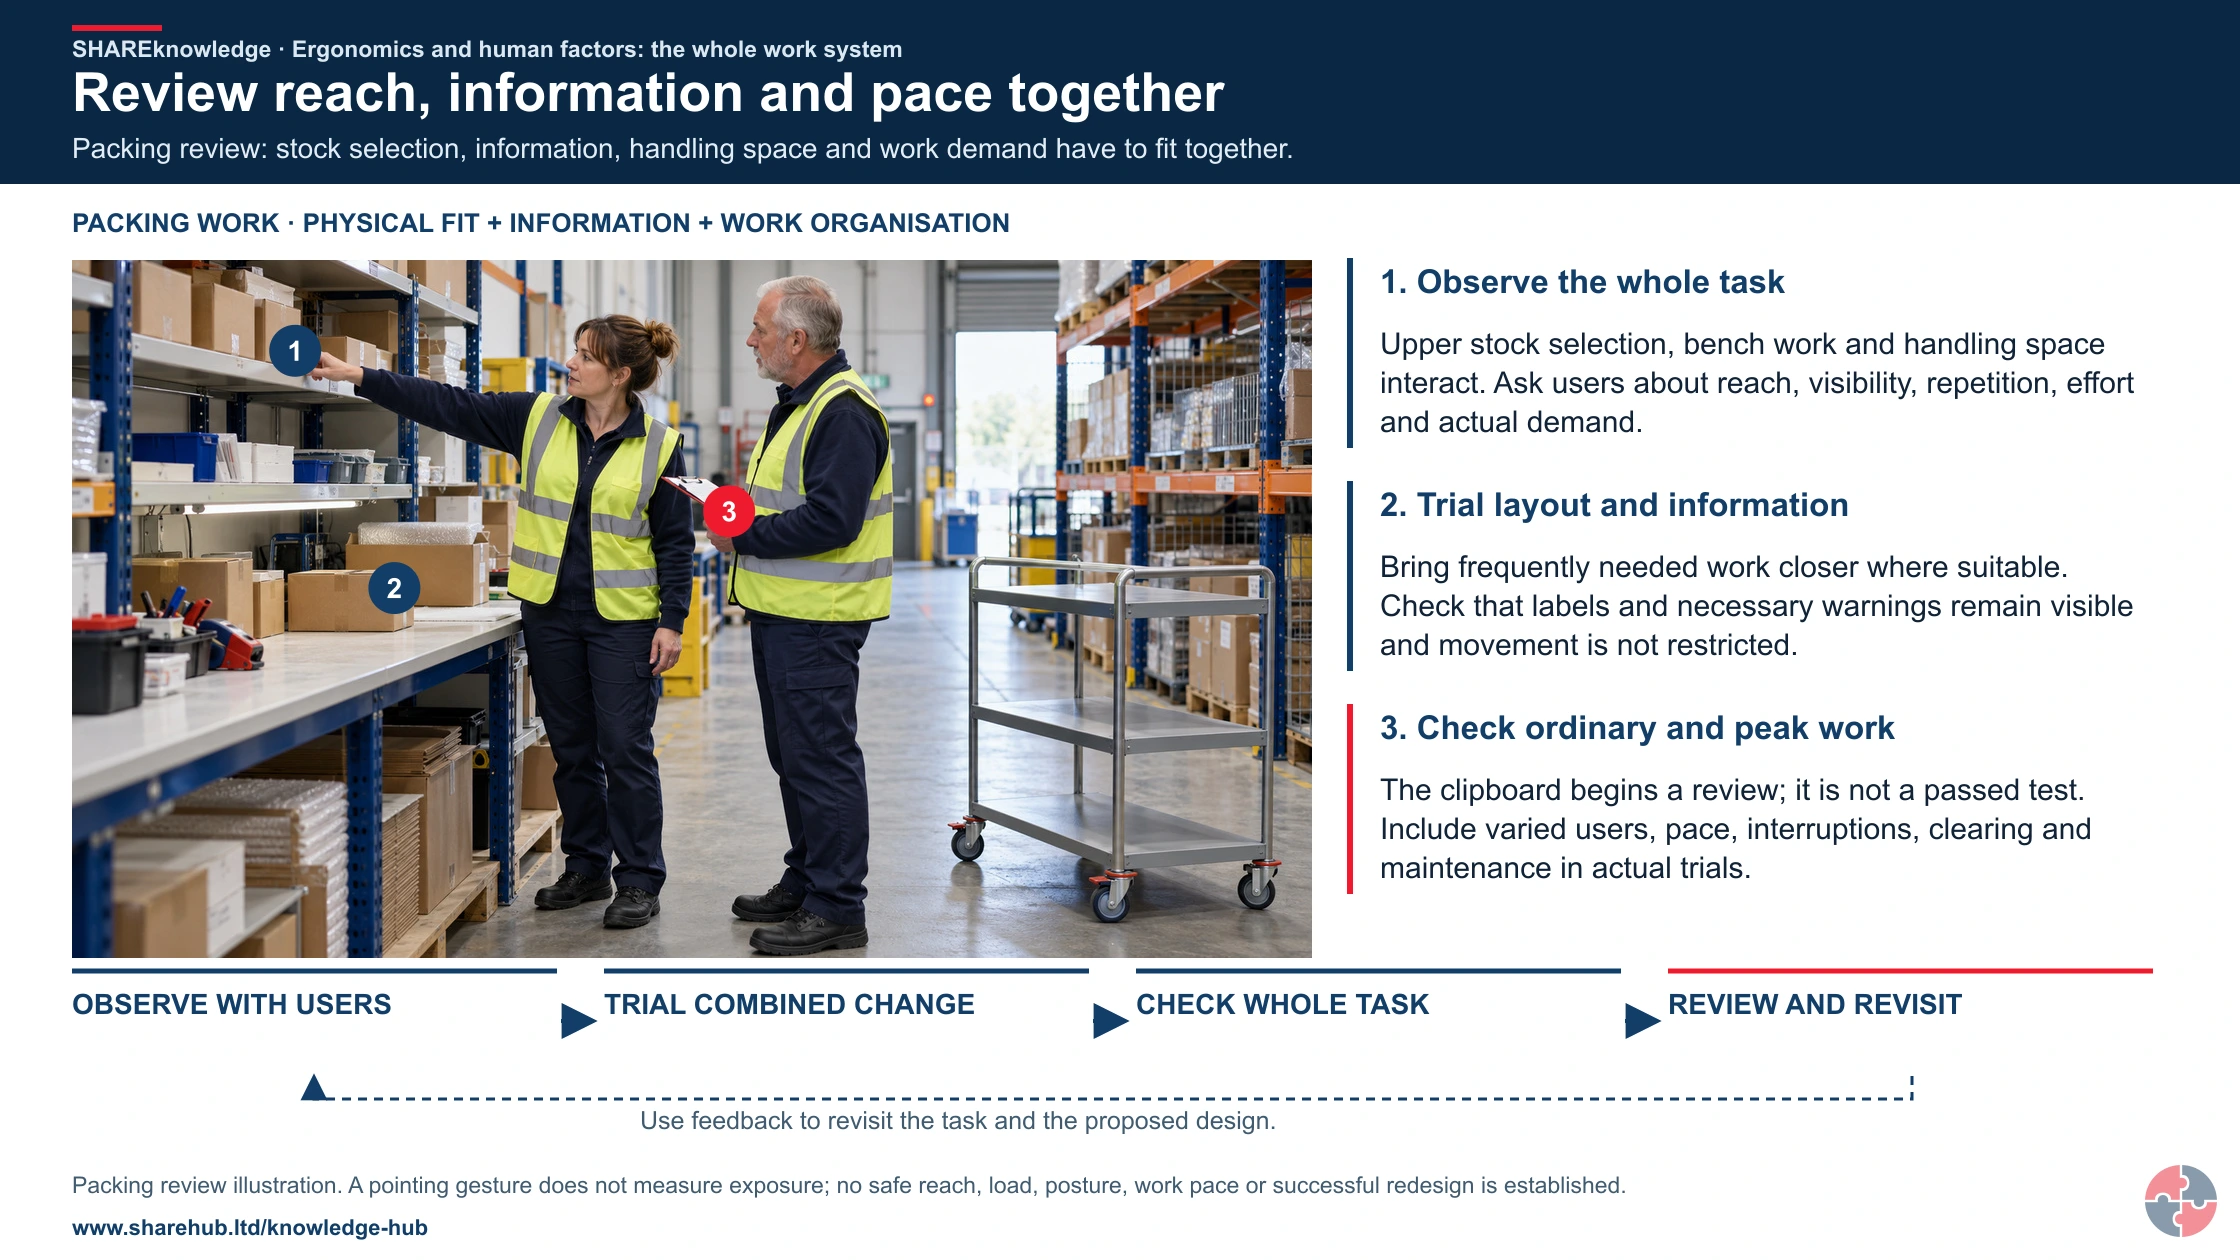
Physical, cognitive and organisational factors must be reviewed together
Primary references: HSE: ergonomics and user-centred design · HSE: whole-task and team workload · HSE: human-computer interfaces · HSE: alarm-management principles
A useful register does not simply say 'ergonomics'. It names the task: palletising, laptop work, repetitive packing, overhead maintenance, pushing linen cages, control-room monitoring or driving. That helps managers link the risk to the real controls and evidence.
The best registers include leading indicators. These may include discomfort reports, repeat DSE actions, broken handling aids, overtime peaks, tool vibration exposure, high force tasks, new starter injuries or frequent workarounds.
| Scenario | Risk | Controls and evidence |
|---|---|---|
| Repetitive packing line | Upper limb pain from repetition, force and pace. | ART assessment, rotation, tool redesign, breaks, worker feedback and symptom trend review. |
| Laptop-based hybrid work | Neck, shoulder, back or wrist discomfort. | DSE assessment, laptop accessories, training, review after change and eye-test route. |
| Warehouse trolley movement | Back and shoulder strain from pushing and pulling. | RAPP assessment, route repair, wheel maintenance, load limits and supervision. |
| Maintenance in cramped plant | Awkward posture, poor visibility and error. | Access redesign, task lighting, permit planning, tool selection and post-job learning. |
| Control room monitoring | Static sitting, fatigue, information overload and missed alarms. | Adjustable workstations, alarm rationalisation, breaks, workload review and human factors audit. |
How could BuildOut Ltd manage ergonomics and human factors?

BuildOut Ltd would manage ergonomics by joining design, procurement, task planning, worker involvement, assessment, training, supervision and learning.
A field decision from start to hand-back — part 1 of 3


Read the complete visual as text
- 1. Task and setting: Packing-line reach and label errors at normal production pace.
- 2. People and prerequisites: Operators, designer, supervisor and maintainer; observe varied users and normal and abnormal states.
- 3. Before the task: Assess reach, force, equipment, information, target pressure and maintenance access.
A field decision from start to hand-back — part 2 of 3


Read the complete visual as text
- 1. Check during work: Trial shorter reach, adjustable fixtures and clearer labels without moving risk to another task.
- 2. Stop, hold or refer: Pause unsafe operation if controls fail at normal pace; peak throughput or product changes need reassessment.
A field decision from start to hand-back — part 3 of 3


Read the complete visual as text
- 1. Completion and hand-back: Train operators on the changed layout and verify both discomfort and error rates after start-up.
- 2. Retained evidence: User trial, design decision, defect correction, training, maintenance check and post-change review.
BuildOut Ltd
a construction and fit-out contractor using joiners, labourers, plant operators, site supervisors, designers, subcontractors and office-based planners across multiple changing sites
BuildOut starts by identifying ergonomic risk in its risk register: manual handling of plasterboard and doors, repetitive fixing, overhead drilling, kneeling, vibrating tools, DSE use by planners, poor site storage, awkward access, material delivery points and subcontractor work interfaces. Designers and planners then look for elimination and reduction before the site starts, such as prefabrication, board lifters, smaller load sizes, delivery-to-floor planning and layout that avoids double handling.
Procurement specifies tools and equipment with ergonomic criteria: low vibration, suitable handles, lighter equipment, adjustable benches, trolleys with appropriate wheels, task lighting, board lifters and compatible PPE. Supervisors use short task observations to check work-as-done, not just method statements. When workers report pain, numbness or fatigue, actions are recorded, reviewed and closed rather than treated as informal complaints.
The business uses first-line checks by supervisors and workers, second-line audits by HSSE advisers and third-line topic reviews by an external ergonomics or occupational health specialist where trends show repeated problems. Learning is fed back into RAMS, procurement standards, contractor rules, training and design reviews.
| Stage | How BuildOut applies it | Evidence |
|---|---|---|
| Assess and analyse | Maps ergonomic risks by trade, task, site phase and worker group. | Risk register, task observations, worker feedback and injury trends. |
| Design and plan | Uses prefabrication, delivery planning, mechanical aids and better access before work begins. | Construction phase plan, procurement spec and logistics plan. |
| Train and brief | Gives awareness to all workers, task-specific training to high-risk trades and deeper training to supervisors. | Induction, toolbox talks, attendance and competence matrix. |
| Implement | Provides board lifters, trolleys, platforms, task lighting and adjusted workstations. | Equipment issue, inspection and site checks. |
| Check and assure | Uses binary frontline checks and specialist audits for high-risk tasks. | Check sheets, audit reports, findings and action close-out. |
| Learn and improve | Updates RAMS, procurement, contractor expectations and training from incidents and discomfort reports. | Lessons learned log and management review. |
A field decision from start to hand-back
Task, material and setting: Packing-line reach and label errors at normal production pace.
People and prerequisites: Operators, designer, supervisor and maintainer; observe varied users and normal and abnormal states.
Before: Assess reach, force, equipment, information, target pressure and maintenance access.
During: Trial shorter reach, adjustable fixtures and clearer labels without moving risk to another task.
Hold or stop: Pause unsafe operation if controls fail at normal pace; peak throughput or product changes need reassessment.
Completion and hand back: Train operators on the changed layout and verify both discomfort and error rates after start-up.
Evidence: User trial, design decision, defect correction, training, maintenance check and post-change review.
What training and competence are needed?
Training should match responsibility, from general awareness through task-specific training to assessor, supervisor and specialist competence.
General awareness helps everyone understand early reporting, workstation adjustment, manual handling principles and why discomfort matters. It can be delivered through induction, e-learning or short awareness sessions, but it should not be the only control.
People doing higher-risk tasks need practical, task-based training. This includes how to use mechanical aids, set up workstations, adjust tools, report defects, recognise symptoms and follow task-specific controls. Supervisors need deeper competence because they must plan work, challenge unsafe adaptations, review assessments and close actions.
Specialist assessors need enough knowledge to use HSE tools correctly and interpret findings. In complex cases, occupational health, ergonomists, physiotherapists, human factors specialists or equipment designers may be needed.
| Role | Learning | Demonstration | Assessor | Record | Reassess when |
|---|---|---|---|---|---|
| Workers | Spot discomfort and error traps | Show real task and workaround | Supervisor | Feedback log | New task |
| Supervisors | Control pace and stop unsafe work | Observe task at normal rate | Operations lead | Action log | Complaint |
| Designers | Fit equipment and information to users | Trial varied user and abnormal state | Technical lead | Design record | Modification |
| Assessors | Select MAC, ART, RAPP or DSE tool appropriately | Explain tool limits and full assessment | Competent lead | Assessment | Changed work |
| Maintenance | Preserve usability and safe access | Test adjustment and controls | Engineering lead | Maintenance log | Defect |
| Leaders | Resource and verify redesign | Sample discomfort and errors | Independent lead | Review record | Repeat pattern |
How does ergonomics and human factors support NEBOSH study?
For NEBOSH study, learners should be able to apply ergonomic principles to scenarios rather than only define the term.
In National General Certificate style scenarios, ergonomics may appear through DSE, manual handling, welfare, workplace layout, equipment suitability, worker capability and risk assessment. Learners should be able to describe practical controls in the right order: design out the problem first, then reduce task demands, then use training and supervision.
At Diploma level, the topic becomes broader. Learners should connect ergonomics with human reliability, workload, fatigue, culture, competence, organisational change, human error, incident investigation and management system assurance. A strong answer explains why a person behaved as they did by looking at the job, individual and organisation together.
| Study area | What to know | Scenario application |
|---|---|---|
| Definitions | Ergonomics, human factors, MSD, DSE, work-as-done and fatigue. | Explain terms in plain language and link them to risk. |
| Risk assessment | Task, load, environment, individual and organisational factors. | Identify specific factors in a scenario, not generic hazards. |
| Controls | Avoid, redesign, adjust, maintain, train, supervise and review. | Apply HSE control hierarchy and avoid relying on training alone. |
| Human error | Slips, lapses, mistakes and violations. | Identify system factors that made the error more likely. |
| Assurance | Inspection, audit, monitoring, worker feedback and trend data. | Describe how managers know controls are working. |
| Professional judgement | When to involve occupational health or specialists. | Recognise limits of competence and escalate appropriately. |
How can management arrangements support this topic?
The voluntary standard can structure ownership and review; it is not itself a legal duty or proof that this work is controlled.
Official management guidance: HSE Managing for health and safety (HSG65)
HSE human-factors guidance supports designing tasks, equipment and work systems around the people who use them; involve users and competent specialists before deciding on a control. HSE human factors in design (official source).
What are the warning signs that ergonomics is not being managed?
Warning signs include pain reports, workarounds, repeated DSE actions, broken aids, high fatigue, poor housekeeping, under-reporting and blaming workers for system problems.
Warning signs matter because ergonomic harm often builds slowly. A worker may change grip, slow down, swap tasks informally, stop reporting discomfort or rely on colleagues before an injury is visible in the data. By the time absence appears, the organisation may already have missed several early opportunities.
Managers should ask how each warning sign could cause harm. A broken trolley may increase pushing force and back strain. Poor lighting may make people lean forward and misread labels. A repeated shortcut may show that the official method is impractical. High overtime may increase fatigue and error.
| Warning sign | How harm can develop | Response |
|---|---|---|
| Pain, numbness or tingling reports | Symptoms may worsen into MSDs if task demands remain unchanged. | Review task, adjust controls and consider occupational health. |
| Workarounds | People may bypass controls because the task is poorly designed. | Observe work-as-done and redesign the task. |
| Broken handling aids | Manual fallback increases force and injury risk. | Repair, replace and review maintenance priority. |
| Repeated DSE issues | Poor setup can create neck, shoulder, wrist or eye discomfort. | Reassess and verify action close-out. |
| High fatigue or overtime | Attention, judgement and co-ordination can decline. | Review staffing, breaks, workload and shift design. |
| Blame-focused investigations | System weaknesses remain and events repeat. | Investigate job, individual and organisation factors. |
What do the acronyms and key terms mean?
Acronyms should be explained because many readers will be new to the topic.
| Term | Full expansion | Meaning here |
|---|---|---|
| ART | Assessment of Repetitive Tasks | Assessment of Repetitive Tasks |
| DSE | Display screen equipment | Display Screen Equipment |
| HSE | HSE | Health and Safety Executive |
| MAC | Manual Handling Assessment Charts | Manual Handling Assessment Charts |
| MSD | Musculoskeletal disorder | Musculoskeletal Disorder |
| RAPP | Risk Assessment of Pushing and Pulling | Risk Assessment of Pushing and Pulling |
| RIDDOR | Reporting of Injuries, Diseases and Dangerous Occurrences Regulations | Reporting of Injuries, Diseases and Dangerous Occurrences Regulations |
| ULD | Upper limb disorder | Upper Limb Disorder |
| WRULD | WRULD | Work-related Upper Limb Disorder |